
Golden Baked Egg Custard Recipe That’s So Simple
Creamy baked egg custard brings comfort straight to your kitchen table with its silky smooth texture.
Whisked eggs blend perfectly with rich cream and delicate vanilla.
Generations have cherished this classic dessert for its simplicity and elegant taste.
Soft and wobbly, the custard melts effortlessly on your tongue.
Home cooks appreciate how few ingredients create such a delightful treat.
Sweet memories flow with each spoonful of this timeless dessert.
Dive into this recipe and let your taste buds dance with pure delight.
Why Nigella Baked Egg Custard Feels So Cozy

What You Need For Nigella Baked Egg Custard
Custard Base:Pastry Shell:Kitchen Essentials:Easy Guide To Nigella Baked Egg Custard

Step 1: Prepare Baking Vessel
Grease a deep pie plate thoroughly to prevent sticking. Set your oven to preheat at 400°F (200°C) to ensure the right baking temperature.
Step 2: Create Pastry Dough
In a mixing bowl, combine butter, sugar, and egg. Mix these ingredients until they form a smooth, consistent mixture. Gradually add flour and work the ingredients until a soft dough develops.
Step 3: Shape Pastry Shell
Gently roll out the prepared dough on a clean surface. Carefully transfer and press the dough into the greased pie plate, ensuring an even coverage along the bottom and sides.
Step 4: Craft Custard Mixture
Whisk eggs and sugar together in a separate bowl until they become light and well-blended. Add vanilla extract and stir to incorporate a rich, aromatic flavor.
Step 5: Combine Liquid Ingredients
Slowly pour milk into the egg mixture, stirring continuously to create a smooth, silky custard. Mix thoroughly to prevent any lumps from forming.
Step 6: Fill and Season
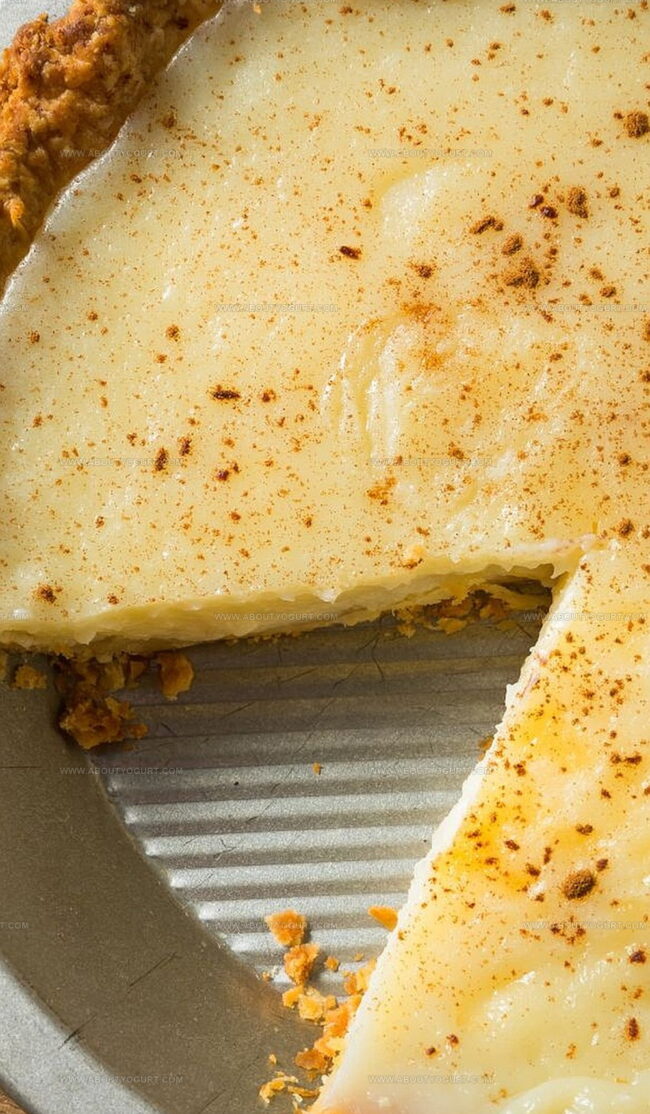
Carefully pour the prepared custard into the pastry shell. Sprinkle a light dusting of ground nutmeg across the surface for a warm, traditional flavor.
Step 7: Bake to Perfection
Place the pie plate in the preheated oven. Bake for approximately 45 minutes, watching for the custard to set but remain slightly jiggly in the center.
Step 8: Cool and Serve
Remove the custard from the oven and allow it to cool completely for at least one hour. This resting period helps the custard firm up and develop its full flavor profile.
Tips That Help With Nigella Baked Egg Custard

Ways To Change Nigella Baked Egg Custard
What To Enjoy With Nigella Baked Egg Custard
Best Way To Store Nigella Baked Egg Custard
Nigella Baked Egg Custard FAQs
The key is whisking eggs and sugar thoroughly, then slowly incorporating milk to create a silky texture without lumps.
While a deep pie plate works best, you can use similar deep baking dishes like ceramic ramekins or a round baking pan with similar dimensions.
Nutmeg adds a warm, aromatic flavor that complements the sweet, rich custard and provides a traditional finishing touch to the dessert.
The custard is done when it’s just set – it should have a slight wobble in the center and look slightly firm but not completely solid when you gently shake the dish.
Print
Baked Egg Custard Recipe
- Total Time: 1 hour 60 minutes
- Yield: 4 1x
Description
Silky smooth baked egg custard whisks classic British comfort into a dreamy dessert. Creamy vanilla-infused custard melts delicately on your palate, offering pure culinary bliss with each elegant spoonful.
Ingredients
Main Ingredients:
- 4 eggs
- 2 cups milk
- 12 cup white sugar
Sugar and Sweeteners:
- 34 cup white sugar
Baking and Flavoring:
- 2 12 cups all-purpose flour
- 1 cup unsalted butter, softened
- 1 large egg
- 2 teaspoons vanilla extract
- Pinch of ground nutmeg
Instructions
- Warm the oven to 400F (200C) and prepare a deep pie plate with a light coating of grease.
- In a mixing bowl, combine softened butter, sugar, and an egg until smooth and well-integrated.
- Gradually incorporate flour into the mixture, kneading gently to create a cohesive pastry dough.
- Carefully roll out the dough and delicately drape it into the prepared pie plate, ensuring even coverage.
- In a separate bowl, vigorously whisk eggs with sugar until the mixture becomes pale and slightly frothy.
- Introduce pure vanilla extract to the egg mixture, stirring to distribute the aromatic flavor evenly.
- Gradually stream in cold milk, whisking continuously to create a silky, uniform custard base.
- Carefully transfer the liquid custard into the prepared pastry shell, maintaining a steady hand to prevent spillage.
- Sprinkle a delicate layer of freshly grated nutmeg across the surface for an elegant, fragrant touch.
- Place the pie plate in the preheated oven and bake for approximately 45 minutes, watching for a gentle set and golden edges.
- Remove from oven and allow the custard to cool completely for at least one hour, enabling it to firm up and develop a rich, creamy texture.
Notes
- Ensure butter is at room temperature for easier mixing and smoother dough consistency.
- Chill the pie plate before greasing to help prevent soggy bottom crust.
- Use fresh, high-quality eggs for the richest and most delicate custard texture.
- Gently whisk eggs to avoid creating too many air bubbles that can cause cracking during baking.
- Strain the custard mixture through a fine-mesh sieve for an ultra-smooth, silky finish.
- Avoid overbaking by checking custard at 40 minutes; it should have a slight wobble in the center.
- For a gluten-free version, substitute all-purpose flour with almond or coconut flour.
- Sprinkle additional nutmeg just before serving to enhance the aromatic flavor.
- Prep Time: 15 minutes
- Cook Time: 45 minutes
- Category: Breakfast, Desserts
- Method: Baking
- Cuisine: Chinese
Nutrition
- Serving Size: 4
- Calories: 517
- Sugar: 26 g
- Sodium: 82 mg
- Fat: 30 g
- Saturated Fat: 18 g
- Unsaturated Fat: 11 g
- Trans Fat: 0.5 g
- Carbohydrates: 52 g
- Fiber: 1 g
- Protein: 8 g
- Cholesterol: 151 mg
Michael Thompson
Founder & Recipe Developer
Expertise
Education
Cascade Culinary Institute – Bend, OR
ServSafe Food Handler Certification – Portland, OR
Focus: Certified in core food safety and hygiene principles for both home and professional kitchens, with emphasis on ingredient handling, kitchen cleanliness, and safe preparation methods.
Mike’s kitchen journey began with a single goal: to make everyday meals feel like something worth celebrating.
After earning his Certificate in Culinary Arts from Cascade Culinary Institute, he spent years working with local farmers and small kitchens across Oregon, learning the beauty of seasonal, small-batch cooking.
Mike’s approach is simple, cook with what’s fresh, keep it approachable, and always leave room for a little creativity. When he’s not testing yogurt marinades or designing single-serving meals, you’ll find him hiking trails or hunting down the best berries at local markets.