
Banana Cheesecake Bars Recipe for a Creamy Dessert Fix
Creamy banana cream cheesecake bars deliver a dreamy dessert that melts in your mouth with pure bliss.
Sweet bananas blend perfectly with rich cream cheese, creating a luxurious treat.
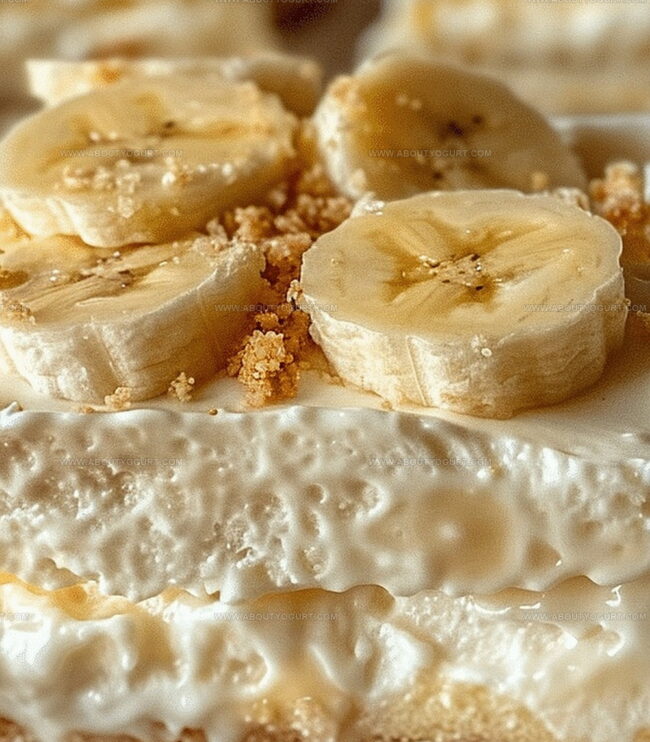
Layers of smooth filling sit atop a buttery graham cracker crust that crumbles delightfully.
Each bite promises a dance of fruity and tangy flavors that surprise and delight.
Our simple recipe lets you craft these heavenly bars without complex techniques or expensive ingredients.
Indulgent yet approachable, these bars transform an ordinary afternoon into a celebration of deliciousness.
You won’t be able to resist cutting a generous slice and savoring every decadent moment.
What Makes Banana Cream Cheesecake Bars Unforgettable

Essential Ingredients For Banana Cream Cheesecake Bars
Crust Ingredients:Cheesecake Filling Ingredients:Garnish Ingredients:Mastering The Steps To Banana Cream Cheesecake Bars
Step 1: Create the Crunchy Wafer Crust
Grab a medium mixing bowl and combine crushed Nilla Wafer crumbs with melted butter. Press this delightful mixture firmly into a square 8-inch baking pan lined with parchment paper. Pop the crust into the refrigerator or freezer to chill and set.
Step 2: Whip up the Creamy Clouds
Using a large metal mixing bowl, whip heavy whipping cream and sugar with an electric mixer until the mixture forms beautiful stiff peaks. Set this fluffy cloud aside for later use.
Step 3: Blend the Cream Cheese Base
In another large mixing bowl, beat cream cheese until it becomes silky smooth. Gradually add dry pudding mixes, mixing thoroughly between each addition to ensure a perfectly combined mixture.
Step 4: Combine the Creamy Layers
Gently fold the whipped cream into the cream cheese mixture, stirring until everything blends into a luxuriously smooth filling.
Step 5: Layer and Chill
Spread the cheesecake filling evenly over the chilled crust. Cover the pan with plastic wrap and refrigerate for 8 hours or overnight to allow flavors to meld and texture to set.
Step 6: Slice and Serve
Remove the chilled cheesecake and cut into 9 perfect squares. If desired, garnish with a dollop of whipped topping and fresh banana slices. Serve chilled for maximum enjoyment.
Expert Tips For Flawless Banana Cream Cheesecake Bars
Delicious Twists To Try With Banana Cream Cheesecake Bars
Pairing Suggestions To Elevate Banana Cream Cheesecake Bars
How To Keep Banana Cream Cheesecake Bars Fresh And Tasty
Your Burning Questions About Banana Cream Cheesecake Bars Answered
Nilla Wafers are classic vanilla-flavored cookies with a light, crisp texture commonly used in dessert crusts and as a base for many sweet recipes.
Yes, you can substitute vanilla pudding mix with banana pudding mix to enhance the banana flavor or use cheesecake-flavored pudding for a different twist.
You’ll need an electric mixer, an 8×8-inch baking pan, parchment paper, and basic mixing bowls to create these cheesecake bars.
The whipped cream is ready when it forms stiff peaks – meaning when you lift the mixer, the cream stands up straight without falling over.
Print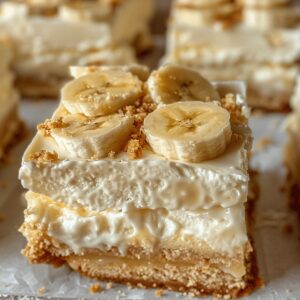
Banana Cream Cheesecake Bars!! Recipe
- Total Time: 8 hours 20 minutes
- Yield: 12 1x
Description
Creamy banana cream cheesecake bars blend luxurious dessert magic with classic comfort. Rich layers of smooth cheesecake and ripe bananas create a delightful treat you’ll savor down to the last crumbly bite.
Ingredients
Main Ingredients:
- 24 ounces (680 grams) cream cheese, softened
- 2 packages instant banana cream pudding mix (3.4 ounces or 96 grams each)
- 1 pint (473 milliliters) heavy whipping cream
Crust Ingredients:
- 3 cups (360 grams) Nilla Wafer cookie crumbs
- 1/2 cup (113 grams) butter, melted
Sweetener:
- 3/4 cup (150 grams) sugar
Garnish (Optional):
- Whipped topping
- Banana slices
Instructions
- Create a buttery foundation by pulverizing Nilla Wafer crumbs with melted butter, then firmly press the mixture into a parchment-lined 8×8-inch baking pan. Refrigerate for 15 minutes to solidify the crust.
- Whip heavy cream and sugar using an electric mixer until stiff, glossy peaks form. Set aside the whipped cream mixture.
- In a separate bowl, thoroughly beat cream cheese until silky and free of lumps.
- Gradually incorporate dry pudding mixes into the cream cheese, mixing meticulously between each addition to ensure smooth integration.
- Gently fold the prepared whipped cream into the cream cheese mixture, blending until uniformly combined and achieving a light, airy texture.
- Evenly distribute the creamy cheesecake filling over the chilled crust, using a spatula to create a smooth surface.
- Seal the pan with plastic wrap and refrigerate for 8 hours or overnight, allowing flavors to meld and texture to set.
- Once thoroughly chilled, slice the cheesecake into 9 equal squares using a sharp knife wiped clean between cuts.
- Optional: Garnish each bar with a dollop of whipped topping and fresh banana slices just before serving. Keep refrigerated until ready to enjoy.
- Serve chilled for optimal flavor and texture.
Notes
- Swap Nilla Wafers for gluten-free graham crackers to create a celiac-friendly dessert option.
- Prevent banana browning by tossing fresh banana slices in lemon juice before garnishing.
- Achieve ultra-smooth cheesecake texture by ensuring cream cheese is fully room temperature before mixing.
- Reduce calorie content by using low-fat cream cheese and light whipped topping without compromising delicious flavor profile.
- Prep Time: 20 minutes
- Cook Time: 0 minutes
- Category: Desserts, Snacks
- Method: Chilling
- Cuisine: American
Nutrition
- Serving Size: 12
- Calories: 429
- Sugar: 29 g
- Sodium: 237 mg
- Fat: 30 g
- Saturated Fat: 19 g
- Unsaturated Fat: 9 g
- Trans Fat: 0.5 g
- Carbohydrates: 33 g
- Fiber: 0.5 g
- Protein: 6 g
- Cholesterol: 90 mg
Sarah Mitchell
Content Specialist & Home Cooking Enthusiast
Expertise
Education
Asheville-Buncombe Technical Community College – Asheville, NC
American Fitness Professionals & Associates – Online
Sarah’s passion for food was sparked by weekend trips to the farmers’ market and her belief that healthy meals should never feel boring.
After earning her culinary diploma and becoming a certified Nutrition and Wellness Consultant, she set out to help others fall in love with simple, wholesome cooking.
She’s all about celebrating the small wins in the kitchen: a colorful yogurt bowl, a new twist on a classic dish, or a homemade snack that feels just a little extra special.
Outside the kitchen, Sarah is a gardener at heart, a yoga enthusiast, and a believer that fresh herbs can brighten any meal, and any day.