
Sweet and Flaky Bear Claws Recipe with Nutty Filling
Fluffy pastry bear claws beckon with their irresistible buttery charm.
Crisp edges promise a delightful crunch that melts in your mouth.
Almond-studded layers tell a story of sweet indulgence waiting to unfold.
Delicate Danish-inspired treats hint at bakery magic you can create right in your kitchen.
Surprisingly simple ingredients combine to craft these elegant morning companions.
Rich, golden-brown crescents emerge from the oven, tempting everyone nearby.
Let the aroma guide you toward baking these delectable pastries that will surely impress.
What Makes Bear Claws a Delicious Pastry Treat
Ingredients for Bear Claws
Dough Ingredients:Filling Ingredients:Glaze Ingredients:How to Prepare Bear Claws at Home
Step 1: Activate Yeast Mixture
Dissolve yeast in warm milk with a touch of sugar. Wait 5-10 minutes until the mixture becomes bubbly and fragrant.
Step 2: Prepare Dough Base
In a large mixing bowl, combine:Cut butter into the dry ingredients using your fingertips until the mixture looks like rough breadcrumbs.
Step 3: Combine Wet and Dry Ingredients
Whisk eggs into the yeast mixture, then pour the liquid into the flour mixture. Stir until a soft dough forms.
Step 4: Knead and Rise
Transfer dough to a floured surface. Knead thoroughly until smooth and elastic. Place in a greased bowl, cover, and let rise in a warm spot until doubled in size, approximately one hour.
Step 5: Create Almond Filling
Blend together:Mix until silky smooth. Fold in flour and optional raisins or nuts.
Step 6: Roll and Fill Pastry
Roll dough into a large rectangle about 1/4 inch thick. Spread almond filling evenly, leaving small margins around edges.
Step 7: Shape Bear Claws
Fold dough over filling and seal edges. Cut into 2-inch wide strips. Make diagonal cuts along each strip, creating claw-like separations without cutting completely through.
Step 8: Proof Pastries
Place shaped pastries on baking sheet. Cover with a clean towel and let rise for 30 minutes.
Step 9: Bake to Golden Perfection
Preheat oven to 375°F. Bake bear claws for 20-25 minutes until beautifully golden brown.
Step 10: Add Finishing Glaze
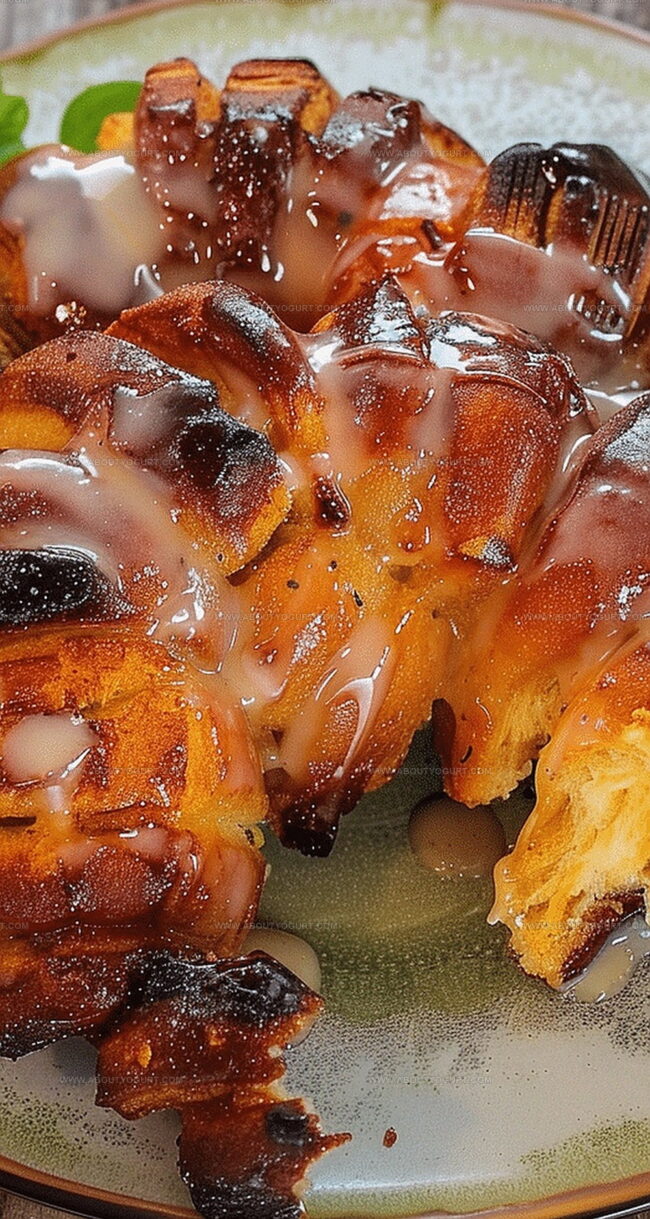
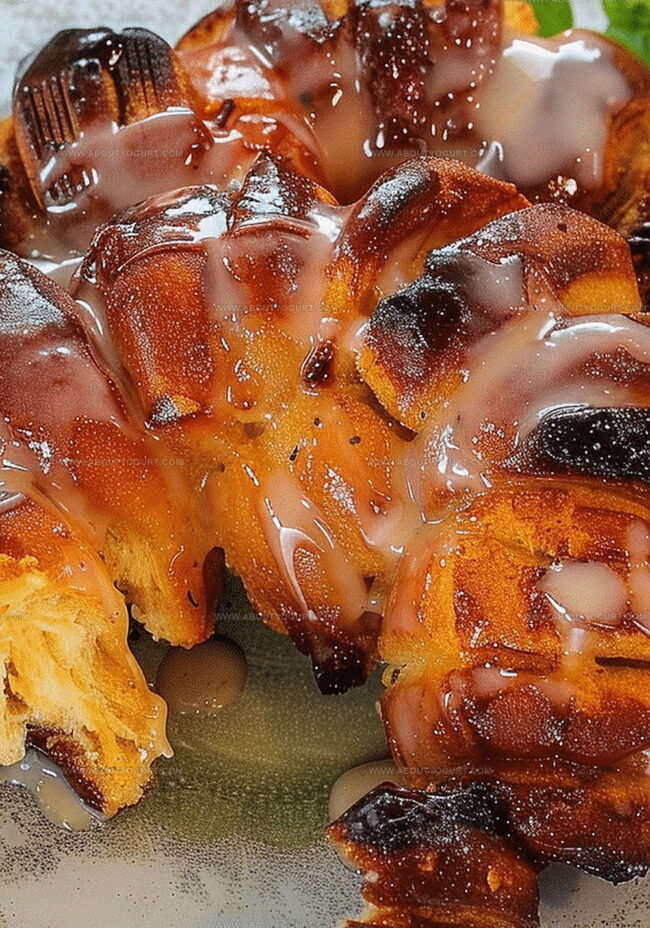
Whisk powdered sugar, milk, and vanilla into a smooth glaze. Brush over warm pastries.
Step 11: Serve and Enjoy
Allow bear claws to cool slightly on a wire rack before serving. Best enjoyed warm with a cup of coffee or tea.
Tips for Perfectly Flaky Bear Claws
Variation Ideas for Bear Claws
Best Pairings for Bear Claws
Storing Bear Claws to Maintain Freshness
Frequently Asked Questions About Bear Claws
Bear Claws are a classic Danish pastry with a flaky dough filled with sweet almond paste, shaped to resemble a bear’s paw with multiple “claw” cuts.
No, while traditional Bear Claws use almond filling, you can customize with other fillings like fruit preserves or chocolate if desired.
This recipe requires intermediate baking skills. Experienced home bakers who understand working with yeast dough and can handle delicate pastry techniques will find it manageable.
Yes, you can prepare the dough and filling in advance. Store the unbaked pastries in the refrigerator overnight and bake fresh in the morning for the best texture and flavor.
Print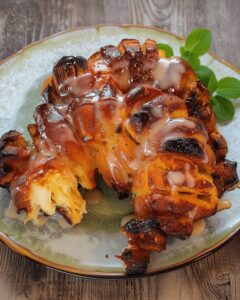
Bear Claws Recipe
- Total Time: 2 hours 5-10 minutes
- Yield: 12 1x
Description
Irresistible bear claws pastry weaves German bakery magic into a delectable sweet treat perfect for morning indulgence. Flaky almond-filled crescents promise delightful moments of pure culinary pleasure you will savor with each tender, buttery bite.
Ingredients
Dough Ingredients:
- 3.5 cups all-purpose flour
- 2.25 teaspoons active dry yeast
- 1 cup milk, lukewarm
- 1 cup unsalted butter, cold, cut into small pieces
- 2 large eggs
- 1/4 cup sugar
- 1 teaspoon salt
Filling Ingredients:
- 1 cup almond paste
- 1/2 cup powdered sugar
- 1/4 cup all-purpose flour
- 1 egg white
- 1/2 teaspoon almond extract
- 1/4 cup raisins or chopped nuts (optional)
Glaze Ingredients:
- 1 cup powdered sugar
- 2 tablespoons milk or water
- 1/2 teaspoon vanilla extract
Instructions
- Activate yeast by dissolving it with a pinch of sugar in lukewarm milk. Allow 5-10 minutes for the mixture to become foamy and fragrant.
- Combine flour, salt, and remaining sugar in a large mixing bowl. Cut cold butter into the dry ingredients until the texture resembles coarse breadcrumbs.
- Incorporate beaten eggs into the yeast mixture, then pour this liquid into the flour mixture. Stir until a cohesive dough forms.
- Transfer dough to a floured surface and knead vigorously for 5-7 minutes until smooth and elastic. Place in a greased bowl, cover, and let rise in a warm environment for approximately 1 hour or until volume doubles.
- Prepare almond filling by blending almond paste with powdered sugar until well integrated. Mix in egg white and almond extract until smooth. Fold in flour and optional raisins or nuts to create a firm filling.
- Roll dough into a thin rectangle approximately 1/4 inch thick on a lightly dusted surface.
- Spread almond filling evenly across the dough, maintaining a small border around the edges.
- Fold dough over the filling, pressing edges to create a secure seal. Slice into 2-inch wide strips.
- Make diagonal cuts along each strip, stopping short of complete separation. Gently curve strips to define the “claws”.
- Arrange pastries on a baking sheet. Drape with a clean kitchen towel and allow to rise for 30 minutes.
- Preheat oven to 375F (190C). Bake bear claws for 20-25 minutes until achieving a rich golden-brown color.
- Whisk powdered sugar, milk, and vanilla extract to create a smooth glaze. Brush warm pastries with the glossy mixture.
- Cool bear claws on a wire rack before serving to allow proper setting and flavor development.
Notes
- Swap almond paste with cashew or sunflower seed butter for nut-free variations, perfect for those with allergies.
- Add cinnamon or cardamom to the filling for extra warmth and depth of flavor that complements the almond notes.
- Ensure yeast is fresh and active by checking the expiration date and using lukewarm milk to activate properly.
- Chill the dough for 30 minutes before rolling to make handling easier and create flakier pastry layers.
- Prep Time: 1 hour 45 minutes
- Cook Time: 20-25 minutes
- Category: Breakfast, Snacks, Desserts
- Method: Baking
- Cuisine: American
Nutrition
- Serving Size: 12
- Calories: 333 kcal
- Sugar: 23 g
- Sodium: 127 mg
- Fat: 18 g
- Saturated Fat: 10 g
- Unsaturated Fat: 7 g
- Trans Fat: 0.2 g
- Carbohydrates: 38 g
- Fiber: 2 g
- Protein: 6 g
- Cholesterol: 55 mg
Michael Thompson
Founder & Recipe Developer
Expertise
Education
Cascade Culinary Institute – Bend, OR
ServSafe Food Handler Certification – Portland, OR
Focus: Certified in core food safety and hygiene principles for both home and professional kitchens, with emphasis on ingredient handling, kitchen cleanliness, and safe preparation methods.
Mike’s kitchen journey began with a single goal: to make everyday meals feel like something worth celebrating.
After earning his Certificate in Culinary Arts from Cascade Culinary Institute, he spent years working with local farmers and small kitchens across Oregon, learning the beauty of seasonal, small-batch cooking.
Mike’s approach is simple, cook with what’s fresh, keep it approachable, and always leave room for a little creativity. When he’s not testing yogurt marinades or designing single-serving meals, you’ll find him hiking trails or hunting down the best berries at local markets.