Homemade Carmelitas Recipe with Gooey Chocolate Caramel
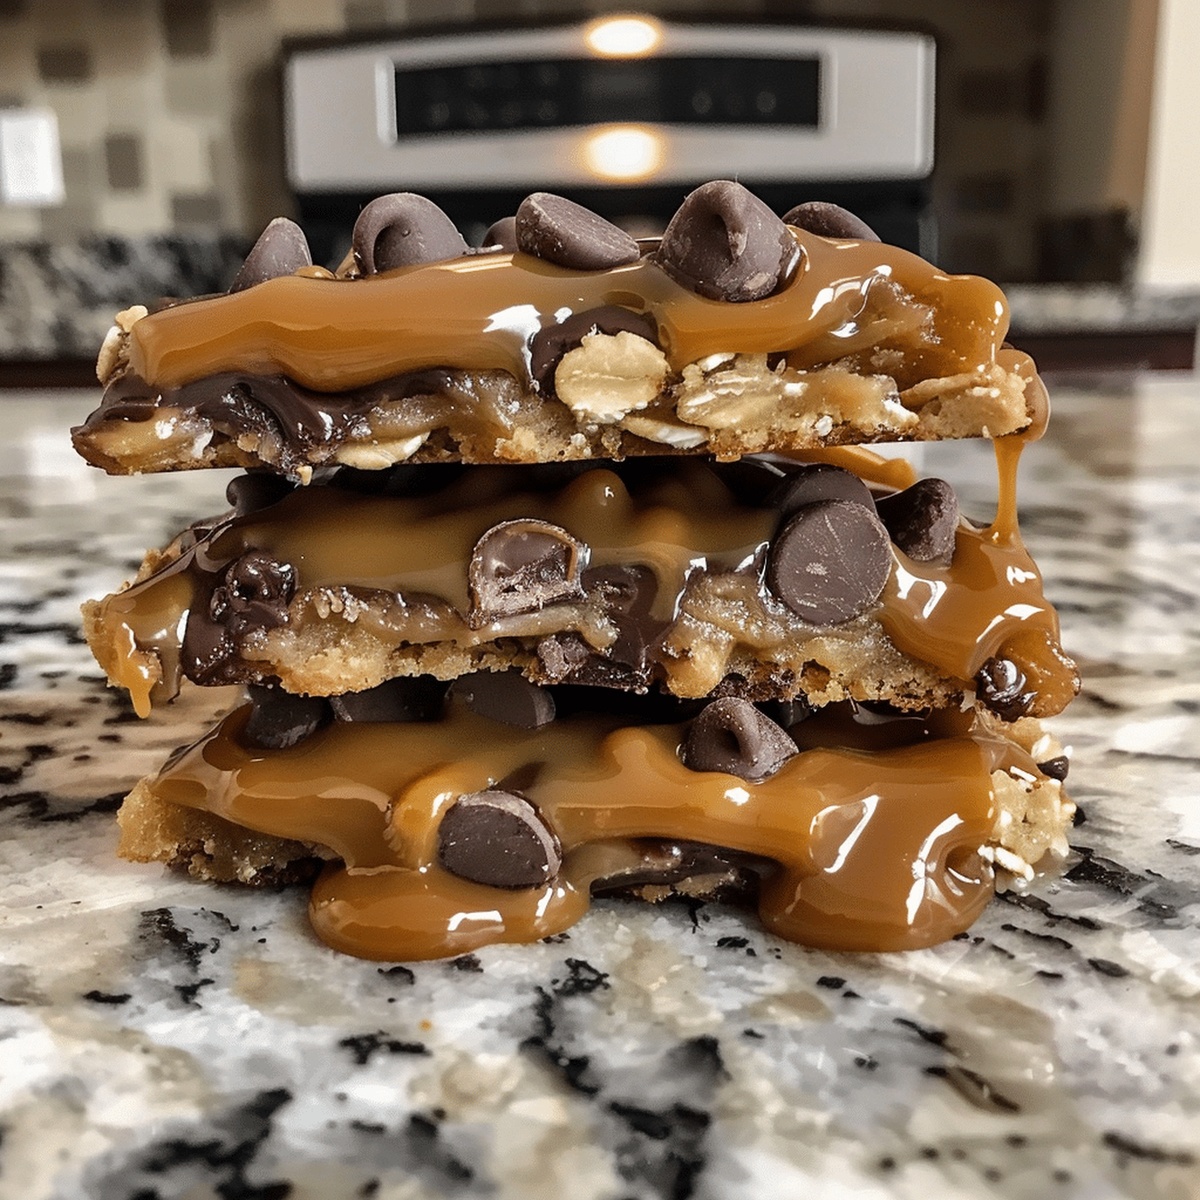
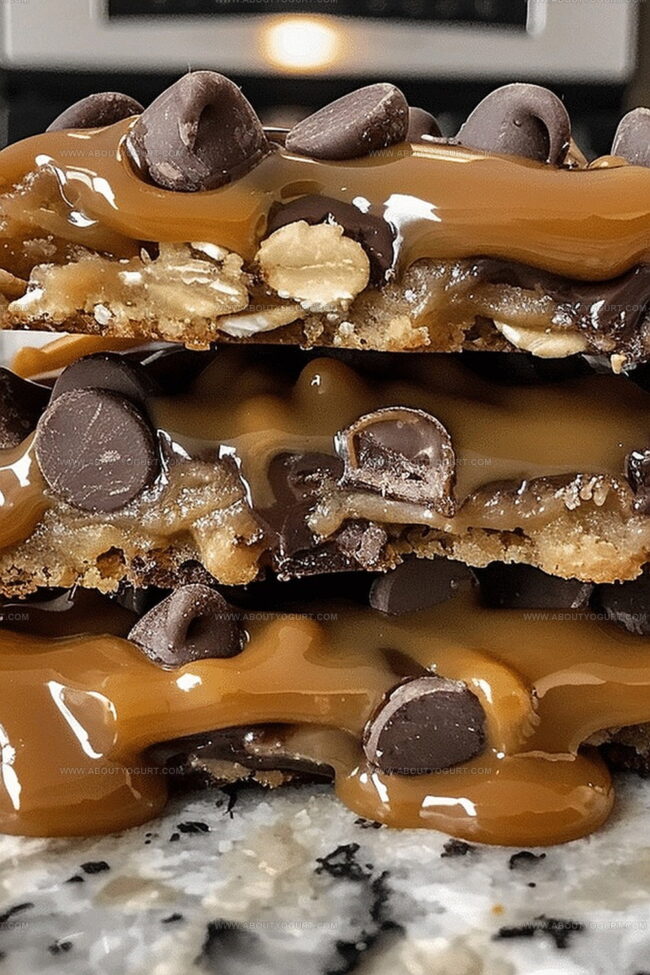
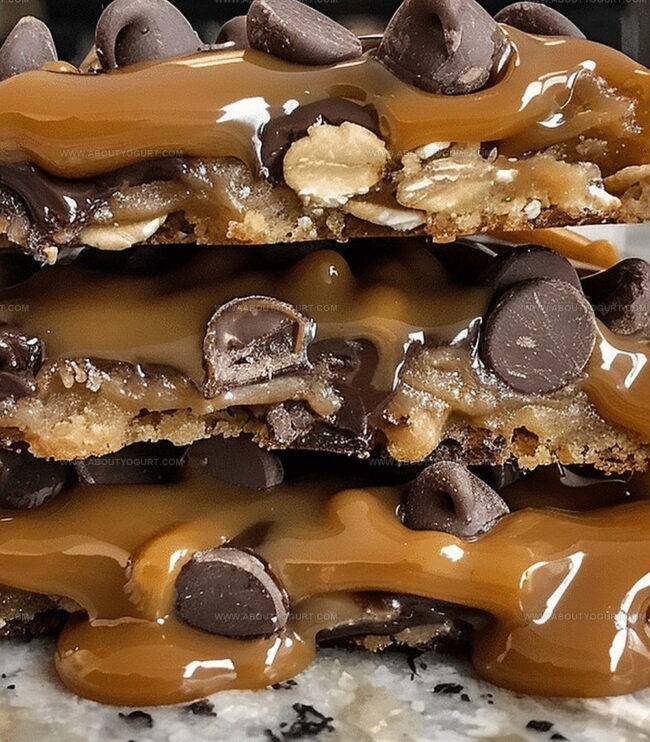
Gooey chocolate and caramel dance together in this irresistible carmelitas recipe that promises pure dessert magic.
Layers of buttery oats create a crumbly foundation for decadent swirls of sweet goodness.
Melted chocolate chips mingle with rich caramel, forming a heavenly combination that makes taste buds sing.
Surprisingly simple ingredients come together in less than an hour, delivering maximum flavor with minimal effort.
Every bite offers a perfect balance between crisp cookie edges and molten center treasures.
Warm from the oven or chilled in the refrigerator, these bars become an instant crowd-pleaser.
Bring these delectable treats to your next gathering, and watch smiles bloom with each delicious morsel.
Why Carmelitas Are a Chewy, Sweet Delight
Ingredients for Carmelitas
Base Ingredients:Filling Ingredients:Optional Ingredients:How to Make Carmelitas
Step 1: Prepare Baking Station
Grab a 9×9-inch baking dish. Coat it with butter or cooking spray. Line the dish with parchment paper, allowing extra paper to hang over the edges for easy lifting later.
Step 2: Create Crumbly Oat Base
In a large mixing bowl, combine:Mix ingredients until they form a soft, crumbly texture that holds together when pressed.
Step 3: Form Initial Crust Layer
Press half of the oat mixture into the bottom of the prepared baking dish. Use your fingers to create an even, compact layer that covers the entire base.
Step 4: Initial Baking
Slide the dish into a preheated oven at 350°F. Bake the crust for 10 minutes until it becomes slightly golden and sets.
Step 5: Add Chocolate Layer
Remove the hot crust from the oven. Sprinkle chocolate chips generously across the entire surface, creating a complete chocolate coverage.
Step 6: Drizzle Caramel
Pour caramel sauce or dulce de leche over the chocolate chips, ensuring an even distribution that covers the entire chocolate layer.
Step 7: Top With Remaining Crumble
Scatter the remaining oat mixture over the caramel, creating a rustic, uneven topping that will become deliciously crispy.
Step 8: Final Baking
Return the dish to the oven. Bake for 15-20 minutes until the top turns a beautiful golden brown and looks perfectly crisp.
Step 9: Cool and Set
Remove from the oven and let the bars cool completely in the baking dish. This helps them set and makes cutting easier.
Step 10: Slice and Serve
Lift the bars out using the parchment paper overhang. Cut into square portions. Serve at room temperature for maximum gooey deliciousness.
Tips for Perfectly Chewy Carmelitas
Variations to Customize Carmelitas
Suggested Pairings for Carmelitas
Storage Advice for Carmelitas
Frequently Asked Questions About Carmelitas
The key ingredients are butter, brown sugar, flour, oats, chocolate chips, and caramel sauce or dulce de leche.
Yes, you can substitute milk, dark, or semi-sweet chocolate chips based on your preference.
Absolutely! Carmelitas are easy to make and require basic baking skills with simple mixing and layering techniques.
Look for a golden brown top layer and the edges starting to slightly pull away from the sides of the baking dish.
Print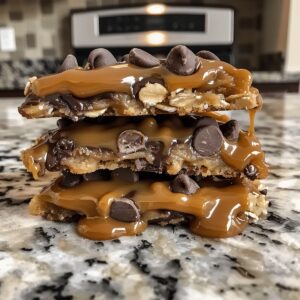
Carmelitas Recipe
- Total Time: 35-40 minutes
- Yield: 16 1x
Description
Irresistible Carmelitas blend rich chocolate and gooey caramel between buttery oat layers, creating a midwest cookie bar that melts hearts. Chocolate lovers discover pure indulgence with each delectable bite of this classic homestyle dessert.
Ingredients
Base Ingredients:
- 1 1/2 cups all-purpose flour
- 1 1/2 cups old-fashioned oats
- 1 cup packed brown sugar
Dry Ingredients:
- 1 teaspoon baking soda
- 1/2 teaspoon salt
Wet and Additional Ingredients:
- 1 cup (2 sticks / 226 grams) unsalted butter, melted
- 1 cup semi-sweet chocolate chips
- 1 cup caramel sauce or dulce de leche
- 1 teaspoon vanilla extract
Instructions
- Prepare the baking workspace by heating the oven to 350F (175C) and positioning the rack in the middle position.
- Create a non-stick foundation by thoroughly greasing a 9×9-inch baking dish and lining it with parchment paper, ensuring extended edges for effortless removal.
- Craft the oat base by blending melted butter with brown sugar, flour, rolled oats, baking soda, and salt until a cohesive, crumbly mixture forms.
- Distribute half of the oat mixture uniformly across the prepared baking dish, pressing firmly to create a compact, even layer.
- Bake the initial crust for 10 minutes until it develops a light golden appearance and becomes slightly set.
- Immediately after removing from the oven, generously scatter chocolate chips across the hot crust, creating an even chocolate landscape.
- Drizzle caramel sauce or dulce de leche over the chocolate chips, ensuring complete coverage and potential pooling in chocolate valleys.
- Delicately sprinkle the remaining oat mixture over the caramel layer, creating a rustic, textured topping.
- Return the assembled dessert to the oven and bake for an additional 15-20 minutes, watching for a rich golden-brown surface indicating perfect doneness.
- Allow the Carmelitas to cool completely within the baking dish, which helps the layers set and makes cutting cleaner and more precise.
- Slice into squares, revealing the luscious layers of caramel, chocolate, and oat crumble, and serve at room temperature.
Notes
- Swap out ingredients to create gluten-free versions by using almond flour or gluten-free oats for those with dietary restrictions.
- Enhance the chocolate flavor by mixing different types of chocolate chips like dark, milk, and semi-sweet for a more complex taste profile.
- Prevent sticky caramel layers by chilling the bars in the refrigerator for 30 minutes before cutting, which helps create cleaner, more precise slices.
- Experiment with additional toppings like chopped nuts, sea salt, or a drizzle of melted chocolate to elevate the classic Carmelitas recipe and add extra texture and depth.
- Prep Time: 10 minutes
- Cook Time: 25-30 minutes
- Category: Desserts, Snacks
- Method: Baking
- Cuisine: American
Nutrition
- Serving Size: 16
- Calories: 242 kcal
- Sugar: 14 g
- Sodium: 75 mg
- Fat: 12 g
- Saturated Fat: 7 g
- Unsaturated Fat: 5 g
- Trans Fat: 0.3 g
- Carbohydrates: 31 g
- Fiber: 2 g
- Protein: 2 g
- Cholesterol: 30 mg
Michael Thompson
Founder & Recipe Developer
Expertise
Education
Cascade Culinary Institute – Bend, OR
ServSafe Food Handler Certification – Portland, OR
Focus: Certified in core food safety and hygiene principles for both home and professional kitchens, with emphasis on ingredient handling, kitchen cleanliness, and safe preparation methods.
Mike’s kitchen journey began with a single goal: to make everyday meals feel like something worth celebrating.
After earning his Certificate in Culinary Arts from Cascade Culinary Institute, he spent years working with local farmers and small kitchens across Oregon, learning the beauty of seasonal, small-batch cooking.
Mike’s approach is simple, cook with what’s fresh, keep it approachable, and always leave room for a little creativity. When he’s not testing yogurt marinades or designing single-serving meals, you’ll find him hiking trails or hunting down the best berries at local markets.