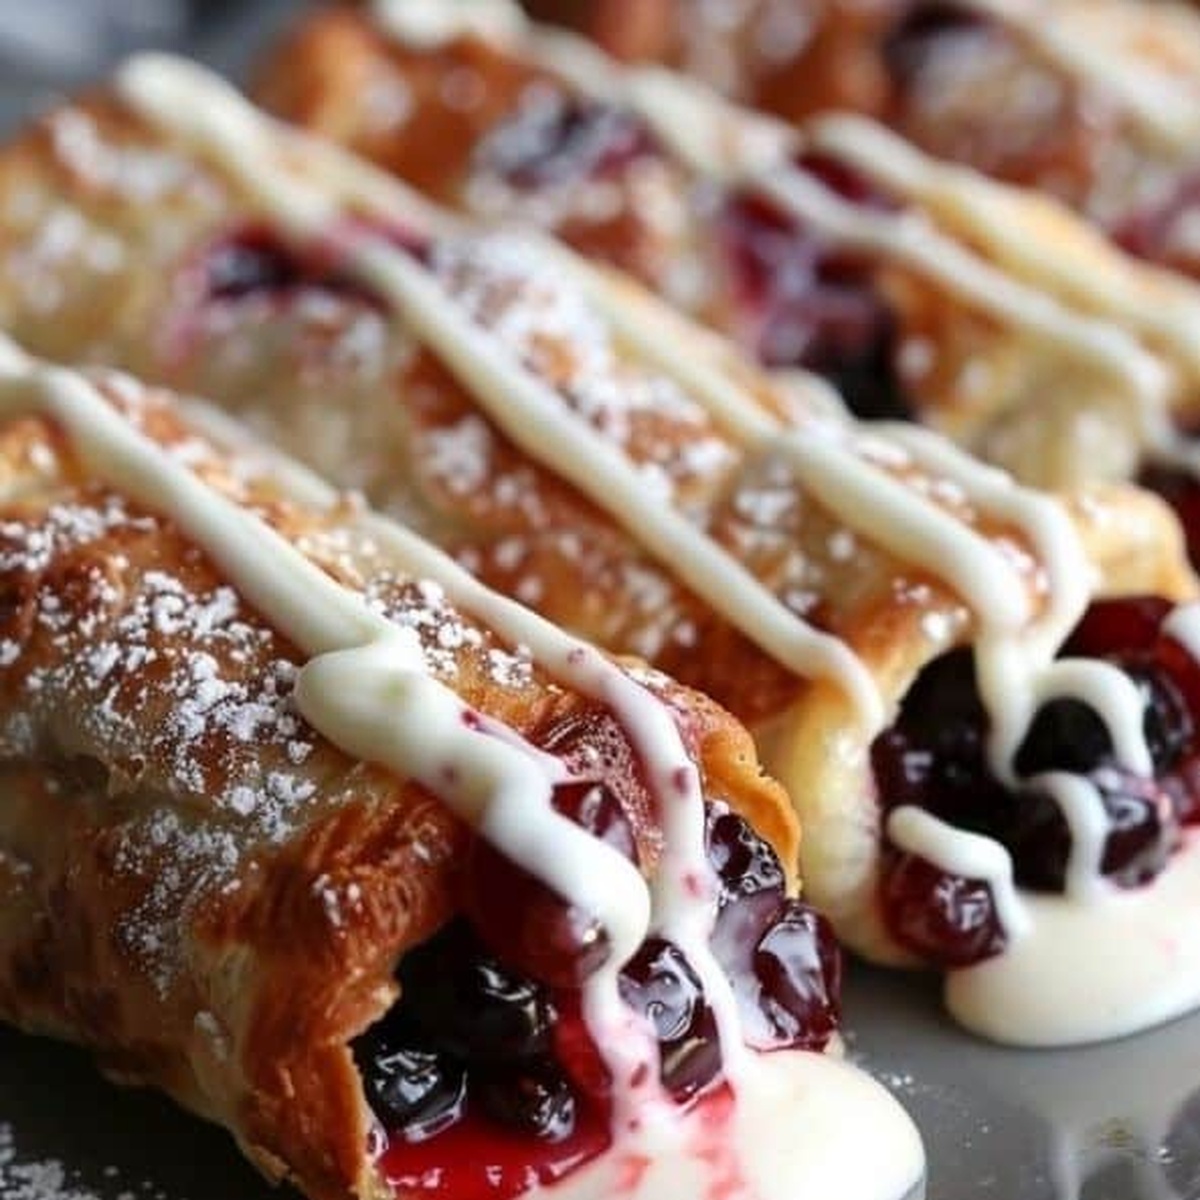
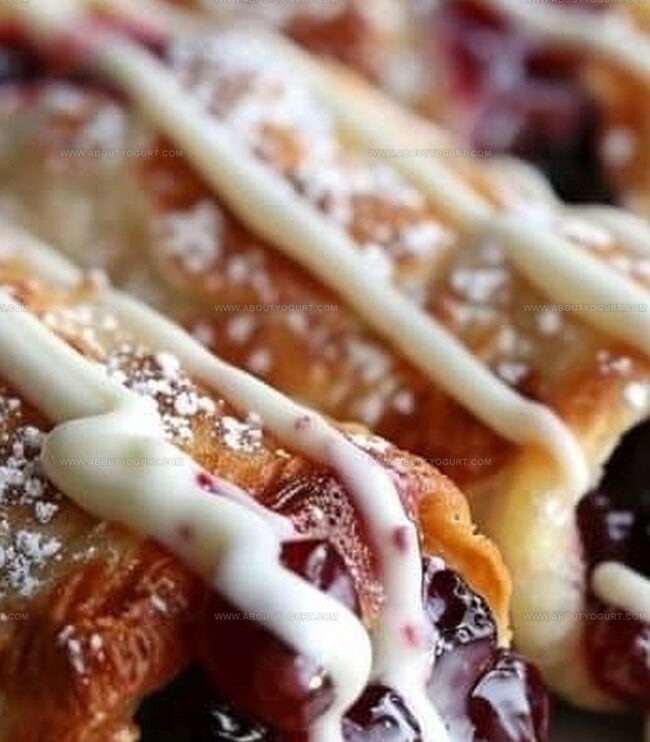
Cherry Cheesecake Chimichangas Recipe with a Twist
Crispy golden chimichangas stuffed with tangy cherry cheesecake filling will make your taste buds dance with excitement.
Sweet cream cheese mingles perfectly with bright cherry flavors inside a warm, crunchy tortilla wrapper.
Mexican-inspired desserts rarely get more delightful than this playful fusion treat.
Unexpected combinations often create magical culinary moments that surprise and delight.
Creamy cheese and fruit fillings merge seamlessly within a delicate, crisp exterior.
Each bite promises a delectable balance between rich cheesecake and fruity cherry notes.
You won’t believe how simple these decadent dessert chimichangas are to prepare.
Dive into this recipe and experience a dessert that breaks all the traditional rules.
Why Cherry Cheesecake Chimichangas Are a Fun Treat

Ingredients for Cherry Cheesecake Chimichangas
Main Ingredients:Dry Ingredients:Cooking Ingredients:How to Prepare Cherry Cheesecake Chimichangas
Step 1: Whip Up Creamy Filling
In a mixing bowl, blend softened cream cheese with powdered sugar and vanilla extract until the mixture becomes silky smooth and fully combined.
Step 2: Wrap and Stuff
Spread the creamy mixture across each tortilla, leaving a small border around the edges. Dollop cherry pie filling right in the center of each tortilla. Roll the tortillas tightly, folding in the sides to create a secure burrito-like package.
Step 3: Fry to Golden Perfection
Heat oil in a skillet over medium heat. Gently place each chimichanga into the hot oil, cooking until they transform into crispy, golden-brown delights. Fry each side for approximately 2-3 minutes, ensuring an even, crunchy exterior.
Step 4: Dust with Sweet Coating
Combine sugar and cinnamon in a shallow dish. Once the chimichangas are fried and slightly cooled, roll them generously in the fragrant cinnamon-sugar mixture, creating a delectable sweet crust that adds an extra layer of deliciousness.
Pro Tips for Cherry Cheesecake Chimichangas
Variation Ideas for Cherry Cheesecake Chimichangas
Pairing Suggestions for Cherry Cheesecake Chimichangas
Storage Tips for Cherry Cheesecake Chimichangas
FAQs for Cherry Cheesecake Chimichangas
A chimichanga is a deep-fried burrito popular in Tex-Mex cuisine, typically filled with meat, beans, or other savory ingredients. In this recipe, we’re creating a sweet dessert version with cream cheese and cherry filling.
Yes, you can bake the chimichangas in a preheated oven at 400°F for about 15-20 minutes, turning them halfway through to ensure even browning. Brush with a little oil to help them crisp up.
Use room temperature, soft tortillas and don’t overfill them. Leave space around the edges and roll them tightly but gently to prevent tearing.
Print
Cherry Cheesecake Chimichangas Recipe
- Total Time: 18-22 minutes
- Yield: 6 1x
Description
Indulgent cherry cheesecake chimichangas blend Mexican street food with classic dessert charm. Crispy tortillas cradle a luscious filling of creamy cheese and sweet cherries, promising a delightful culinary adventure you won’t forget.
Ingredients
Main Ingredients:
- 6 flour tortillas
- 1 1/2 cups (360 milliliters) cherry pie filling
- 8 ounces (226 grams) cream cheese, softened
Filling Ingredients:
- 1/4 cup (30 grams) powdered sugar
- 1 teaspoon vanilla extract
Coating and Frying Ingredients:
- 1/4 cup (50 grams) sugar
- 1 teaspoon cinnamon
- Oil for frying
Instructions
- Whip cream cheese with powdered sugar and vanilla until velvety and uniform in texture, ensuring no lumps remain.
- Lay out tortillas and evenly distribute cream cheese mixture, leaving a small border around the edges for secure folding.
- Spoon cherry pie filling precisely in the center of each tortilla, then fold and roll tightly into compact burrito-like parcels, tucking in sides to prevent filling from leaking.
- Prepare a skillet with vegetable oil heated to 350°F, creating a consistent medium-high temperature for even frying.
- Gently lower chimichangas into hot oil, frying each side for 2-3 minutes until achieving a deep golden-brown exterior and crisp texture.
- Remove fried chimichangas and immediately transfer to a cinnamon-sugar mixture, rotating to coat completely for a sweet, aromatic finish.
- Allow chimichangas to rest momentarily on a wire rack to drain excess oil before serving warm, ensuring a perfect balance of crispy exterior and creamy interior.
Notes
- Opt for full-fat cream cheese to ensure a rich, creamy filling that holds its shape during frying.
- Seal the tortilla edges with a bit of water to prevent the filling from leaking during cooking.
- Pat the chimichangas dry with paper towels after frying to remove excess oil and maintain a crispy texture.
- For a lighter version, consider baking the chimichangas at 400°F for 15-20 minutes instead of deep-frying.
- Prep Time: 10 minutes
- Cook Time: 8-12 minutes
- Category: Desserts, Snacks
- Method: Frying
- Cuisine: Mexican-American
Nutrition
- Serving Size: 6
- Calories: 430 kcal
- Sugar: 30 g
- Sodium: 280 mg
- Fat: 22 g
- Saturated Fat: 13 g
- Unsaturated Fat: 7 g
- Trans Fat: 0.5 g
- Carbohydrates: 45 g
- Fiber: 2 g
- Protein: 6 g
- Cholesterol: 55 mg
Sarah Mitchell
Content Specialist & Home Cooking Enthusiast
Expertise
Education
Asheville-Buncombe Technical Community College – Asheville, NC
American Fitness Professionals & Associates – Online
Sarah’s passion for food was sparked by weekend trips to the farmers’ market and her belief that healthy meals should never feel boring.
After earning her culinary diploma and becoming a certified Nutrition and Wellness Consultant, she set out to help others fall in love with simple, wholesome cooking.
She’s all about celebrating the small wins in the kitchen: a colorful yogurt bowl, a new twist on a classic dish, or a homemade snack that feels just a little extra special.
Outside the kitchen, Sarah is a gardener at heart, a yoga enthusiast, and a believer that fresh herbs can brighten any meal, and any day.