
Chocolate Cherry Cheesecake Bar Recipe Made Easy
Sweet dreams come alive with these decadent chocolate cherry cheesecake bars that blend rich cocoa and luscious fruit in every delightful bite.
Layers of creamy filling nestle between crumbly graham cracker crust and smooth chocolate ganache.
Intense cherry notes dance through the dessert, creating a symphony of flavors.
Chocolate and cherries make magic when combined with velvety cream cheese.
Every forkful promises pure indulgence that melts on your tongue.
Dessert enthusiasts will fall head over heels for this irresistible treat that looks stunning and tastes even better.
You cannot wait to slice into these beautiful bars and savor each magnificent moment.
Chocolate Cherry Cheesecake Bars: Sweet and Tart Harmony

Ingredients for Chocolate Cherry Cheesecake Bars Perfection
Crust Ingredients:Cheesecake Filling Ingredients:Topping and Garnish Ingredients:How to Bake Chocolate Cherry Cheesecake Bars
Step 1: Prepare Baking Station
Get your oven ready by heating it to 350F (175C). Grab a 9×13 inch rectangular pan and line it with parchment paper, making sure to cover the bottom and sides completely.
Step 2: Create Chocolate Crust
In a food processor or using a pastry blender, combine:Blend until the mixture looks like coarse crumbs. Set aside 1 cup of this crumbly mixture for later.
Step 3: Form Initial Crust Layer
Press the remaining crumb mixture firmly into the bottom of the prepared pan. Ensure an even, compact layer that will serve as the base of your bars.
Step 4: Prebake Crust Foundation
Slide the pan into the preheated oven and bake for 25 minutes. Remove and let cool slightly, allowing the crust to set and become slightly crisp.
Step 5: Whip Creamy Cheesecake Filling
Using an electric mixer, blend:Mix until silky smooth. Add eggs one at a time, mixing thoroughly after each addition.
Step 6: Layer Cheesecake Mixture
Pour the creamy cheesecake mixture over the cooled crust. Distribute chopped cherries evenly across the surface.
Step 7: Add Crumble Topping
Sprinkle the reserved cup of chocolate crumb mixture over the cheesecake layer, creating a delightful textured top.
Step 8: Bake to Perfection
Reduce oven temperature to 325F (163C). Bake for 35-40 minutes until the cheesecake is set but still slightly jiggly in the center.
Step 9: Cool and Garnish
Allow bars to cool completely at room temperature. Optional: Drizzle melted chocolate chips mixed with whipping cream over the top for extra indulgence.
Step 10: Store and Serve
Refrigerate in an airtight container. These bars freeze beautifully and can be enjoyed for several days.
Pro Tips for Flavorful Chocolate Cherry Cheesecake Bars

Variations to Customize Your Chocolate Cherry Cheesecake Bars
Pairing Suggestions to Complement Chocolate Cherry Cheesecake Bars
Storage Tips for Chocolate Cherry Cheesecake Bars
FAQs About Chocolate Cherry Cheesecake Bars
Yes, thaw and drain frozen cherries completely before chopping and adding to the cheesecake layer to prevent excess moisture.
The edges will look set, and the center will have a slight jiggle but not be liquid. A toothpick inserted near the center should come out mostly clean.
Press the crust mixture firmly into the pan and pre-bake it before adding the cheesecake layer. This helps create a crisp, stable base for your bars.
Yes, you can replace brown sugar with granulated sugar, and use whole wheat flour or gluten-free flour blends as alternatives to all-purpose flour.
Print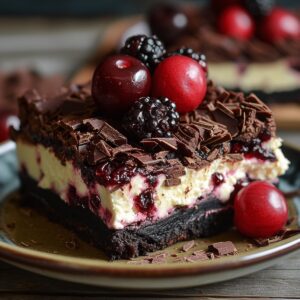
Chocolate Cherry Cheesecake Bars Recipe
- Total Time: 1 hour 5 minutes
- Yield: 12 1x
Description
Rich chocolate cherry cheesecake bars blend luscious flavors into an irresistible dessert masterpiece. Sweet cherries and creamy chocolate create a delightful harmony that will enchant dessert enthusiasts with each delectable bite.
Ingredients
Chocolate Bars Ingredients:
Main Ingredients:
- 2 cups (1 pound) cream cheese
- 1 1/3 cups fresh or frozen cherries, quartered
- 2 large eggs
- 3 cups flour
- 2/3 cup cocoa
- 3/4 cup firmly packed brown sugar
- 1 1/2 cups cold butter
Sweeteners and Flavoring:
- 1 cup white sugar
- 2 tablespoons vanilla extract
- 2 tablespoons lemon juice
Chocolate Drizzle (Optional):
- 1/2 cup chocolate chips
- 2 tablespoons whipping cream
Instructions
- Prepare the oven to 350F (175C) and ready a 9×13 inch baking pan with parchment paper or light greasing.
- Pulse flour, brown sugar, cocoa, and butter in a food processor until it forms a coarse, crumbly texture. If no food processor is available, use a pastry knife to cut butter into dry ingredients.
- Separate 1 cup of the crumb mixture for later topping, then firmly press the remaining mixture into the bottom of the prepared pan.
- Bake the crust for 25 minutes, allowing it to cool and set slightly after removing from oven.
- Create the cheesecake filling by whipping cream cheese, white sugar, lemon juice, and vanilla extract until completely smooth and uniform.
- Incorporate eggs into the cream cheese mixture one at a time, ensuring each is fully blended before adding the next.
- Evenly spread the cheesecake mixture over the cooled crust, then distribute chopped cherries across the surface.
- Sprinkle the reserved crumb mixture over the cheesecake layer, creating a rustic, textured topping.
- Reduce oven temperature to 325F (163C) and bake for 35-40 minutes until the cheesecake sets and appears slightly firm.
- Allow bars to cool completely at room temperature before cutting into squares.
- Optional: Melt chocolate chips with whipping cream and drizzle decoratively over the cooled bars.
- Refrigerate in an airtight container. These bars can be frozen for extended storage.
Notes
- Crust Perfection: Use cold butter for a flakier, more crumbly texture that creates a delightful base for the cheesecake bars.
- Cherry Selection: Choose fresh, ripe cherries for the most vibrant flavor, or opt for frozen cherries if fresh aren’t available.
- Smooth Cheesecake Technique: Ensure cream cheese is at room temperature to prevent lumps and create a silky-smooth filling.
- Make-Ahead Magic: These bars can be prepared a day in advance, allowing flavors to meld and making party prep easier.
- Prep Time: 25 minutes
- Cook Time: 40 minutes
- Category: Desserts, Snacks
- Method: Baking
- Cuisine: American
Nutrition
- Serving Size: 12
- Calories: 320 kcal
- Sugar: 22 g
- Sodium: 120 mg
- Fat: 20 g
- Saturated Fat: 12 g
- Unsaturated Fat: 7 g
- Trans Fat: 0.3 g
- Carbohydrates: 30 g
- Fiber: 2 g
- Protein: 5 g
- Cholesterol: 65 mg
Sarah Mitchell
Content Specialist & Home Cooking Enthusiast
Expertise
Education
Asheville-Buncombe Technical Community College – Asheville, NC
American Fitness Professionals & Associates – Online
Sarah’s passion for food was sparked by weekend trips to the farmers’ market and her belief that healthy meals should never feel boring.
After earning her culinary diploma and becoming a certified Nutrition and Wellness Consultant, she set out to help others fall in love with simple, wholesome cooking.
She’s all about celebrating the small wins in the kitchen: a colorful yogurt bowl, a new twist on a classic dish, or a homemade snack that feels just a little extra special.
Outside the kitchen, Sarah is a gardener at heart, a yoga enthusiast, and a believer that fresh herbs can brighten any meal, and any day.