
Golden Crispy Arancini Recipe for Party Tables
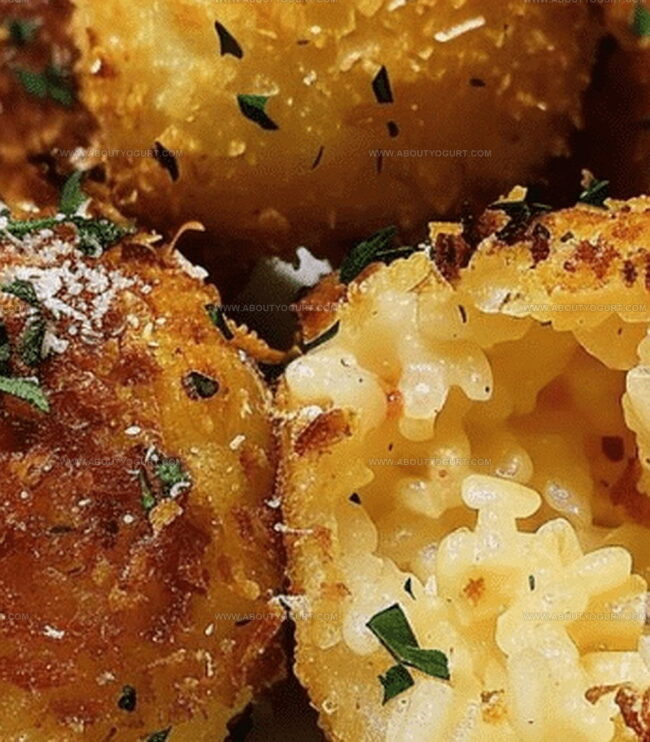
Arancini, those delightful Italian rice balls, bring pure culinary magic to your kitchen.
Sicilian cooks have perfected these golden-brown delicacies over generations.
Small handheld treasures pack incredible flavor into every crispy bite.
Stuffed with creamy mozzarella and savory fillings, each morsel tells a delicious story.
Carefully rolling and coating these rice spheres requires patience but rewards you with incredible results.
Cheese melts perfectly inside the crunchy exterior, creating an irresistible contrast.
Serve these little wonders and watch everyone’s eyes light up with excitement.
Why Crispy Arancini Are So Popular

Ingredients for Crispy Arancini
Base Ingredients:Aromatics and Flavor Enhancers:Coating and Frying Ingredients:Instructions for Crispy Arancini
Step 1: Craft Creamy Risotto Base
Gently warm broth in a saucepan over low heat. In a separate large skillet, melt together olive oil and butter. Sauté finely chopped onions and minced garlic until they become soft and translucent. Introduce Arborio rice, toasting it carefully while stirring constantly. Pour in white wine and let it absorb into the rice. Gradually add warm broth, one ladleful at a time, stirring frequently. Allow each broth addition to be fully absorbed before adding more. Continue this process until rice transforms into a luxurious, creamy texture. Fold in Parmesan cheese, seasoning with salt and pepper. Let the risotto cool completely, then refrigerate for at least 2 hours until firm and set.
Step 2: Create Cheesy Rice Spheres
Once risotto is chilled and firm, take small portions and gently flatten in your palm.
Place cheese in the center and carefully mold risotto around it, forming perfect round balls. Repeat this process with remaining risotto and cheese.
Step 3: Prepare Crispy Coating
Set up a three-stage breading station:Carefully coat each rice ball by:Ensure complete and even coverage for each arancini.
Step 4: Achieve Golden Perfection
Heat vegetable oil in a large skillet or deep fryer to 350°F. Carefully lower arancini into hot oil, working in small batches. Fry, turning occasionally, until they develop a stunning golden-brown exterior, approximately 3-4 minutes per batch. Use a slotted spoon to transfer crispy spheres onto a paper towel-lined plate for excess oil drainage.
Step 5: Serve and Savor
Present these golden, crispy arancini while warm. Pair with marinara sauce or your preferred dipping companion for an irresistible culinary experience.
Pro Tips for Crispy Arancini
Variation Ideas for Crispy Arancini
Pairing Suggestions for Crispy Arancini
Storage Tips for Crispy Arancini
FAQs About Crispy Arancini
Arborio rice contains high starch content that helps bind the risotto together, making it perfect for creating compact rice balls that hold their shape when fried.
Absolutely! Leftover risotto works wonderfully for arancini, and chilled risotto is actually easier to shape and form into balls.
Ensure the risotto completely covers the cheese, and refrigerate the formed balls before breading to help them maintain their structure during frying.
Breadcrumbs create a crispy exterior and help seal the arancini, providing a golden, crunchy coating that’s essential to the traditional recipe.
Print
Crispy Arancini Recipe
- Total Time: 2 hours 52-54 minutes
- Yield: 6 1x
Description
Sicilian crispy arancini invite culinary adventurers into a world of golden rice balls filled with savory treasures. Cheese-laced risotto, breaded and fried to perfection, promises a delightful journey through Italy’s rich street food traditions you won’t want to miss.
Ingredients
Main Ingredients:
- 1 1/2 cups (360 ml) arborio rice
- 1 cup (240 ml) mozzarella cheese, cut into small cubes
- 1 cup (240 ml) grated parmesan cheese
- 4 cups (960 ml) chicken or vegetable broth
Preparation Ingredients:
- 1 small onion, finely chopped
- 2 cloves garlic, minced
- 2 tablespoons (30 ml) unsalted butter
- 2 tablespoons (30 ml) olive oil
- 1 cup (240 ml) white wine
- Salt and pepper to taste
Coating and Frying Ingredients:
- 1 cup (240 ml) all-purpose flour
- 2 large eggs, beaten
- 1 1/2 cups (360 ml) italian-style breadcrumbs
- Vegetable oil, for frying
Instructions
- Prepare a velvety risotto base by gently warming broth in a saucepan over low heat while simultaneously sautéing finely chopped onions and minced garlic in olive oil and butter until translucent and fragrant.
- Introduce Arborio rice to the aromatic mixture, toasting it lightly to enhance its nutty flavor, then deglaze the pan with white wine, allowing it to be absorbed completely.
- Gradually incorporate warm broth, one ladleful at a time, stirring consistently and patiently until the rice transforms into a creamy, luxurious texture, approximately 18-20 minutes.
- Fold in Parmesan cheese, seasoning with salt and pepper, then spread the risotto on a flat surface to cool completely. Refrigerate for at least 2 hours until firm and easily moldable.
- Shape chilled risotto into compact spheres, nestling a cube of mozzarella at the center of each ball, ensuring a molten cheese surprise within.
- Create a three-stage breading station: dust each risotto ball in flour, baptize in beaten eggs, then generously coat with breadcrumbs for maximum crispiness.
- Heat vegetable oil to 350°F (175°C) in a deep skillet or fryer, carefully submerging arancini in small batches and rotating to achieve an even, golden-brown exterior.
- Transfer crispy arancini to a paper towel-lined plate to drain excess oil, allowing them to rest briefly before serving with marinara sauce or preferred accompaniment.
Notes
- Chill risotto thoroughly to ensure firm texture and easier ball formation, preventing crumbling during frying.
- Use cold risotto directly from refrigerator for best structural integrity and easier shaping of arancini.
- Experiment with different cheese fillings like blue cheese, gouda, or fontina for unique flavor variations.
- For gluten-free version, substitute regular breadcrumbs with gluten-free panko or almond flour coating.
- Prep Time: 2 hours 30 minutes
- Cook Time: 22-24 minutes
- Category: Appetizer, Snacks, Dinner
- Method: Frying
- Cuisine: Italian
Nutrition
- Serving Size: 6
- Calories: 485 kcal
- Sugar: 2 g
- Sodium: 320 mg
- Fat: 22 g
- Saturated Fat: 8 g
- Unsaturated Fat: 12 g
- Trans Fat: 0.3 g
- Carbohydrates: 50 g
- Fiber: 2 g
- Protein: 18 g
- Cholesterol: 75 mg
Sarah Mitchell
Content Specialist & Home Cooking Enthusiast
Expertise
Education
Asheville-Buncombe Technical Community College – Asheville, NC
American Fitness Professionals & Associates – Online
Sarah’s passion for food was sparked by weekend trips to the farmers’ market and her belief that healthy meals should never feel boring.
After earning her culinary diploma and becoming a certified Nutrition and Wellness Consultant, she set out to help others fall in love with simple, wholesome cooking.
She’s all about celebrating the small wins in the kitchen: a colorful yogurt bowl, a new twist on a classic dish, or a homemade snack that feels just a little extra special.
Outside the kitchen, Sarah is a gardener at heart, a yoga enthusiast, and a believer that fresh herbs can brighten any meal, and any day.