
Vanilla Custard Slice Recipe for a Sweet Indulgence
Sweet memories often dance around a classic custard slice that brings comfort and joy to many kitchen tables.
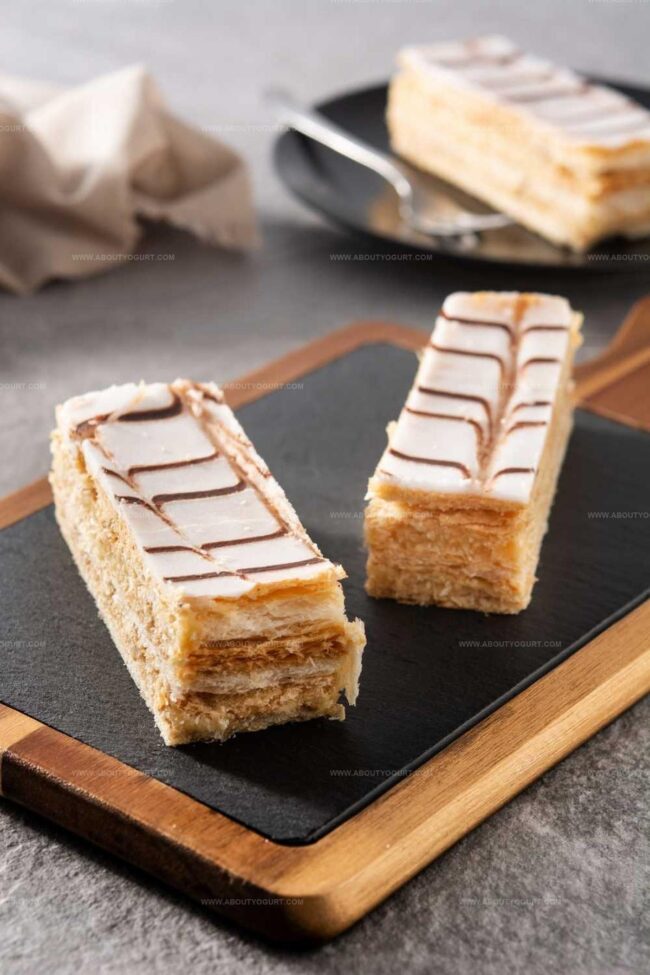
Layers of delicate pastry and smooth, creamy filling create a dessert that feels like a warm hug.
Delightful textures mingle in each perfect bite, promising pure satisfaction.
Crisp, golden puff pastry cradles the silky custard with elegant simplicity.
Butter and vanilla whisper promises of indulgence that will make your taste buds sing.
Simple ingredients come together in a magical transformation that seems almost effortless.
You can totally nail this recipe and impress everyone with your baking skills.
Why Mary Berry Custard Slice Recipe Is A Creamy Classic
What You’ll Need For Mary Berry Custard Slice Recipe
Pastry Base:Custard Filling:Topping and Decoration:How To Make Mary Berry Custard Slice Recipe

Step 1: Prepare Flaky Pastry Dough
Create a tender pastry base by mixing flour and salt in a large bowl. Gently work in the butter using your fingertips, first incorporating a third of the butter, then adding the remaining butter in small chunks. This technique ensures a wonderfully flaky texture.
Step 2: Bring Dough Together
Slowly add cold water to the flour mixture, carefully mixing until a smooth dough forms. The key is to add water sparingly, ensuring the dough comes together without becoming too wet.
Step 3: Create Pastry Layers
Roll the dough into a rectangular shape. Fold the dough in thirds like a letter, creating multiple layers. Chill the dough for 10 minutes to relax the gluten and firm up the butter. Repeat this roll-fold-chill process three more times to develop those signature flaky layers.
Step 4: Whip Up Creamy Custard
Prepare the custard by whisking together:Gently heat milk with vanilla in a separate pan. Slowly pour the warm milk into the egg mixture, whisking constantly to prevent scrambling. Return the mixture to the pan and cook until it thickens to a smooth, creamy consistency.
Step 5: Finish Custard Filling
Stir butter into the warm custard until fully incorporated. Cover and refrigerate to cool completely.
Step 6: Bake Pastry Sheets
Preheat the oven to 220°C (425°F). Line baking trays with parchment paper. Divide the pastry dough in half and roll each piece into a rectangle approximately 20cm long and 5mm thick. Chill briefly before baking.
Bake the pastry sheets until they turn a beautiful golden brown. Allow to cool completely.
Step 7: Assemble Custard Slice
Place one pastry sheet in a lined baking tin. Spread the chilled custard evenly across the pastry. Carefully top with the second pastry sheet.
Step 8: Create Elegant Topping
Mix icing sugar with a small amount of water to create a smooth glaze. Spread evenly over the top pastry layer.
Step 9: Add Decorative Touches
Pipe delicate chocolate lines across the icing. Use a toothpick to create a feathered pattern by dragging it through the lines.
Step 10: Final Chill and Serve
Refrigerate the custard slice until completely set. Slice into elegant portions and serve chilled.
Helpful Tips For Mary Berry Custard Slice Recipe

Tasty Twists On Mary Berry Custard Slice Recipe

Pairing Ideas For Mary Berry Custard Slice Recipe
How To Store Mary Berry Custard Slice Recipe Properly
Mary Berry Custard Slice Recipe FAQs
The repeated folding creates multiple layers of butter and pastry, which results in a flaky, light texture with delicate, crisp layers that give the custard slice its signature buttery, melt-in-your-mouth quality.
The custard is ready when it thickens and coats the back of a spoon, and you can draw a line through it with your finger that holds its shape without running back together immediately.
Use a sharp knife dipped in hot water and wiped clean between each cut to ensure smooth, precise edges without dragging or crushing the delicate pastry layers.
Print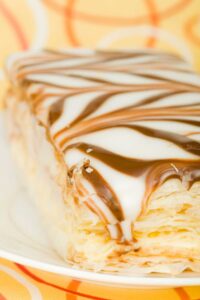
Custard Slice Recipe
- Total Time: 75 mins
- Yield: 8 1x
Description
Mouthwatering custard slice elevates classic dessert with silky layers of creamy goodness. Sweet pastry and velvety custard create a delightful treat you’ll savor down to the last delectable bite.
Ingredients
Main Ingredients (Pastry and Filling):
- 225 grams (8 ounces) plain flour
- 200 grams (7 ounces) butter, chilled and cut into cubes
- 500 milliliters (18 fluid ounces) milk
- 4 egg yolks
- 1 vanilla pod
- 100 grams (3.5 ounces) caster sugar
- 40 grams (1.5 ounces) cornflour
Thickening and Binding Ingredients:
- 12 teaspoons salt
- 140–160 milliliters (5–5.5 fluid ounces) water
- 40 grams (1.5 ounces) butter
Topping and Decoration:
- 200 grams (7 ounces) icing sugar
- 5 teaspoons water
- 50 grams (2 ounces) dark chocolate, melted
Instructions
- Prepare the pastry dough by combining flour and salt, then incorporate butter in two stages – first a third, then the remaining chunks.
- Gradually introduce water to form a cohesive dough, ensuring even hydration.
- Transform the dough into a rectangular shape, executing a precise tri-fold technique, then refrigerate for 10 minutes to relax gluten.
- Repeat the roll-fold-chill process three additional times to develop flaky, layered pastry.
- Create custard base by whisking egg yolks with sugar and cornflour until smooth and pale.
- Gently warm milk with vanilla, then gradually stream into yolk mixture while continuously whisking to prevent curdling.
- Return custard to pan, cooking over medium heat until thickened and coating the back of a spoon, approximately 3-5 minutes.
- Incorporate butter into custard, creating a luxurious texture, then refrigerate to cool completely.
- Preheat oven to 220C (425F), preparing baking trays with parchment paper.
- Divide pastry into two equal portions, rolling each to precise 20cm x 8in x 5mm dimensions, then chill to maintain structure.
- Bake pastry sheets until golden brown and crisp, approximately 15-20 minutes, then allow complete cooling.
- Assemble dessert by positioning first pastry layer in serving tin, spreading custard evenly across surface.
- Carefully place second pastry sheet atop custard, creating a elegant layered presentation.
- Prepare glossy icing by mixing powdered sugar with water until smooth.
- Drizzle icing across top layer, creating an elegant finish.
- Optional: Pipe delicate chocolate lines and feather with toothpick for decorative effect.
- Refrigerate until fully set, then slice into precise portions and serve chilled.
Notes
- Butter Temperature Matters: Keep butter cold and in small chunks for a flakier, more delicate pastry texture that melts in your mouth.
- Gentle Milk Heating: Warm milk slowly and steadily to prevent scorching, ensuring a smooth, silky custard without lumps.
- Pastry Chilling Technique: Frequent chilling between roll and fold stages helps develop those gorgeous, delicate layers that create incredible crispness.
- Gluten-Free Adaptation: Substitute regular flour with a gluten-free blend to make this dessert accessible for those with wheat sensitivities, maintaining similar texture and taste.
- Prep Time: 60 mins
- Cook Time: 15 mins
- Category: Desserts
- Method: Baking
- Cuisine: British
Nutrition
- Serving Size: 8
- Calories: 340
- Sugar: 25 g
- Sodium: 900 mg
- Fat: 22 g
- Saturated Fat: 13 g
- Unsaturated Fat: 7 g
- Trans Fat: 0.3 g
- Carbohydrates: 30 g
- Fiber: 1 g
- Protein: 5 g
- Cholesterol: 115 mg
Michael Thompson
Founder & Recipe Developer
Expertise
Education
Cascade Culinary Institute – Bend, OR
ServSafe Food Handler Certification – Portland, OR
Focus: Certified in core food safety and hygiene principles for both home and professional kitchens, with emphasis on ingredient handling, kitchen cleanliness, and safe preparation methods.
Mike’s kitchen journey began with a single goal: to make everyday meals feel like something worth celebrating.
After earning his Certificate in Culinary Arts from Cascade Culinary Institute, he spent years working with local farmers and small kitchens across Oregon, learning the beauty of seasonal, small-batch cooking.
Mike’s approach is simple, cook with what’s fresh, keep it approachable, and always leave room for a little creativity. When he’s not testing yogurt marinades or designing single-serving meals, you’ll find him hiking trails or hunting down the best berries at local markets.