
Cool Whip Candy Recipe for Easy Sweet Tooth Fix
Sweet dreams meet reality with this cool whip candy recipe that melts hearts faster than chocolate drops.
Creamy textures dance alongside simple ingredients waiting to surprise you.
Every kitchen novice can master these delightful treats without complicated techniques.
Minimal effort produces maximum happiness when mixing just a few pantry staples.
Chocolate chips and cool whip become magical partners in this quick dessert adventure.
Unexpected combinations spark joy and create memories around your kitchen counter.
Prepare to dazzle everyone with a confection that sounds complex but comes together in minutes.
Why Easy Cool Whip Candy Is A Quick Treat
Ingredients For Easy Cool Whip Candy
Main Ingredients:Coloring and Decoration:Preparation Ingredients:How To Prepare Easy Cool Whip Candy
Step 1: Whip Up the Base
Grab a mixing bowl and toss in thawed Cool Whip, instant pudding mix, powdered sugar, and vanilla extract. Blend everything together using a hand mixer or your trusty spoon until the mixture becomes thick, smooth, and super creamy.
Step 2: Add a Splash of Color
Want to make your candy pop? Drop in a few food coloring drops and swirl until the color spreads evenly throughout the mixture.
Step 3: Prepare Your Canvas
Line a baking sheet or large tray with parchment paper or wax paper. This prevents your sweet treats from sticking and makes cleanup a breeze.
Step 4: Shape Your Treats
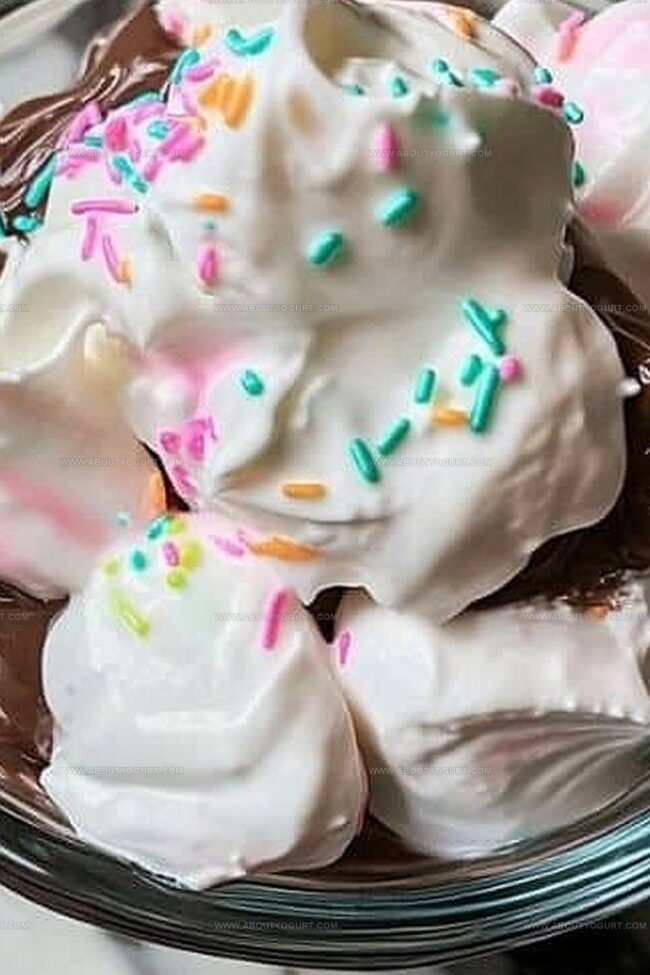
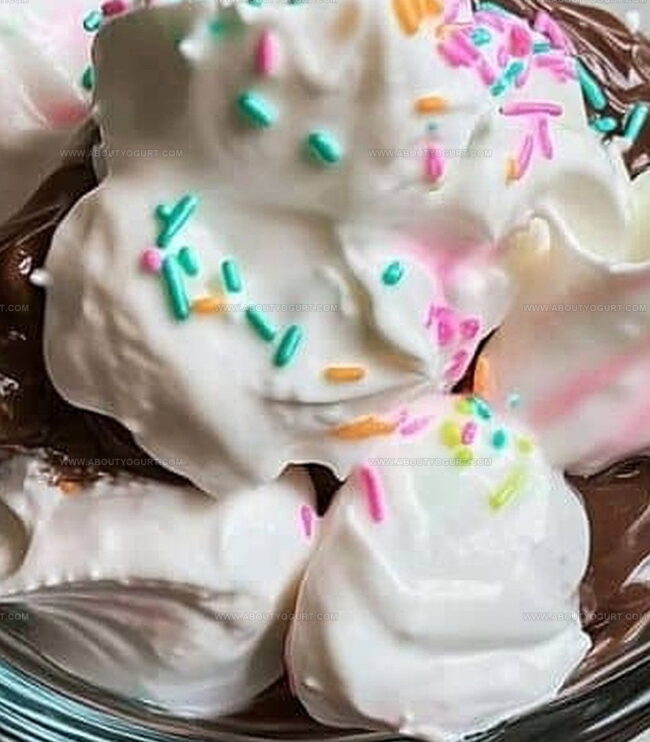
Grab a spoon or cookie scoop and start dropping small dollops of the Cool Whip mixture onto the prepared surface. Get creative with the shapes and sizes – there are no rules here!
Step 5: Sprinkle Some Fun
Feeling fancy? Scatter sprinkles or colored sugar on top of each candy portion for an extra touch of excitement.
Step 6: Freeze and Transform
Slide the tray into the freezer and let the magic happen. Give your candies about 2-3 hours to firm up completely.
Step 7: Indulge and Store
Once the candies are solid and frosty, pull them out and enjoy! Stash any leftovers in an airtight container in the freezer to keep them perfectly preserved.
Pro Tips For Easy Cool Whip Candy
Variations To Enjoy With Easy Cool Whip Candy
Pairing Suggestions For Easy Cool Whip Candy
Storage Advice For Easy Cool Whip Candy
FAQs On Easy Cool Whip Candy
While homemade whipped cream can work, Cool Whip provides better stability and prevents the candy from melting quickly during freezing.
Vanilla, chocolate, and strawberry pudding mixes are popular choices that create delicious and distinct candy flavors. Experiment with different flavors to find your favorite.
The candies can be stored in an airtight container in the freezer for up to 2 weeks without losing their texture or taste quality.
Absolutely! Kids can help mix ingredients, add colors, and decorate with sprinkles, making it a fun and easy dessert activity for the whole family.
Print
Easy Cool Whip Candy Recipe
- Total Time: 2 hours 10 minutes to 3 hours 10 minutes
- Yield: 24 1x
Description
Cool Whip Candy delivers a creamy, cloud-like dessert that melts in your mouth with pure simplicity. Sweet dreams come true when you indulge in this quick and delightful treat that brings instant happiness to any gathering.
Ingredients
Main Ingredients:
- 1 cup powdered sugar
- 1 container (8 ounces / 226 grams) Cool Whip, thawed
- 1 package (3.4 ounces / 96 grams) instant pudding mix (any flavor)
Flavoring and Optional Ingredients:
- 1 teaspoon vanilla extract
Decoration Ingredients:
- Food coloring (optional)
- Sprinkles or colored sugar (optional)
Instructions
- In a large mixing bowl, whip together thawed Cool Whip, instant pudding mix, powdered sugar, and vanilla extract until the mixture becomes smooth and luxurious, using a hand mixer or vigorous stirring.
- Enhance the visual appeal by incorporating a few drops of food coloring, ensuring even distribution throughout the creamy base.
- Prepare a baking sheet by carefully lining it with parchment paper, creating a non-stick surface for your sweet treats.
- Utilize a spoon or cookie scoop to delicately portion the whipped mixture onto the prepared sheet, crafting bite-sized morsels with gentle, consistent shaping.
- Optional: Sprinkle decorative elements like colorful sugar crystals or festive sprinkles atop each candy piece for added texture and visual excitement.
- Transfer the baking sheet to the freezer, allowing the candies to solidify for approximately 2-3 hours until they reach a firm, ice-crystal-like consistency.
- Once completely frozen, extract the candies from the freezer and indulge immediately. For future enjoyment, preserve in an airtight freezer container to maintain their delicate texture and prevent freezer burn.
Notes
- Whip the mixture thoroughly to ensure a smooth, creamy texture without lumps.
- Choose pudding flavors strategically to create unique taste combinations like chocolate, vanilla, or strawberry.
- Experiment with different decorative toppings such as crushed nuts, mini chocolate chips, or coconut flakes for added crunch and visual appeal.
- For dietary modifications, use sugar-free pudding mix and low-fat Cool Whip to reduce calories and create a lighter version of the treat.
- Prep Time: 10 minutes
- Cook Time: 2-3 hours (freezing)
- Category: Desserts, Snacks
- Method: Freezing
- Cuisine: American
Nutrition
- Serving Size: 24
- Calories: 108
- Sugar: 16 g
- Sodium: 65 mg
- Fat: 3 g
- Saturated Fat: 2 g
- Unsaturated Fat: 1 g
- Trans Fat: 0 g
- Carbohydrates: 19 g
- Fiber: 0 g
- Protein: 1 g
- Cholesterol: 5 mg
Michael Thompson
Founder & Recipe Developer
Expertise
Education
Cascade Culinary Institute – Bend, OR
ServSafe Food Handler Certification – Portland, OR
Focus: Certified in core food safety and hygiene principles for both home and professional kitchens, with emphasis on ingredient handling, kitchen cleanliness, and safe preparation methods.
Mike’s kitchen journey began with a single goal: to make everyday meals feel like something worth celebrating.
After earning his Certificate in Culinary Arts from Cascade Culinary Institute, he spent years working with local farmers and small kitchens across Oregon, learning the beauty of seasonal, small-batch cooking.
Mike’s approach is simple, cook with what’s fresh, keep it approachable, and always leave room for a little creativity. When he’s not testing yogurt marinades or designing single-serving meals, you’ll find him hiking trails or hunting down the best berries at local markets.