Perfect Garlic Butter Lobster Tails Recipe to Enjoy
Succulent garlic butter lobster tails bring restaurant-quality elegance right to your kitchen.
Fresh seafood enthusiasts appreciate how simple gourmet cooking can be.
Each tender morsel promises incredible flavor without complicated techniques.
Melted butter infused with aromatic garlic creates a rich, luxurious coating that perfectly complements delicate lobster meat.
Professional chefs know these classic ingredients turn ordinary meals into spectacular dining experiences.
Minimal preparation meets maximum deliciousness when you master this straightforward recipe.
Prepare to impress everyone at your next special dinner.
What Makes Garlic Butter Lobster Tails So Luxurious
Ingredients for Garlic Butter Lobster Tails
Main Ingredients:Flavor Enhancers:Seasoning and Garnish:How to Prepare Garlic Butter Lobster Tails
Step 1: Fire Up The Broiler
Turn on your oven’s broiler to high heat, creating the perfect cooking environment for succulent lobster tails.
Step 2: Precise Shell Cutting
Grab your kitchen shears and carefully slice down the center of the lobster shell’s top, following the natural line from top to bottom.
Step 3: Gracefully Release The Meat
Gently separate the shell, using your fingers to delicately lift the lobster meat upward while keeping the tail base connected, creating a beautiful butterfly presentation.
Step 4: Prepare The Baking Surface
Place the prepared lobster tails on a clean baking sheet, ensuring they are evenly spaced and ready for cooking.
Step 5: Create Magical Garlic Butter
In a small saucepan, transform your butter into a luxurious sauce by melting it over medium heat.
Step 6: Infuse With Flavor
Add these ingredients to your melted butter:Stir the mixture and cook for 1-2 minutes, allowing the garlic to release its aromatic essence.
Step 7: Lavish The Lobster
Using a basting brush, generously coat the exposed lobster meat with the fragrant garlic butter mixture, ensuring every crevice is covered.
Step 8: Broil To Perfection
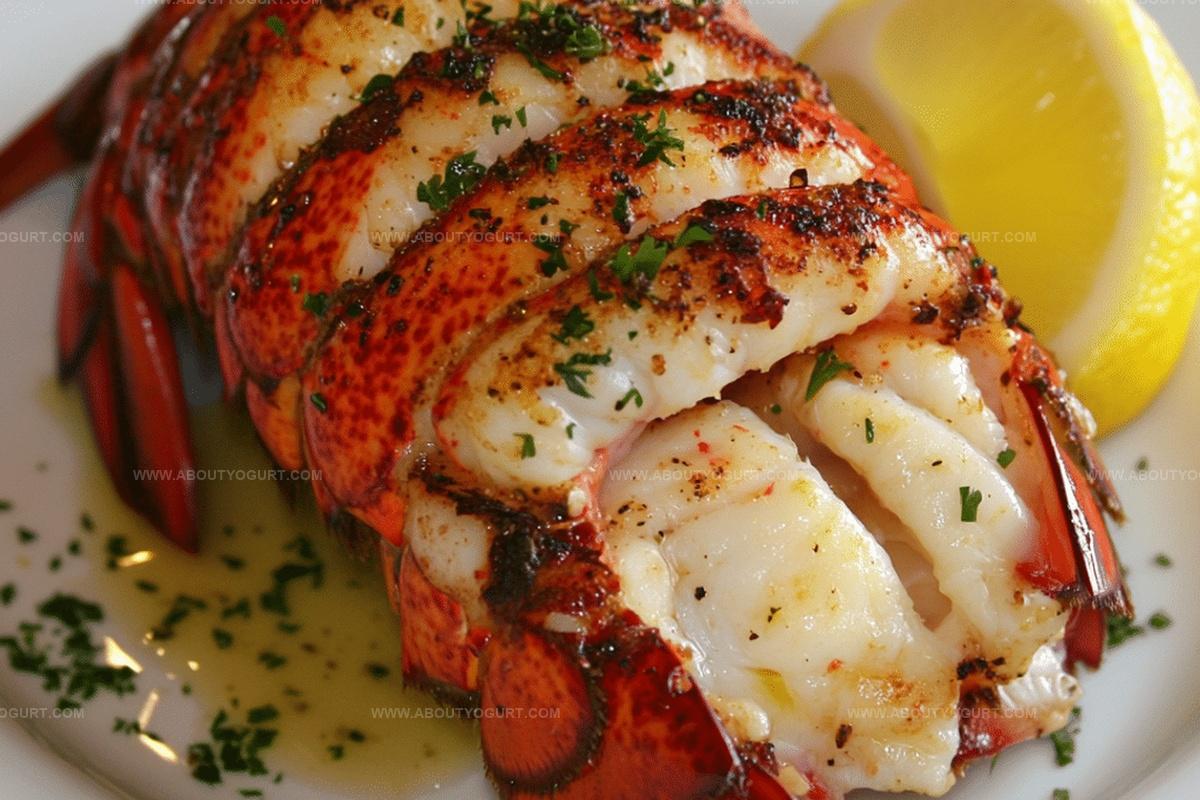
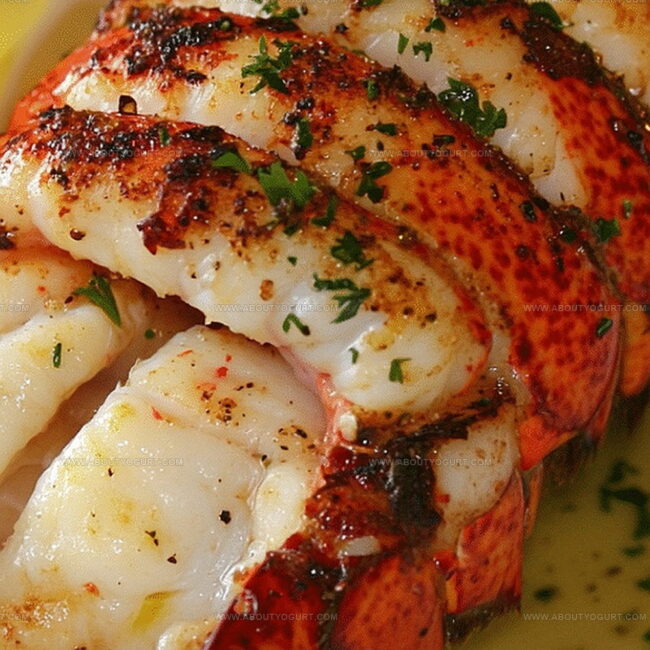
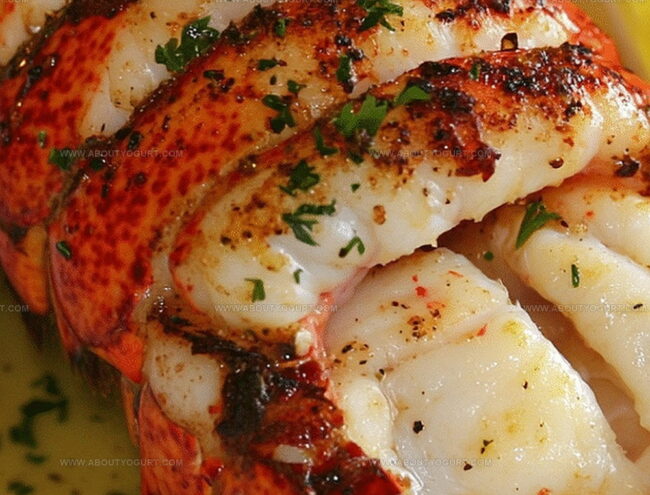
Slide the baking sheet into the broiler and cook for 10-12 minutes. Watch carefully as the lobster meat turns opaque and develops a beautiful golden color.
Step 9: Final Flourish
Sprinkle freshly chopped parsley over the lobster tails, adding a pop of color and fresh herbaceous flavor before serving.
Pro Tips for Lobster Tail Perfection
Variations to Enhance Garlic Butter Lobster Tails
Pairing Ideas for Garlic Butter Lobster Tails
Storage Tips for Lobster Tails
FAQs on Garlic Butter Lobster Tails
The lobster meat should turn opaque white and look firm, not translucent. The internal temperature should reach 140-145°F for perfect doneness.
Yes, thaw frozen lobster tails completely in the refrigerator overnight before preparing. Pat them dry with paper towels to remove excess moisture before cooking.
Use unsalted butter for better control of salt levels. High-quality butter like European-style or grass-fed butter will enhance the overall flavor of the garlic butter sauce.
Print
Garlic Butter Lobster Tails Recipe
- Total Time: 22 minutes
- Yield: 4 1x
Description
Succulent garlic butter lobster tails elevate seafood dining with Mediterranean charm. Luxurious flavors meld perfectly, promising an unforgettable culinary experience you’ll savor to the last delectable bite.
Ingredients
Main Protein:
- 4 lobster tails
Dairy and Butter:
- 1/2 cup (120 milliliters) butter
Seasoning and Herbs:
- 4 cloves garlic, minced
- 1 tablespoon (15 milliliters) fresh lemon juice
- Salt to taste
- Black pepper to taste
- Fresh parsley, chopped for garnish
Instructions
- Position the oven rack 6 inches from the broiler and activate the high-heat setting.
- Using sharp kitchen shears, carefully slice the lobster shell down the center, stopping at the tail base.
- Delicately separate the shell, gently lifting the meat upward while keeping the end connection intact.
- Arrange lobster tails on a rimmed metal baking sheet with the meat exposed.
- Melt butter in a small saucepan over medium temperature, allowing it to become smooth and liquid.
- Introduce finely chopped garlic into the melted butter, sautéing for approximately 60-90 seconds until fragrant.
- Incorporate freshly squeezed lemon juice, kosher salt, and cracked black pepper into the garlic butter, then remove from heat.
- Generously coat the exposed lobster meat with the aromatic garlic butter mixture using a culinary brush.
- Transfer the prepared lobster tails to the preheated broiler, cooking for 10-12 minutes until the meat transforms to a pearly white color and appears firm.
- Sprinkle finely chopped fresh parsley across the surface immediately before presenting the dish.
Notes
- Ensure lobster tails are fully thawed before cooking to guarantee even heating and prevent rubbery texture.
- Butterfly the lobster shells carefully to create an elegant presentation that allows garlic butter to penetrate the meat.
- Adjust broiling time based on tail size – smaller tails need less time to prevent overcooking and maintain delicate, tender meat.
- For a low-carb or keto-friendly version, replace butter with ghee and add extra herbs like dill or chives for enhanced flavor profile.
- Prep Time: 10 minutes
- Cook Time: 12 minutes
- Category: Dinner
- Method: Broiling
- Cuisine: American
Nutrition
- Serving Size: 4
- Calories: 233 kcal
- Sugar: 0.2 g
- Sodium: 210 mg
- Fat: 23 g
- Saturated Fat: 14 g
- Unsaturated Fat: 7 g
- Trans Fat: 0.1 g
- Carbohydrates: 1 g
- Fiber: 0.1 g
- Protein: 16 g
- Cholesterol: 140 mg
Michael Thompson
Founder & Recipe Developer
Expertise
Education
Cascade Culinary Institute – Bend, OR
ServSafe Food Handler Certification – Portland, OR
Focus: Certified in core food safety and hygiene principles for both home and professional kitchens, with emphasis on ingredient handling, kitchen cleanliness, and safe preparation methods.
Mike’s kitchen journey began with a single goal: to make everyday meals feel like something worth celebrating.
After earning his Certificate in Culinary Arts from Cascade Culinary Institute, he spent years working with local farmers and small kitchens across Oregon, learning the beauty of seasonal, small-batch cooking.
Mike’s approach is simple, cook with what’s fresh, keep it approachable, and always leave room for a little creativity. When he’s not testing yogurt marinades or designing single-serving meals, you’ll find him hiking trails or hunting down the best berries at local markets.