
Fluffy Gluten-Free Sponge Cake Recipe for Cloud-Like Desserts
Crafting a delightful gluten-free sponge cake brings pure joy to baking enthusiasts seeking lighter, airy desserts.
Soft and tender textures emerge from carefully selected ingredients that dance together harmoniously.
Wheat-free baking requires precision and understanding of alternative flour properties.
Delicate crumbs melt in your mouth, promising a sensational treat that rivals traditional recipes.
Swapping standard wheat flour for gluten-free alternatives opens exciting culinary possibilities.
Whisking egg whites to perfect peaks creates incredible lift and volume.
You’ll adore how simple techniques can produce such magnificent results that everyone can savor and enjoy.
Why Mary Berry Gluten-Free Sponge Cake Works For Everyone

Ingredients In Mary Berry Gluten-Free Sponge Cake
Cake Base:Dry Ingredients:Finishing Ingredients:Steps For Making Mary Berry Gluten-Free Sponge Cake

Step 1: Prepare Baking Equipment
Grab two round cake pans and line them with parchment paper. Set your oven to warm up at 190C (170C Fan) or Gas mark 5.
Step 2: Whip Up Fluffy Base
Grab a mixing bowl and combine:Whisk these ingredients together vigorously for about 5 minutes until the mixture becomes light, airy, and transforms into a pale, creamy texture.
Step 3: Create Smooth Cake Batter
Gently fold in:Mix carefully to keep the air bubbles intact, creating a silky smooth consistency.
Step 4: Fill Cake Pans
Divide the batter evenly between the prepared pans. Use a spatula to smooth the tops, ensuring an even surface for perfect baking.
Step 5: Bake to Golden Perfection
Place the pans in the preheated oven. Bake for 20-22 minutes until the cakes turn a beautiful golden color and spring back when lightly touched.
Step 6: Cool and Rest
Remove the cakes from the oven. Let them rest in the pans for 10-15 minutes to settle. Carefully transfer to a wire rack to cool completely.
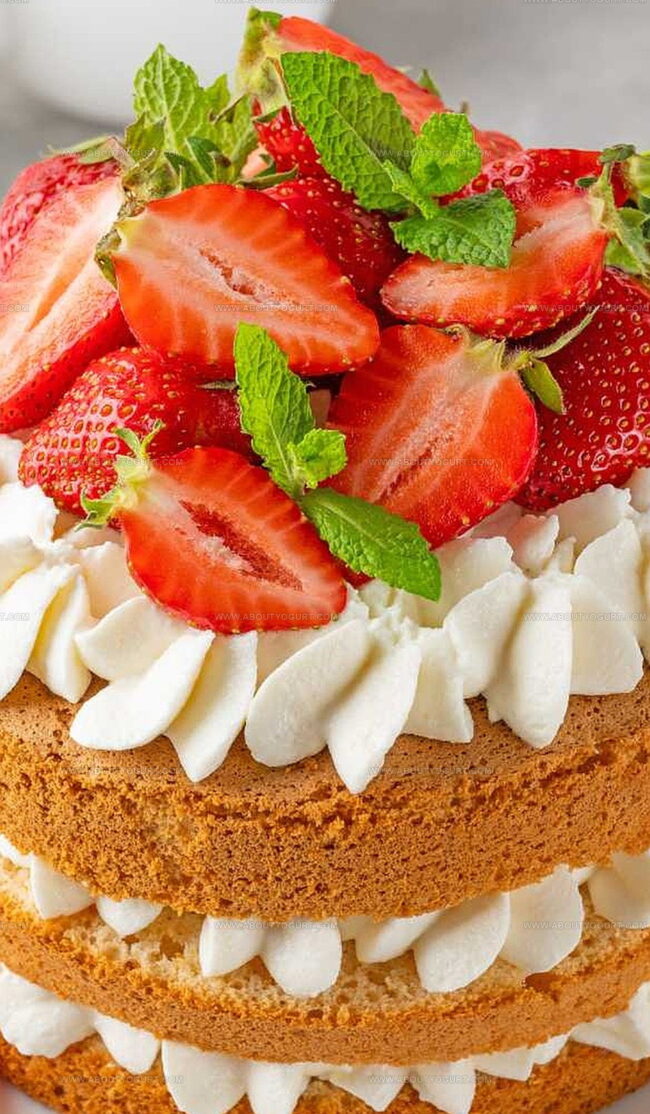
Step 7: Assemble Delightful Cake
Spread a generous layer of jam on one cake layer. Carefully place the second layer on top, creating a classic sandwich-style cake.
Step 8: Finish with Flourish
Dust the top with a light sprinkle of powdered sugar. Slice and serve this delightful gluten-free treat to eager guests.
Tips That Help With Mary Berry Gluten-Free Sponge Cake

Twists You Can Try On Mary Berry Gluten-Free Sponge Cake
Best Pairings With Mary Berry Gluten-Free Sponge Cake
How To Store Mary Berry Gluten-Free Sponge Cake Properly
FAQ About Mary Berry Gluten-Free Sponge Cake
No, this is a specific gluten-free recipe. Using regular flour will change the texture and make it unsuitable for those with gluten sensitivities.
Check the cake when it turns golden and springs back when lightly touched. If a toothpick inserted comes out clean, it’s ready.
Any seedless jam like strawberry or raspberry works wonderfully. Choose a flavor you enjoy that complements the light sponge cake.
Yes, you can bake the sponge layers a day in advance. Keep them wrapped at room temperature and assemble just before serving for the freshest taste.
Print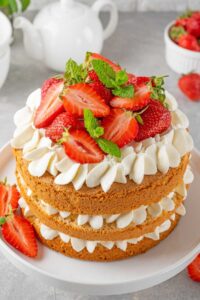
Gluten-Free Sponge Cake Recipe
- Total Time: 32 minutes
- Yield: 8 1x
Description
Sweet aromas of Italian baking fill kitchens with this delightful gluten-free sponge cake, blending delicate textures and rich flavors. Delicate crumbs and elegant simplicity invite dessert enthusiasts to savor each light, airy bite.
Ingredients
Main Ingredients:
- 4 free-range eggs
- 225 grams (8 ounces) butter, cubed and well-softened
- 225 grams (8 ounces) caster sugar
- 250 grams (9 ounces) gluten-free white self-raising flour
Dry Ingredients and Leavening Agents:
- 1 teaspoon gluten-free baking powder
Additional Ingredients:
- 1 teaspoon vanilla extract
- 125 grams (4.5 ounces) jam (raspberry, strawberry and blackcurrant all work well)
- 1 tablespoon icing sugar, sifted
Instructions
- Prepare baking space by positioning oven rack in center and heating to 190°C (170°C fan). Carefully line two 20cm sandwich tins with parchment paper.
- In a large mixing bowl, vigorously whisk sugar, eggs, and vanilla extract for approximately 5 minutes until mixture transforms into a pale, voluminous, and thick consistency.
- Gently fold butter, gluten-free flour, and baking powder into egg mixture, stirring minimally to maintain air bubbles and create a smooth, uniform batter.
- Evenly distribute batter between prepared sandwich tins, using a spatula to level and smooth surfaces.
- Transfer tins to preheated oven and bake for 20-22 minutes, watching for golden-brown coloration and a springy texture when lightly touched.
- Remove cakes from oven and allow to rest in tins for 10-15 minutes, enabling gentle cooling and preventing potential structural collapse.
- Carefully transfer sponge cakes onto wire cooling rack, peeling away parchment paper.
- Once completely cooled, spread a generous layer of jam across one sponge layer, then delicately position second sponge on top.
- Finish by dusting top with a light, even coating of icing sugar just before serving.
Notes
- Choose a gluten-free flour blend specifically designed for baking to ensure the best texture and rise for your sponge cake.
- Whip eggs and sugar thoroughly to create maximum volume, which helps compensate for the lack of gluten’s natural binding properties.
- Room temperature ingredients are crucial for achieving a light, airy gluten-free sponge cake that doesn’t become dense or heavy.
- Consider adding a small amount of xanthan gum to improve the cake’s structure and prevent crumbling, especially important in gluten-free baking.
- Prep Time: 10 minutes
- Cook Time: 22 minutes
- Category: Desserts
- Method: Baking
- Cuisine: Western
Nutrition
- Serving Size: 8
- Calories: 374 kcal
- Sugar: 33 g
- Sodium: 121 mg
- Fat: 20 g
- Saturated Fat: 12 g
- Unsaturated Fat: 8 g
- Trans Fat: 0.2 g
- Carbohydrates: 39 g
- Fiber: 1.5 g
- Protein: 4.5 g
- Cholesterol: 93 mg
Michael Thompson
Founder & Recipe Developer
Expertise
Education
Cascade Culinary Institute – Bend, OR
ServSafe Food Handler Certification – Portland, OR
Focus: Certified in core food safety and hygiene principles for both home and professional kitchens, with emphasis on ingredient handling, kitchen cleanliness, and safe preparation methods.
Mike’s kitchen journey began with a single goal: to make everyday meals feel like something worth celebrating.
After earning his Certificate in Culinary Arts from Cascade Culinary Institute, he spent years working with local farmers and small kitchens across Oregon, learning the beauty of seasonal, small-batch cooking.
Mike’s approach is simple, cook with what’s fresh, keep it approachable, and always leave room for a little creativity. When he’s not testing yogurt marinades or designing single-serving meals, you’ll find him hiking trails or hunting down the best berries at local markets.