
Grandma’s Chocolate Pie Recipe to Make Today
Crafting this delectable grandmas chocolate pie recipe brings back memories of cozy kitchen moments.
Sweet aromas would drift through her welcoming home, filling every corner with warmth.
Generations of love baked into each carefully measured ingredient tell a story beyond simple dessert making.
Chocolate’s rich depth promises comfort and connection with every delightful slice.
Memories of shared laughter and tender conversations emerge from each creamy bite.
Soft whispers of tradition blend seamlessly with pure culinary joy.
Why Grandma’s Chocolate Pie Is a Classic Favorite
Components Needed for Grandma’s Chocolate Pie
Pie Crust Ingredients:Chocolate Filling Ingredients:Whipped Cream Topping Ingredients:How to Make Grandma’s Chocolate Pie
Step 1: Warm Up the Oven
Preheat your oven to 375F (190C). Grab a 9-inch pie dish and give it a light coating of grease to prevent sticking.
Step 2: Craft the Buttery Crust
Mix together:Cut cold butter into the dry ingredients until the mixture looks like rough pebbles. Slowly add ice water, gently stirring until the dough holds together smoothly.
Step 3: Shape and Bake the Crust
Dust your work surface with flour. Roll out the dough and carefully transfer it to the pie dish. Trim the edges and create a decorative crimp. Poke holes in the bottom with a fork. Slide into the oven and bake until the crust turns a beautiful golden brown, about 15-20 minutes. Let the crust cool completely.
Step 4: Whip Up Chocolate Magic
In a saucepan, combine:Slowly pour in milk, whisking until completely smooth. Cook over medium heat, stirring constantly, until the mixture thickens and bubbles appear.
Step 5: Blend in Creamy Egg Yolks
Whisk egg yolks in a separate bowl. Slowly stream about 1/2 cup of the hot chocolate mixture into the yolks, stirring constantly. Pour the tempered yolks back into the saucepan. Cook for an additional 2 minutes, whisking continuously. Remove from heat and stir in butter and vanilla extract.
Step 6: Fill the Waiting Crust
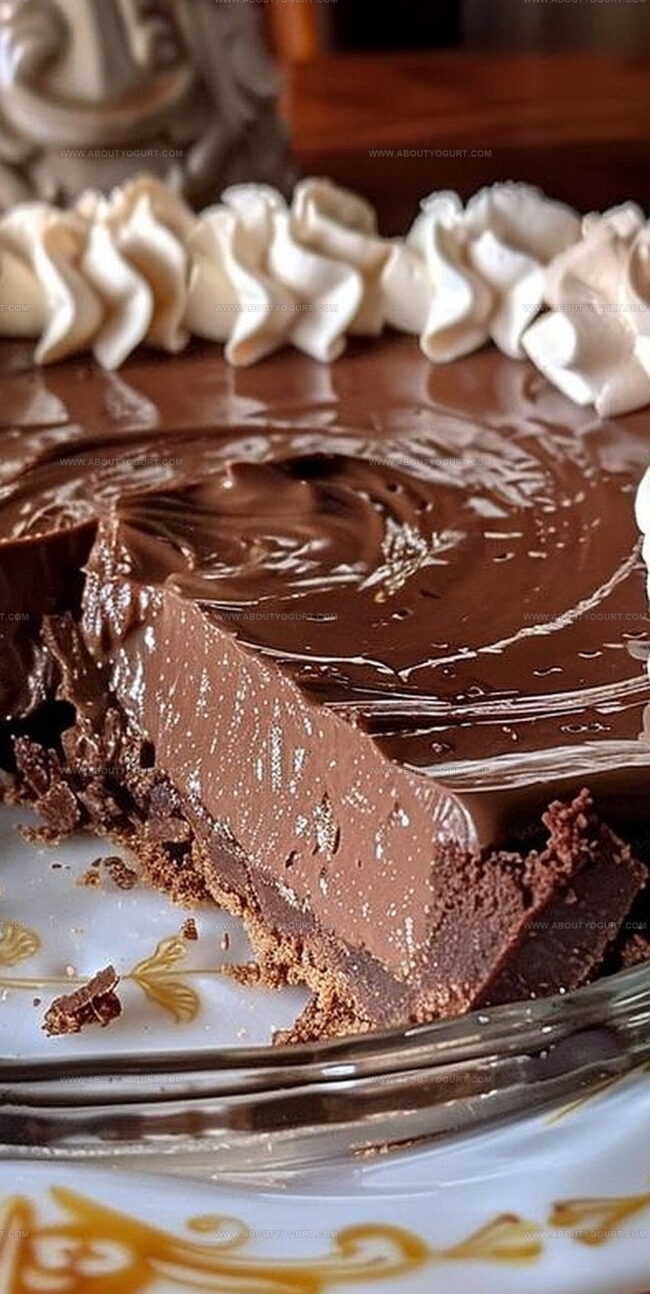
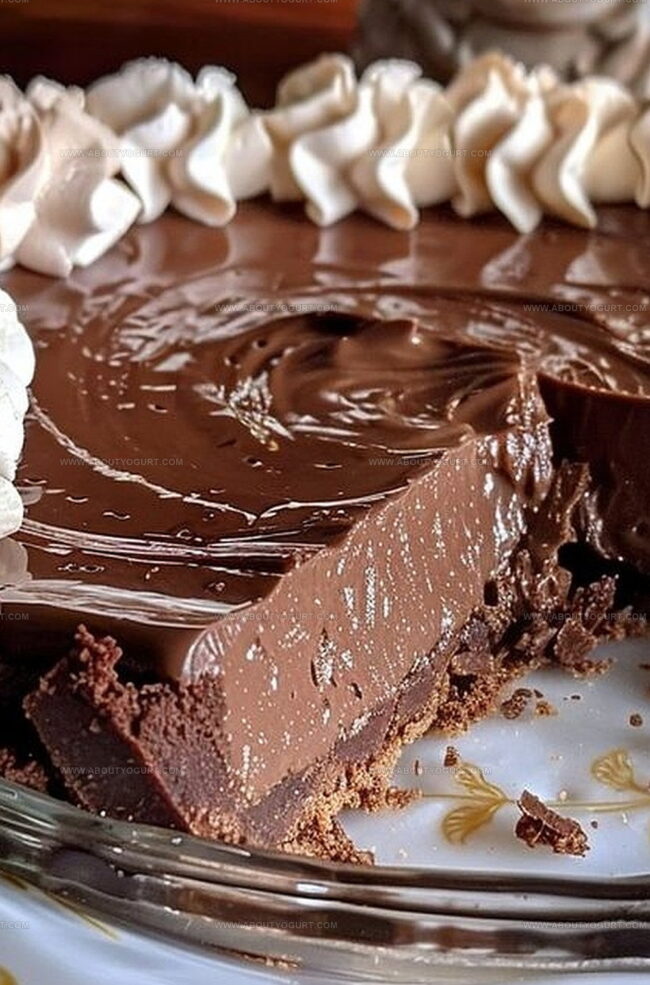
Gently pour the rich chocolate filling into the cooled pie crust.
Step 7: Crown with Fluffy Cream
In a chilled bowl, whip together:Beat until soft peaks form. Spread or pipe the cloud-like cream over the chocolate filling.
Step 8: Chill and Anticipate
Refrigerate the pie for at least 4 hours. This allows the filling to set and the flavors to meld together perfectly.
Pro Tips for Grandma’s Chocolate Pie
Variations to Experiment With Grandma’s Chocolate Pie
Pairing Suggestions for Grandma’s Chocolate Pie
Storage Recommendations for Grandma’s Chocolate Pie
FAQs About Grandma’s Chocolate Pie
The cold butter and minimal handling create a tender, flaky crust. Cutting cold butter into the flour and using just enough ice water prevents gluten development, resulting in a light, crisp texture.
Yes, dark cocoa powder works perfectly and will give the pie a richer, more intense chocolate flavor. Just use the same measurement as regular cocoa powder.
Whisk constantly while cooking and gradually add milk to the dry ingredients. Tempering the egg yolks by slowly adding hot chocolate mixture prevents scrambling and ensures a smooth, creamy filling.
Print
Grandmas Chocolate Pie Recipe
- Total Time: 4 hours 52 minutes
- Yield: 8 1x
Description
Grandma’s chocolate pie whisks you into a nostalgic journey of sweet comfort and family tradition. Rich chocolate filling nestled in a buttery crust promises pure dessert bliss you’ll savor with every delightful bite.
Ingredients
Main Ingredients (Pie Crust):
- 1 1/2 cups (360 ml) all-purpose flour
- 1/2 cup (113 g) unsalted butter, cold and cut into pieces
- 1/4 cup (50 g) granulated sugar
- 1/4 teaspoon (1.5 ml) salt
Liquid Ingredient:
- 23 tablespoons (340 ml) ice water
Instructions
- Prepare the pie crust by combining flour, sugar, and salt in a mixing bowl. Cut cold butter into the dry ingredients until the texture resembles coarse meal. Gradually introduce ice water, mixing until the dough forms a cohesive ball.
- Roll out the dough on a lightly floured surface and carefully transfer to a 9-inch pie dish. Trim excess edges and create a decorative crimp around the rim. Pierce the bottom with a fork to prevent bubbling.
- Bake the crust at 375°F (190°C) for 15-20 minutes until achieving a golden-brown color. Allow the crust to cool completely before filling.
- Create the chocolate filling by whisking sugar, cocoa powder, cornstarch, and salt in a saucepan. Slowly incorporate milk, stirring until the mixture becomes smooth and uniform.
- Cook the chocolate mixture over medium heat, continuously whisking to prevent scorching. Continue until the mixture thickens and begins to bubble, then remove from heat.
- Temper egg yolks by gradually introducing a portion of the hot chocolate mixture, stirring constantly to prevent curdling. Return the combined mixture to the saucepan and cook for an additional 2 minutes.
- Remove from heat and fold in butter and vanilla extract until fully incorporated. Pour the silky chocolate filling into the cooled pie crust.
- Prepare the whipped cream topping by beating heavy cream with powdered sugar and vanilla in a chilled bowl until soft peaks form. Generously spread or pipe the whipped cream over the chocolate filling.
- Refrigerate the pie for a minimum of 4 hours to set and develop rich flavors. Serve chilled for optimal taste and texture.
Notes
- Use room temperature ingredients to ensure smooth, creamy filling and consistent texture throughout the pie.
- Sift cocoa powder and cornstarch to prevent lumps and create silky-smooth chocolate filling.
- For a gluten-free version, substitute regular flour with almond or gluten-free flour blend in the pie crust.
- Chill mixing bowls and whisk before making whipped cream to help it stabilize and form perfect peaks faster.
- Prep Time: 30 minutes
- Cook Time: 22 minutes
- Category: Desserts
- Method: Baking
- Cuisine: American
Nutrition
- Serving Size: 8
- Calories: 97 kcal
- Sugar: 1 g
- Sodium: 40 mg
- Fat: 5 g
- Saturated Fat: 3 g
- Unsaturated Fat: 2 g
- Trans Fat: 0 g
- Carbohydrates: 12 g
- Fiber: 0.4 g
- Protein: 1.3 g
- Cholesterol: 13 mg
Michael Thompson
Founder & Recipe Developer
Expertise
Education
Cascade Culinary Institute – Bend, OR
ServSafe Food Handler Certification – Portland, OR
Focus: Certified in core food safety and hygiene principles for both home and professional kitchens, with emphasis on ingredient handling, kitchen cleanliness, and safe preparation methods.
Mike’s kitchen journey began with a single goal: to make everyday meals feel like something worth celebrating.
After earning his Certificate in Culinary Arts from Cascade Culinary Institute, he spent years working with local farmers and small kitchens across Oregon, learning the beauty of seasonal, small-batch cooking.
Mike’s approach is simple, cook with what’s fresh, keep it approachable, and always leave room for a little creativity. When he’s not testing yogurt marinades or designing single-serving meals, you’ll find him hiking trails or hunting down the best berries at local markets.