
Lemon Meringue Pie Recipe with Sweet Buttery Layers
Crafting a delectable lemon meringue pie from scratch feels like unlocking a culinary secret that promises pure delight.
Sweet-tart citrus notes dance across a buttery crust, creating a symphony of flavors.
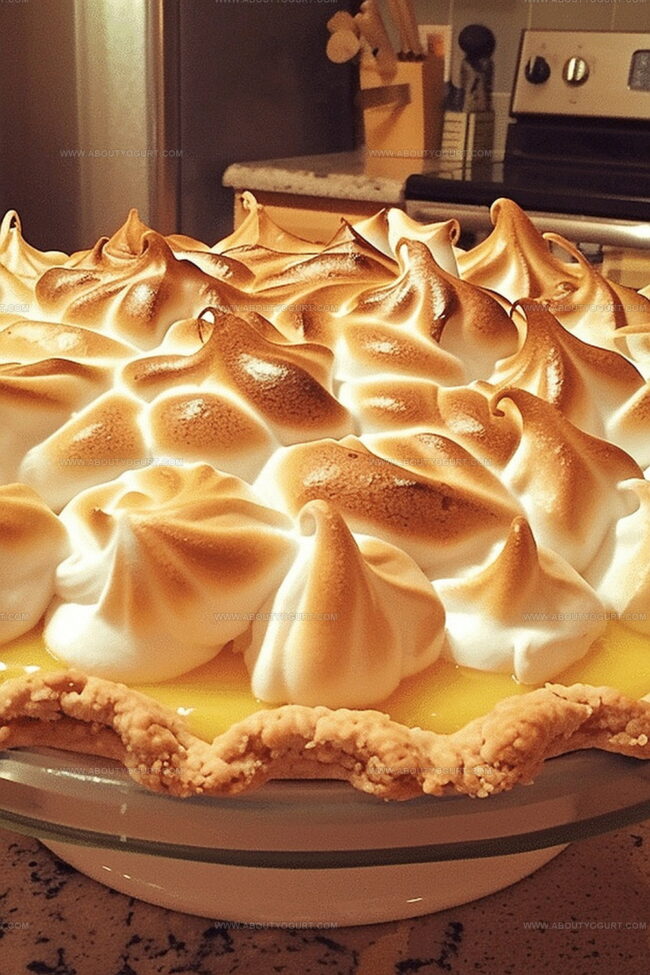
Delicate meringue peaks promise a cloudlike texture that melts effortlessly on your tongue.
Baking this classic dessert connects you to generations of home cooks who cherished simple, remarkable recipes.
Perfectly balanced ingredients turn an ordinary afternoon into a memorable moment of indulgence.
Whisked egg whites and fresh lemons become your canvas for a dessert that sparkles with homemade charm.
Dive into this recipe, and you’ll transform basic ingredients into a showstopping treat that will have everyone asking for seconds.
What Makes Homemade Lemon Meringue Pie So Popular
Ingredients for Homemade Lemon Meringue Pie
Pie Crust Base:Lemon Filling Ingredients:Meringue Topping:How to Prepare Homemade Lemon Meringue Pie
Step 1: Create Tangy Lemon Filling
Grab a medium saucepan and combine these flavor-packed ingredients:Slowly pour in water, fresh lemon juice, and fragrant lemon zest. Whisk everything until the mixture looks smooth and silky. Cook over medium heat, stirring constantly, until the mixture bubbles and thickens like a luxurious custard.
Step 2: Temper The Egg Yolks
Pull the pan off the heat. In a separate bowl, gently beat egg yolks. Carefully add about half a cup of the hot lemon mixture to the eggs, stirring continuously. This prevents the eggs from scrambling and creates a velvety texture.
Step 3: Complete The Lemon Filling
Return the tempered egg mixture to the saucepan. Cook for another two minutes, stirring constantly. Remove from heat and fold in butter until it melts completely and blends seamlessly into the filling.
Step 4: Prepare The Pie Crust
Pour the luscious lemon filling into a pre-baked pie crust. Let it cool slightly while you craft the cloud-like meringue topping.
Step 5: Craft Fluffy Meringue
Preheat the oven to 350°F. In a pristine mixing bowl, beat egg whites and cream of tartar on high speed. Watch as soft peaks begin to form. Gradually sprinkle in sugar, one tablespoon at a time. Keep beating until the meringue forms stiff, glossy peaks that hold their shape.
Step 6: Top And Bake
Spread the billowy meringue evenly over the lemon filling. Make sure to seal the edges against the crust to prevent any shrinking. Bake for 12-15 minutes until the meringue turns a beautiful golden brown.
Step 7: Cool And Serve
Let the pie cool on a wire rack for one hour. Refrigerate for at least three hours to set perfectly. Slice and serve this stunning dessert that balances sweet, tangy, and creamy flavors in every single bite.
Expert Tips for Lemon Meringue Pie Success

Variations to Personalize Lemon Meringue Pie
Suggested Pairings for Lemon Meringue Pie
Storage Guidelines for Lemon Meringue Pie
FAQs About Homemade Lemon Meringue Pie
Tempering prevents eggs from scrambling by slowly raising their temperature, ensuring a smooth, creamy lemon filling without lumps or curdled texture.
Your meringue is ready when it forms stiff, glossy peaks that hold their shape and don’t droop when the whisk is lifted, with sugar completely dissolved.
Spreading meringue while the filling is still warm and sealing the edges completely to the crust helps prevent weeping and shrinking during baking.
Yes, you can prepare the pie a day in advance and store it in the refrigerator, which actually helps the flavors meld and the filling set perfectly.
Print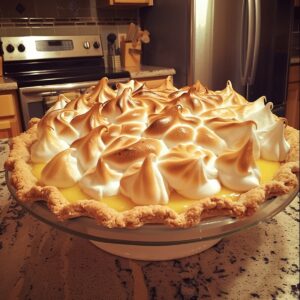
Homemade Lemon Meringue Pie Recipe
- Total Time: 4 hours 34-39 minutes
- Yield: 8 1x
Description
Creamy, tangy Homemade Lemon Meringue Pie brings zesty sunshine to dessert tables with its perfect balance of tart filling and billowy meringue. Silky lemon curd nestled in flaky pastry promises pure comfort and sweet culinary delight you won’t want to miss.
Ingredients
Main Ingredients:
- 1.5 cups (360 ml) water
- 1/2 cup (120 ml) fresh lemon juice
- 1.25 cups (250 g) granulated sugar
- 4 large egg yolks
- 4 large egg whites
Filling Ingredients:
- 1/3 cup (40 g) cornstarch
- 2 tablespoons lemon zest
- 2 tablespoons (28 g) unsalted butter
- 1/4 teaspoon salt
Pie Crust and Meringue Stabilizer:
- 1 pre-baked 9-inch pie crust
- 1/4 teaspoon cream of tartar
- 0.5 cups (100 g) granulated sugar
Instructions
- Combine sugar, cornstarch, and salt in a medium saucepan, whisking thoroughly to eliminate lumps.
- Gradually incorporate water, lemon juice, and zest, stirring until mixture achieves a smooth consistency.
- Heat over medium temperature, continuously stirring until the mixture reaches a vigorous boil and thickens, approximately 5-7 minutes.
- Remove from heat and gently temper egg yolks by slowly introducing a portion of the hot lemon mixture, whisking constantly to prevent curdling.
- Return tempered egg mixture to saucepan, cooking and stirring for an additional 2 minutes to ensure proper thickening.
- Incorporate butter until completely melted and seamlessly blended into the filling.
- Transfer lemon filling into pre-baked pie crust, allowing it to cool slightly while preparing meringue topping.
- Preheat oven to 350°F (175°C) for optimal meringue browning.
- Using clean beaters, whip egg whites and cream of tartar on high speed until soft, billowy peaks emerge.
- Gradually introduce sugar, one tablespoon at a time, continuing to beat until meringue forms stiff, glossy peaks with no granular texture.
- Carefully spread meringue across warm lemon filling, ensuring complete coverage and sealed edges to prevent shrinkage during baking.
- Bake for 12-15 minutes until meringue develops a delicate golden-brown hue.
- Allow pie to cool completely on a wire rack for one hour, then refrigerate for minimum 3 hours to set filling and stabilize texture.
- Slice and serve chilled, revealing layers of tangy filling and cloudlike meringue.
Notes
- Always use fresh lemon juice for the brightest, most vibrant citrus flavor that elevates the entire pie.
- Carefully temper egg yolks by slowly introducing hot liquid to prevent scrambling and ensure a smooth, silky filling.
- Create picture-perfect meringue by ensuring your mixing bowl is completely clean and free from any oil or grease.
- Seal meringue edges completely against the pie crust to prevent weeping and maintain a beautiful, stable topping.
- Prep Time: 15 minutes
- Cook Time: 19-24 minutes
- Category: Desserts
- Method: Boiling
- Cuisine: American
Nutrition
- Serving Size: 8
- Calories: 242 kcal
- Sugar: 34 g
- Sodium: 85 mg
- Fat: 8 g
- Saturated Fat: 4 g
- Unsaturated Fat: 4 g
- Trans Fat: 0 g
- Carbohydrates: 38 g
- Fiber: 0.5 g
- Protein: 3 g
- Cholesterol: 115 mg
Michael Thompson
Founder & Recipe Developer
Expertise
Education
Cascade Culinary Institute – Bend, OR
ServSafe Food Handler Certification – Portland, OR
Focus: Certified in core food safety and hygiene principles for both home and professional kitchens, with emphasis on ingredient handling, kitchen cleanliness, and safe preparation methods.
Mike’s kitchen journey began with a single goal: to make everyday meals feel like something worth celebrating.
After earning his Certificate in Culinary Arts from Cascade Culinary Institute, he spent years working with local farmers and small kitchens across Oregon, learning the beauty of seasonal, small-batch cooking.
Mike’s approach is simple, cook with what’s fresh, keep it approachable, and always leave room for a little creativity. When he’s not testing yogurt marinades or designing single-serving meals, you’ll find him hiking trails or hunting down the best berries at local markets.