
Indulgent M&Ms And Reeses Cookie Monster Ice Cream Recipe
Wild cravings for M&Ms and Reeses cookie monster ice cream strike when least expected!
Sweet tooth enthusiasts know this delightful dessert promises pure happiness.
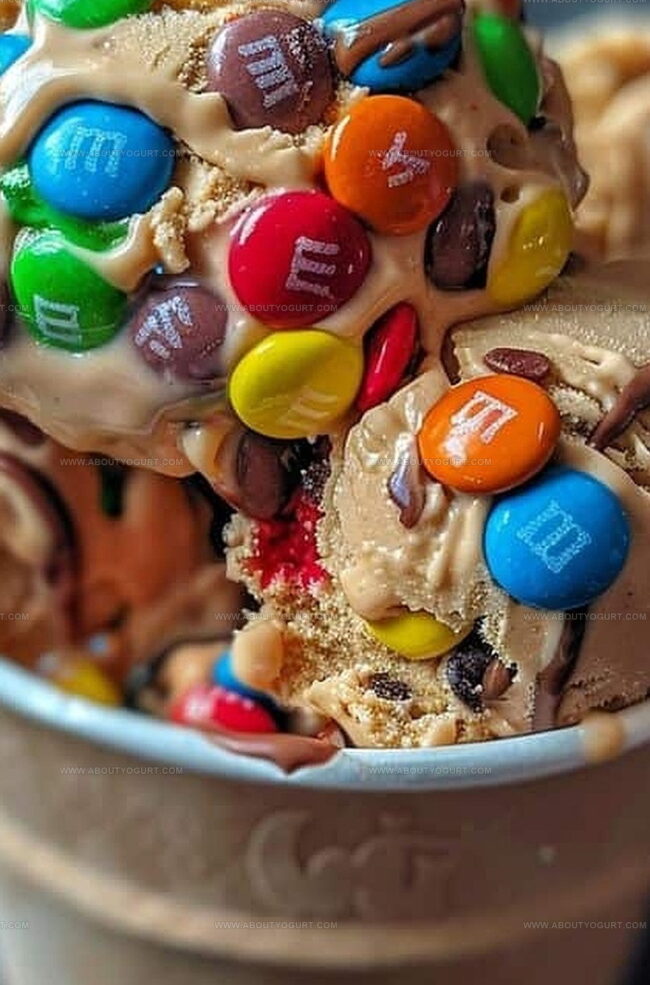
Creamy textures blend magnificently with colorful candy chunks throughout each delectable scoop.
Chocolate lovers will adore how simple ingredients create magic in minutes.
Kids absolutely go crazy for the playful blue coloring and candy surprises.
Mixing becomes an adventure with vibrant candies dancing across cool, smooth surfaces.
Dessert dreams come true with this irresistible frozen treat that guarantees smiles.
Dig in and let the deliciousness begin!
M&Ms And Reeses Cookie Monster Ice Cream That Rocks

Ingredients For M&Ms And Reeses Cookie Monster Ice Cream
Dairy Base:Candy Mix-Ins:Decoration:How To Make M&Ms And Reeses Cookie Monster Ice Cream
Step 1: Whip the Cream to Soft Peaks
Start by grabbing your electric mixer or whisk. Pour the heavy cream into a large mixing bowl and begin whipping at medium-high speed. Continue beating until the cream transforms into fluffy, soft peaks that hold their shape when the whisk is lifted.
Step 2: Create a Smooth Base
Gently introduce the sweetened condensed milk and vanilla extract into the whipped cream. Use a spatula to fold the ingredients together, creating a smooth and creamy mixture. Mix carefully to maintain the light, airy texture of the whipped cream.
Step 3: Fold in Colorful Candy Pieces
Add the colorful M&Ms and chopped Reeses peanut butter cups into the cream mixture. Carefully fold the candies throughout the ice cream base, ensuring an even distribution of sweet, crunchy pieces in every scoop.
Step 4: Prepare for Freezing
Transfer the entire mixture into a loaf pan or freezer-safe container. Spread the ice cream evenly, making sure to create a smooth surface. For an extra burst of color and flavor, sprinkle additional M&Ms and Reeses pieces on top of the mixture.
Step 5: Freeze and Set
Cover the container with plastic wrap or a tight-fitting lid. Place the ice cream in the freezer and let it set for at least 6 hours, or until it reaches a firm, scoopable consistency. The waiting is the hardest part!
Step 6: Serve and Enjoy
Once the ice cream is completely frozen, grab an ice cream scoop. Serve the Cookie Monster Ice Cream in bowls or cones. Watch as the vibrant M&Ms and chunks of Reeses create a delightful, colorful treat that’s sure to bring smiles to everyone’s faces.
Pro Tips For M&Ms And Reeses Cookie Monster Ice Cream
Fun Variations For M&Ms And Reeses Cookie Monster Ice Cream
Pairing Ideas For M&Ms And Reeses Cookie Monster Ice Cream
Storage Tips For M&Ms And Reeses Cookie Monster Ice Cream
FAQs About M&Ms And Reeses Cookie Monster Ice Cream
No, it’s super easy! You only need a few ingredients and basic mixing skills. No ice cream machine required.
Absolutely! Swap M&Ms and Reeses for your favorite chocolate candies like Snickers, Kit Kat, or Butterfinger.
It stays fresh in the freezer for up to 2 weeks when stored in an airtight container. Just make sure to cover it well to prevent freezer burn.
Not at all. You just need a mixing bowl, whisk or electric mixer, and a freezer-safe container. Basic kitchen tools work perfectly.
Print
M&Ms And Reeses Cookie Monster Ice Cream Recipe
- Total Time: 6 hours 15 minutes
- Yield: 4 1x
Description
Monstrous m&ms and reeses cookie monster ice cream delivers a playful blue dessert packed with chocolate chunks and candy pieces. Sweet dreams come true when you dive into this whimsical frozen treat that promises pure childhood nostalgia.
Ingredients
Main Ingredients:
- 2 cups (473 ml) heavy cream
- 1 cup (236 ml) M&Ms candies
- 1 cup (236 ml) Reeses peanut butter cups, chopped
Sweetener and Flavoring:
- 1 can (14 ounces or 397 grams) sweetened condensed milk
- 1 teaspoon (5 ml) vanilla extract
Instructions
- Whip the heavy cream in a spacious mixing vessel until it forms robust, towering peaks that hold their shape when the whisk is lifted.
- Incorporate the sweetened condensed milk and vanilla extract, using delicate folding motions to maintain the cream’s airy texture while ensuring complete integration.
- Gently fold the colorful M&Ms and chunky Reeses peanut butter cup pieces throughout the creamy base, distributing them evenly to create a vibrant, textured mixture.
- Transfer the ice cream base into a freezer-safe container, smoothing the surface with a spatula to create an even layer and prevent air pockets.
- Artfully scatter additional M&Ms and Reeses pieces across the top, creating a visually appealing and inviting presentation.
- Securely cover the container with plastic wrap or a tight-fitting lid to prevent ice crystals from forming.
- Place in the freezer for a minimum of 6 hours, allowing the mixture to solidify completely and develop a rich, creamy consistency.
- When ready to serve, allow the ice cream to rest at room temperature for 2-3 minutes to soften slightly, making scooping easier and enhancing the creamy texture.
- Scoop into chilled bowls or crisp waffle cones, garnishing with additional candy pieces if desired.
Notes
- Crush the M&Ms and Reeses slightly before adding to prevent large chunks from sinking to the bottom during freezing.
- Chill the mixing bowl and whisk beforehand to help heavy cream whip faster and achieve stiffer peaks more easily.
- For a lower-sugar version, use sugar-free condensed milk and dark chocolate candy pieces instead of traditional M&Ms.
- Experiment with alternative mix-ins like crushed cookies, chocolate chips, or different candy varieties to customize the ice cream’s flavor profile.
- Prep Time: 15 minutes
- Cook Time: 0 minutes
- Category: Desserts
- Method: Freezing
- Cuisine: American
Nutrition
- Serving Size: 4
- Calories: 700
- Sugar: 75g
- Sodium: 150mg
- Fat: 45g
- Saturated Fat: 25g
- Unsaturated Fat: 15g
- Trans Fat: 0.5g
- Carbohydrates: 80g
- Fiber: 2g
- Protein: 8g
- Cholesterol: 110mg
Sarah Mitchell
Content Specialist & Home Cooking Enthusiast
Expertise
Education
Asheville-Buncombe Technical Community College – Asheville, NC
American Fitness Professionals & Associates – Online
Sarah’s passion for food was sparked by weekend trips to the farmers’ market and her belief that healthy meals should never feel boring.
After earning her culinary diploma and becoming a certified Nutrition and Wellness Consultant, she set out to help others fall in love with simple, wholesome cooking.
She’s all about celebrating the small wins in the kitchen: a colorful yogurt bowl, a new twist on a classic dish, or a homemade snack that feels just a little extra special.
Outside the kitchen, Sarah is a gardener at heart, a yoga enthusiast, and a believer that fresh herbs can brighten any meal, and any day.