
Homemade Mounds Cake Recipe to Make Today
Crafting a delectable mounds cake brings pure tropical bliss right to your dessert plate.
Sweet coconut layers mingle with rich chocolate in this decadent treat.
Memories of classic candy bars dance through each luxurious bite.
Creamy textures and intense flavors combine to create something magical.
Chocolate lovers will swoon over the intense dark coating.
Coconut enthusiasts find pure joy in every forkful.
You won’t be able to resist this irresistible dessert that promises pure indulgence.
Why Mounds Cake Is A Chocolate Coconut Dream
Ingredients For Mounds Cake
Cake Base:Coconut Filling Ingredients:Chocolate Frosting Components:Step-By-Step Mounds Cake
Step 1: Mix the Chocolate Cake Base
Crank up your oven to a toasty 350F. Grab two round cake pans and give them a light coating of grease and flour. Prepare the chocolate cake mix just like the package says. For an extra moisture boost, toss in some sour cream to make the cake super rich and tender.
Step 2: Bake the Cake Layers
Divide the batter evenly between your prepared pans. Pop them into the oven and bake until a toothpick comes out clean, typically around 25-30 minutes. Let the layers cool completely – patience is key here!
Step 3: Create the Coconut Magic Filling
In a medium saucepan, combine:Stir until the sugar melts and the mixture bubbles gently. Toss in marshmallows and stir until they transform into a smooth, gooey mixture. Remove from heat and fold in shredded coconut. Allow the filling to cool and thicken slightly.
Step 4: Build Your Cake Masterpiece
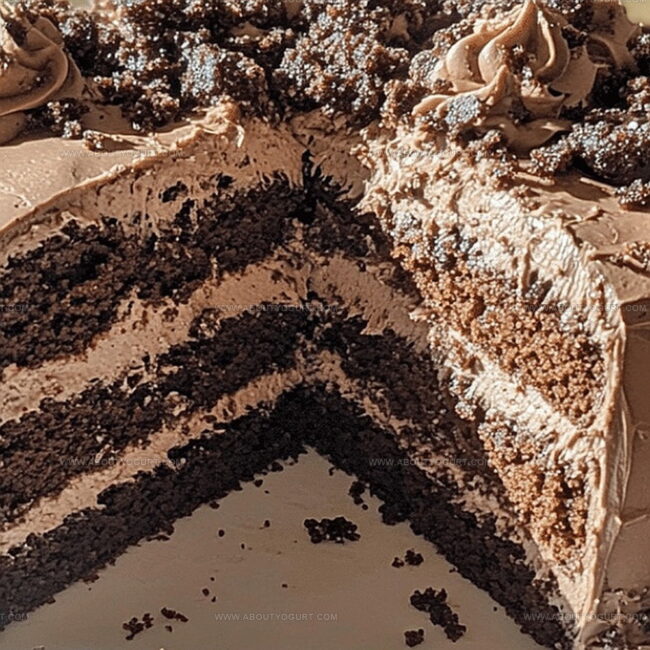
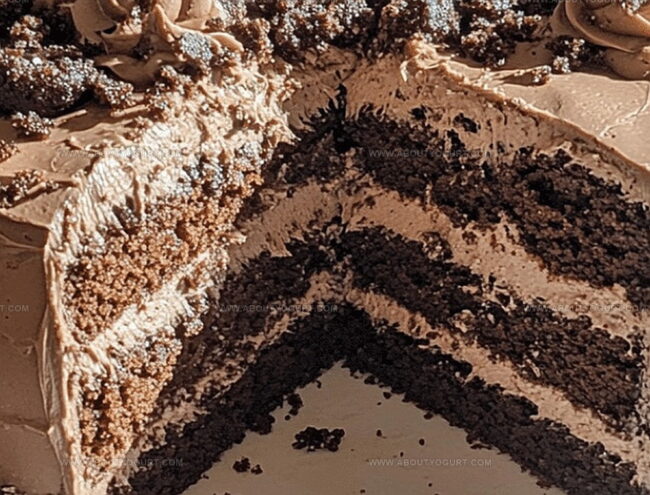
Place the first cake layer on a serving plate. Spread half the coconut filling across the top. Gently position the second cake layer and cover with remaining filling.
Step 5: Craft the Chocolate Drizzle
In another saucepan, combine:Heat until sugar dissolves and mixture boils. Pull off the heat and stir in chocolate chips until you achieve a glossy, smooth chocolate sauce.
Step 6: Frost with Chocolate Elegance
Pour the chocolate frosting over the assembled cake, letting it cascade down the sides for a luxurious look. Use a spatula to smooth out any uneven spots.
Step 7: Chill and Indulge
Slide the cake into the refrigerator for at least an hour to let everything set. Before serving, let it sit at room temperature to soften slightly.
Pro Tips For Mounds Cake
Fun Variations For Mounds Cake
Best Pairings For Mounds Cake
Storage Tips For Mounds Cake
Mounds Cake FAQs
Absolutely! The cake features a generous coconut filling made with shredded coconut, marshmallows, and cream, creating a rich and authentic coconut experience that will delight anyone who loves coconut flavors.
Yes, you can substitute the chocolate cake mix with your preferred flavor, but a chocolate base works best to complement the coconut filling and create a flavor profile similar to a Mounds candy bar.
This cake is moderately easy to prepare. While it involves multiple steps like making filling and frosting from scratch, the instructions are straightforward and achievable for home bakers with basic cooking skills.
Print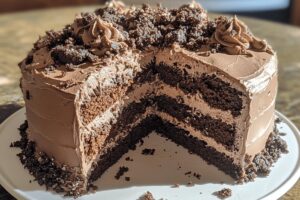
Mounds Cake Recipe
- Total Time: 1 hour 10 minutes
- Yield: 12 1x
Description
Sinful chocolate bliss meets coconut dreams in this Mounds Cake, a tropical paradise of rich cocoa and creamy coconut. Indulgent layers promise pure dessert ecstasy that will transport taste buds to sweet, luxurious heights.
Ingredients
Cake Base:
- 1 box chocolate cake mix
- Ingredients required by cake mix package
Cake Moistening Ingredients:
- 1/2 cup (120 milliliters) sour cream
Coconut and Chocolate Coating:
- 7 ounces (200 grams) sweetened shredded coconut
- 14 ounces (400 grams) sweetened condensed milk
- 1/2 cup (120 milliliters) heavy cream
- 2 tablespoons unsalted butter
- 1 teaspoon vanilla extract
- 1/4 teaspoon salt
Instructions
- Preheat the oven to 350°F (175°C). Thoroughly grease and dust two 9-inch round cake pans with flour, ensuring complete coverage to prevent sticking.
- Prepare the chocolate cake mixture according to package instructions. For enhanced moisture, incorporate sour cream into the batter, mixing until smooth and uniform.
- Distribute the cake batter evenly between the prepared pans, carefully smoothing the surface to create level layers.
- Bake the cake layers for 25-30 minutes. Check doneness by inserting a toothpick into the center – it should emerge clean without any raw batter.
- Remove cakes from oven and allow them to cool completely on a wire rack, which prevents condensation and maintains the cake’s structural integrity.
- Create the coconut filling by combining sugar and heavy cream in a medium saucepan over medium heat. Stir continuously until sugar dissolves and mixture reaches a gentle simmer.
- Add marshmallows to the cream mixture, stirring until they melt completely and integrate smoothly. Remove from heat and fold in shredded coconut, ensuring even distribution.
- Position the first cake layer on a serving plate. Spread half the coconut filling across the surface, creating an even layer.
- Carefully place the second cake layer atop the first, then cover with remaining coconut filling.
- Prepare chocolate frosting by combining sugar, heavy cream, and butter in a saucepan. Heat until sugar dissolves and mixture begins to boil.
- Remove frosting from heat and incorporate chocolate chips, stirring until the mixture becomes smooth and glossy.
- Pour chocolate frosting over the assembled cake, allowing it to cascade down the sides for a luxurious appearance. Use a spatula to smooth and perfect the frosting’s finish.
- Refrigerate the cake for a minimum of 1 hour to set the layers and frosting. Prior to serving, let the cake rest at room temperature for optimal flavor and texture.
Notes
- Select a high-quality chocolate cake mix for richer flavor and texture, ensuring the base complements the coconut filling.
- Enhance moistness by adding sour cream or Greek yogurt to the cake batter, creating a tender crumb that melts in your mouth.
- For a gluten-free version, substitute the regular cake mix with a gluten-free alternative and check all ingredient labels carefully.
- Reduce sugar content by using sugar-free chocolate chips and adjusting the sweetness in the filling with natural sweeteners like stevia or monk fruit.
- Prep Time: 20 minutes
- Cook Time: 50 minutes
- Category: Desserts
- Method: Baking
- Cuisine: American
Nutrition
- Serving Size: 12
- Calories: 290 kcal
- Sugar: 28 g
- Sodium: 320 mg
- Fat: 12 g
- Saturated Fat: 5 g
- Unsaturated Fat: 5 g
- Trans Fat: 0.3 g
- Carbohydrates: 42 g
- Fiber: 2 g
- Protein: 3 g
- Cholesterol: 40 mg
Michael Thompson
Founder & Recipe Developer
Expertise
Education
Cascade Culinary Institute – Bend, OR
ServSafe Food Handler Certification – Portland, OR
Focus: Certified in core food safety and hygiene principles for both home and professional kitchens, with emphasis on ingredient handling, kitchen cleanliness, and safe preparation methods.
Mike’s kitchen journey began with a single goal: to make everyday meals feel like something worth celebrating.
After earning his Certificate in Culinary Arts from Cascade Culinary Institute, he spent years working with local farmers and small kitchens across Oregon, learning the beauty of seasonal, small-batch cooking.
Mike’s approach is simple, cook with what’s fresh, keep it approachable, and always leave room for a little creativity. When he’s not testing yogurt marinades or designing single-serving meals, you’ll find him hiking trails or hunting down the best berries at local markets.