
Tropical Paradise: Pineapple Coconut Dream Cake Recipe
Sweet memories of tropical vacations dance through my pineapple coconut dream cake, a dessert that whispers sunshine and relaxation.
Soft layers promise delightful surprises with each delicate forkful.
Caribbean breezes seem to float from this incredibly moist creation.
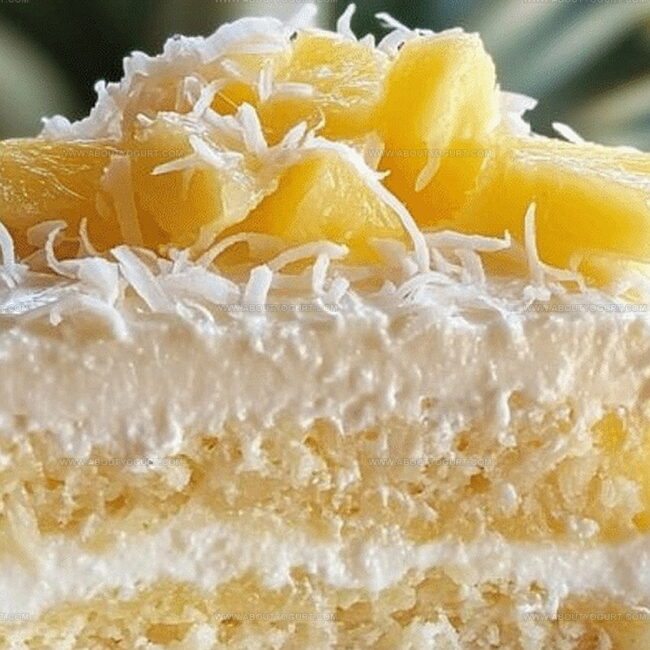
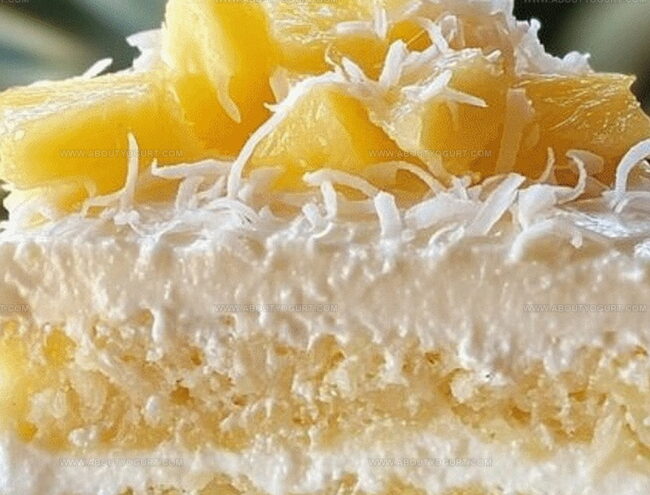
Creamy coconut frosting nestles between golden cake tiers, inviting you to savor pure comfort.
Gentle hints of island flavors meld perfectly in every bite.
Pantry staples transform into something magical with minimal effort.
Why Pineapple Coconut Dream Cake Is a Tropical Treat
Ingredients for Pineapple Coconut Dream Cake
Cake Base:Fruit Filling:Frosting Components:How to Bake Pineapple Coconut Dream Cake
Step 1: Warm Up the Oven and Prep Pans
Crank the oven to 350F (175C). Grease and dust two 9-inch round cake pans with flour to ensure smooth cake release.
Step 2: Create Magical Cake Batter
Grab a large mixing bowl and combine:Whip these ingredients using an electric mixer on medium speed for 2-3 minutes until the batter looks silky and well blended.
Step 3: Bake the Cake Layers
Pour the batter evenly into prepared pans. Slide into the preheated oven and bake for 25-30 minutes. Check doneness by inserting a toothpick – it should come out clean. Let cakes rest in pans for 10 minutes, then transfer to a wire rack for complete cooling.
Step 4: Craft Tangy Pineapple Filling
In a saucepan, mix:Cook over medium heat, stirring constantly until the mixture transforms into a glossy, thick sauce (about 5-7 minutes). Remove from heat and allow to cool completely.
Step 5: Whip Up Dreamy Coconut Frosting
Using an electric mixer, whip heavy cream until soft peaks form. Gradually fold in powdered sugar and coconut extract. Continue whipping until stiff peaks develop. Set frosting aside.
Step 6: Build Your Tropical Cake Masterpiece
Place first cake layer on a serving platter. Spread a generous layer of pineapple filling across the top. Gently position the second cake layer. Frost the entire cake with coconut whipped cream, ensuring even coverage on sides and top.
Pro Tips for Pineapple Coconut Dream Cake
Variations to Explore With Pineapple Coconut Dream Cake
Pairing Suggestions for Pineapple Coconut Dream Cake
Storage Guidelines for Pineapple Coconut Dream Cake
FAQs for Pineapple Coconut Dream Cake
Yes, the Pineapple Coconut Dream Cake is perfect for birthdays, summer parties, and tropical-themed events. Its bright flavors and creamy texture make it a crowd-pleaser.
Absolutely! You can bake the cake layers a day in advance and store them wrapped in plastic. Assemble and frost the cake a few hours before serving to maintain freshness.
Not at all! This recipe is beginner-friendly. As long as you follow the instructions carefully and use a hand mixer, you can create a delicious cake that looks and tastes professional.
Print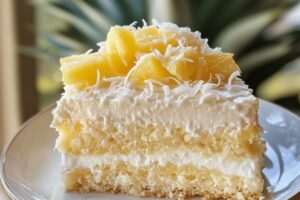
Pineapple Coconut Dream Cake Recipe
- Total Time: 50-62 minutes
- Yield: 12 1x
Description
Indulgent Pineapple Coconut Dream Cake brings tropical paradise straight to your dessert table, blending luscious flavors that dance with sweet, creamy elegance. Creamy coconut and tangy pineapple layers promise a delightful escape you won’t want to miss.
Ingredients
Main Ingredients:
- 1 box yellow cake mix or white cake mix
- 1 cup (240 ml) crushed pineapple (with juice)
- 1/2 cup (120 ml) coconut milk
- 3 large eggs
Supporting Ingredients:
- 1/2 cup (120 ml) vegetable oil
- 1 teaspoon vanilla extract
Filling and Topping Ingredients:
- 1 can (20 ounces/567 grams) crushed pineapple (with juice)
- 1/2 cup (100 grams) granulated sugar
- 2 tablespoons cornstarch
- 1/2 cup (120 ml) cold water
- 1 cup (240 ml) heavy cream
- 1/2 cup (60 grams) powdered sugar
- 1 teaspoon coconut extract
- 1 cup (80 grams) shredded sweetened coconut (toasted, optional for garnish)
Instructions
- Craft the foundation by heating the oven to 350F and preparing two cake pans with grease and flour.
- Blend cake mix, crushed pineapple, coconut milk, vegetable oil, eggs, and vanilla extract in a mixing bowl, whisking for 2-3 minutes until achieving a silky, uniform consistency.
- Distribute the batter equally between prepared pans, baking for 25-30 minutes until a toothpick emerges clean when inserted into the center.
- Allow cakes to rest in pans for 10 minutes, then transfer to a cooling rack for complete temperature reduction.
- Create pineapple filling by combining crushed pineapple, sugar, cornstarch, and cold water in a saucepan, simmering and stirring continuously until the mixture transforms into a glossy, thickened texture (approximately 5-7 minutes).
- Remove filling from heat, letting it cool entirely to room temperature.
- Whip heavy cream using an electric mixer until soft peaks develop, gradually incorporating powdered sugar and coconut extract while continuing to whip until stiff peaks form.
- Position first cake layer on serving platter, spreading a generous layer of cooled pineapple filling across the surface.
- Carefully place second cake layer atop the filling, gently pressing to secure.
- Meticulously frost the entire cake with coconut whipped cream, ensuring smooth, even coverage on sides and top.
Notes
- Swap ingredients easily by using gluten-free cake mix for a celiac-friendly version and dairy-free alternatives like coconut cream for whipping to accommodate different dietary needs.
- Prevent cake from drying out by ensuring accurate baking time and not overbaking; use toothpick test precisely and remove cake from oven immediately when it comes out clean.
- Enhance flavor depth by toasting coconut flakes and sprinkling them on top of frosted cake for extra crunch and nutty complexity that elevates the tropical taste profile.
- Control sweetness levels by adjusting sugar quantities in pineapple filling and frosting, allowing customization for those preferring less sugary desserts while maintaining cake’s signature tropical essence.
- Prep Time: 20-25 minutes
- Cook Time: 30-37 minutes
- Category: Desserts
- Method: Baking
- Cuisine: American
Nutrition
- Serving Size: 12
- Calories: 292 kcal
- Sugar: 29 g
- Sodium: 142 mg
- Fat: 15 g
- Saturated Fat: 9 g
- Unsaturated Fat: 5 g
- Trans Fat: 0.2 g
- Carbohydrates: 37 g
- Fiber: 1 g
- Protein: 3 g
- Cholesterol: 58 mg
Michael Thompson
Founder & Recipe Developer
Expertise
Education
Cascade Culinary Institute – Bend, OR
ServSafe Food Handler Certification – Portland, OR
Focus: Certified in core food safety and hygiene principles for both home and professional kitchens, with emphasis on ingredient handling, kitchen cleanliness, and safe preparation methods.
Mike’s kitchen journey began with a single goal: to make everyday meals feel like something worth celebrating.
After earning his Certificate in Culinary Arts from Cascade Culinary Institute, he spent years working with local farmers and small kitchens across Oregon, learning the beauty of seasonal, small-batch cooking.
Mike’s approach is simple, cook with what’s fresh, keep it approachable, and always leave room for a little creativity. When he’s not testing yogurt marinades or designing single-serving meals, you’ll find him hiking trails or hunting down the best berries at local markets.