
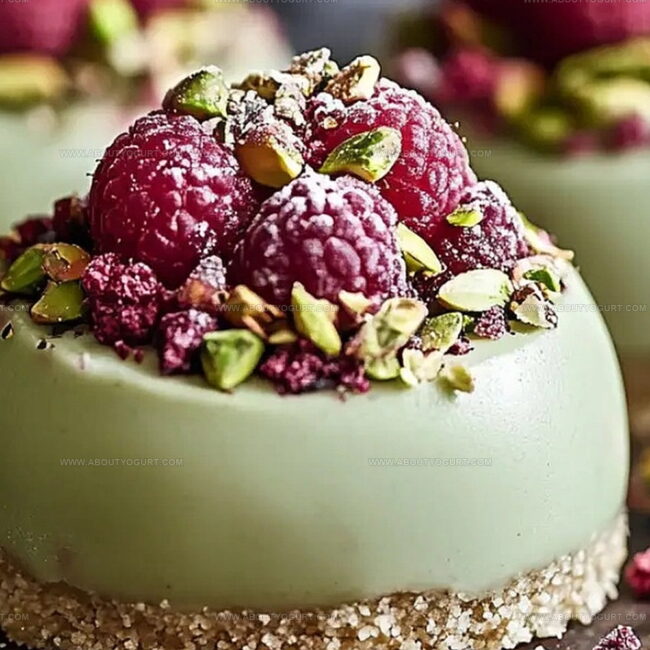
Pistachio and Raspberry Cheesecake Domes Recipe
Creamy pistachio and raspberry cheesecake domes dance between delicate textures and bold flavors.
Soft peaks of mascarpone blend with crushed green nuts for an unexpected twist.
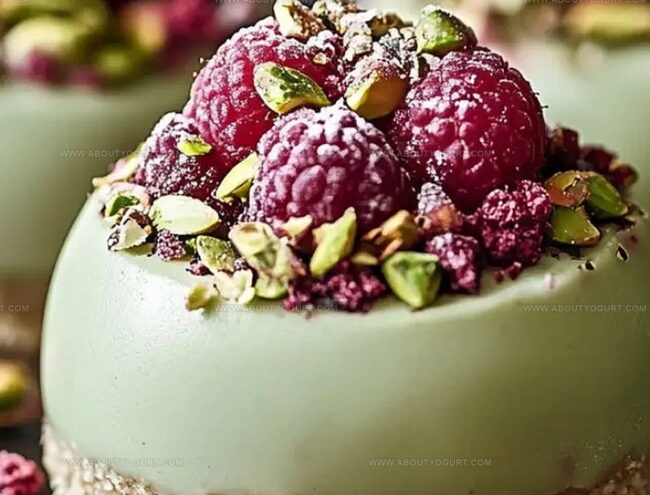
Sweet-tart raspberries peek through silky layers, creating visual drama.
Dessert enthusiasts will fall in love with this elegant treat that balances richness and brightness.
Delicate dome shapes make each serving feel like a personal masterpiece.
Smooth cream cheese whispers luxury with every bite.
You cannot resist this sophisticated yet playful dessert that promises pure indulgence.
Why Pistachio & Raspberry Cheesecake Domes Are an Elegant Treat
Ingredients for Pistachio and Raspberry Cheesecake Domes
For the Raspberry Center:For the Pistachio Cheesecake Base:For the Green Glaze:How to Prepare Pistachio & Raspberry Cheesecake Domes
Step 1: Create Raspberry Heart
Grab a saucepan and toss in raspberries with sugar and water. Simmer on medium heat until raspberries collapse into a gorgeous sauce.
Strain out pesky seeds, returning silky puree to pan. Sprinkle gelatin over cold water, letting it bloom briefly.
Stir gelatin into warm puree until completely dissolved. Pour mixture into:Freeze until rock-solid.
Step 2: Whip Pistachio Cheesecake Base
Sprinkle gelatin over cold water, allowing it to bloom. In a large mixing bowl, combine:Blend until luxuriously smooth.
Microwave gelatin for quick dissolution, then integrate into cheesecake mixture. Whip heavy cream to soft, dreamy peaks.
Gently fold cream into cheesecake base.
Step 3: Construct Delicate Domes
Fill half-sphere silicone molds halfway with pistachio cheesecake mixture.
Nestle frozen raspberry centers into middle of each mold. Cover completely with remaining cheesecake mixture, smoothing tops carefully.
Freeze for minimum 4 hours until completely firm.
Step 4: Develop Glossy Green Glaze
Bloom gelatin in cold water.
In saucepan, combine:Warm mixture without boiling. Stir bloomed gelatin into warm liquid.
Pour over melted white chocolate. Add green gel food coloring.
Blend with immersion blender until silky smooth. Cool glaze to precise 90F.
Step 5: Transform Domes with Glaze
Extract frozen cheesecake domes from molds. Position on wire rack above baking sheet.
Pour green glaze evenly over each dome, ensuring total coverage. Allow excess glaze to drip away gracefully.
Tips for Smooth and Creamy Cheesecake Domes Every Time
Variations to Personalize Cheesecake Domes
What Goes Best with Pistachio and Raspberry Domes
How to Store Cheesecake Domes Properly
Store the glazed pistachio and raspberry cheesecake domes in an airtight container for up to 3 days. Place parchment paper between layers to prevent sticking and maintain their delicate glaze.
Wrap each dome individually in plastic wrap, then place in a freezer-safe container. Freeze for up to 2 months. This method preserves the texture and flavor perfectly.
Remove domes from the freezer and transfer to the refrigerator 4-6 hours before serving. This gradual thawing prevents condensation and maintains the glaze’s shine.
Always serve the domes directly from the refrigerator for the best texture and presentation. Let them sit at room temperature for just 2-3 minutes before enjoying.
FAQs
Gelatin helps stabilize the cheesecake mixture, creating a smooth texture and helping the domes maintain their shape when frozen and glazed.
You can use finely ground pistachios or pistachio extract, but authentic pistachio paste provides the most intense and genuine flavor for the cheesecake.
Freezing the raspberry center prevents it from blending into the cheesecake mixture and helps create a distinct, clean center layer when the dome is cut.
Cool the glaze to exactly 90F (32C), use an immersion blender to eliminate air bubbles, and pour slowly and evenly over the frozen domes for a flawless finish.
Print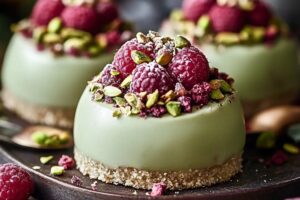
Pistachio & Raspberry Cheesecake Domes Recipe
- Total Time: 4 hours 45 minutes
- Yield: 6 1x
Description
Delicate pistachio & raspberry cheesecake domes deliver a sophisticated dessert experience that whispers elegance. Creamy layers and fruity notes dance together, inviting you to savor each luxurious bite of this Mediterranean-inspired sweet masterpiece.
Ingredients
Cheesecake Base:
- 8 ounces (225 g) softened cream cheese
- 1/4 cup granulated sugar
- 1/4 cup pistachio paste
- 1/2 teaspoon pure vanilla extract
- 1/4 cup heavy cream, whipped
- 1 teaspoon gelatin powder
- 2 tablespoons cold water
Raspberry Center:
- 1/2 cup fresh or frozen raspberries
- 2 tablespoons granulated sugar
- 1 tablespoon water
- 1 teaspoon gelatin powder
Glaze and Decoration:
- 1/2 cup water
- 1/2 cup granulated sugar
- 1/2 cup sweetened condensed milk
- 1/2 cup melted white chocolate
- 2 teaspoons gelatin powder
- Green gel food coloring
- Edible gold leaf
- Crushed pistachios
Instructions
- Craft a vibrant raspberry reduction by simmering raspberries, sugar, and water in a saucepan until fruits disintegrate completely. Strain the mixture to extract a silky smooth puree, eliminating all seeds.
- Activate gelatin by sprinkling over cold water, allowing it to bloom for 5 minutes. Gently warm the gelatin until fully dissolved, then incorporate into the warm raspberry puree.
- Transfer the raspberry mixture into small silicone molds or ice cube trays, then freeze until solidly set, creating compact fruity centers.
- Whip cream cheese with sugar, pistachio paste, and vanilla extract until achieving a luxurious, velvety consistency. Ensure no lumps remain in the mixture.
- Dissolve pre-bloomed gelatin by briefly heating in microwave, then integrate smoothly into the cheesecake base, maintaining a uniform texture.
- Gently fold softly whipped cream into the pistachio cheesecake mixture, creating a light, airy foundation.
- Fill half-sphere silicone molds partially with pistachio cheesecake mixture, strategically positioning frozen raspberry centers in the middle.
- Complete dome formation by covering raspberry centers with remaining cheesecake mixture, carefully smoothing the surface for a polished appearance.
- Freeze the assembled domes for minimum 4 hours, ensuring complete solidification.
- Prepare green glaze by combining water, sugar, and condensed milk, heating until warm but not boiling.
- Dissolve gelatin and blend into warm mixture, then incorporate with melted white chocolate. Add green gel food coloring for vibrant color.
- Cool glaze to precisely 90°F (32°C), maintaining optimal consistency for coating.
- Unmold frozen cheesecake domes and position on wire rack over baking sheet.
- Pour glaze evenly across domes, ensuring complete, seamless coverage. Allow excess glaze to drip away naturally.
Notes
- Stabilize raspberry filling by using gelatin, which prevents iciness and maintains a smooth texture when frozen.
- Whip cream gently to soft peaks to maintain its volume and create a light, airy cheesecake texture without deflating.
- Choose high-quality pistachio paste for an intense, authentic nutty flavor that elevates the entire dessert’s complexity.
- Allow glaze to cool precisely to 90F to achieve the perfect consistency for smooth, even coating without melting the frozen domes.
- Prep Time: 45 minutes
- Cook Time: 4 hours
- Category: Desserts
- Method: Freezing
- Cuisine: American
Nutrition
- Serving Size: 6
- Calories: 289 kcal
- Sugar: 28 g
- Sodium: 105 mg
- Fat: 19 g
- Saturated Fat: 9 g
- Unsaturated Fat: 8 g
- Trans Fat: 0.2 g
- Carbohydrates: 22 g
- Fiber: 1.5 g
- Protein: 5 g
- Cholesterol: 55 mg
Michael Thompson
Founder & Recipe Developer
Expertise
Education
Cascade Culinary Institute – Bend, OR
ServSafe Food Handler Certification – Portland, OR
Focus: Certified in core food safety and hygiene principles for both home and professional kitchens, with emphasis on ingredient handling, kitchen cleanliness, and safe preparation methods.
Mike’s kitchen journey began with a single goal: to make everyday meals feel like something worth celebrating.
After earning his Certificate in Culinary Arts from Cascade Culinary Institute, he spent years working with local farmers and small kitchens across Oregon, learning the beauty of seasonal, small-batch cooking.
Mike’s approach is simple, cook with what’s fresh, keep it approachable, and always leave room for a little creativity. When he’s not testing yogurt marinades or designing single-serving meals, you’ll find him hiking trails or hunting down the best berries at local markets.