
Rich Butterscotch Pie Recipe for Sweet Lovers
Butterscotch pie stands as a golden treasure of comfort desserts that melts hearts instantly.
Sweet memories dance through every silky slice of this classic treat.
Rich caramel notes whisper promises of decadent indulgence waiting to unfold.
Bakers passionate about creating magic in their kitchens will adore this simple yet elegant recipe.
Smooth custard nestled in a flaky crust creates a symphony of textures that surprise and delight.
Each forkful brings a wave of nostalgic warmth, connecting you to cherished moments around the table.
Prepare to experience a dessert that transforms an ordinary evening into something extraordinary.
Why Rich and Creamy Butterscotch Pie Is a Classic Favorite
Components Needed for Rich and Creamy Butterscotch Pie
Crust Ingredients:Butterscotch Filling Ingredients:Whipped Cream Topping Ingredients:Instructions to Make Rich and Creamy Butterscotch Pie
Step 1: Create the Crunchy Base
Warm up your oven to 350F. Grab a mixing bowl and combine graham cracker crumbs, sugar, and melted butter until everything sticks together perfectly. Press this mixture firmly into a 9-inch pie dish, making sure to cover the bottom and sides evenly. Use a spoon or glass to pack it down tightly. Slide the crust into the oven and bake for 8-10 minutes until it turns a beautiful golden color. Once done, let it cool completely.
Step 2: Craft the Luscious Butterscotch Filling
Melt butter in a saucepan over medium heat. Stir in brown sugar and let it bubble for a minute or two. Sprinkle flour over the mixture and whisk constantly to create a smooth paste. Slowly pour in milk, whisking away to prevent any lumps from forming. Keep stirring until the mixture thickens and starts to boil. In a separate bowl, gently beat egg yolks. Carefully add a small amount of the hot butterscotch to the yolks, mixing quickly. Pour the egg mixture back into the saucepan, continuing to whisk. Cook for another 2-3 minutes until the filling becomes thick and creamy. Remove from heat and stir in:Step 3: Assemble the Dreamy Pie
Pour the silky butterscotch filling into the cooled crust, spreading it evenly with a spatula. Let the pie rest at room temperature, then chill in the refrigerator for at least 4 hours until it sets completely.
Step 4: Crown with Fluffy Topping
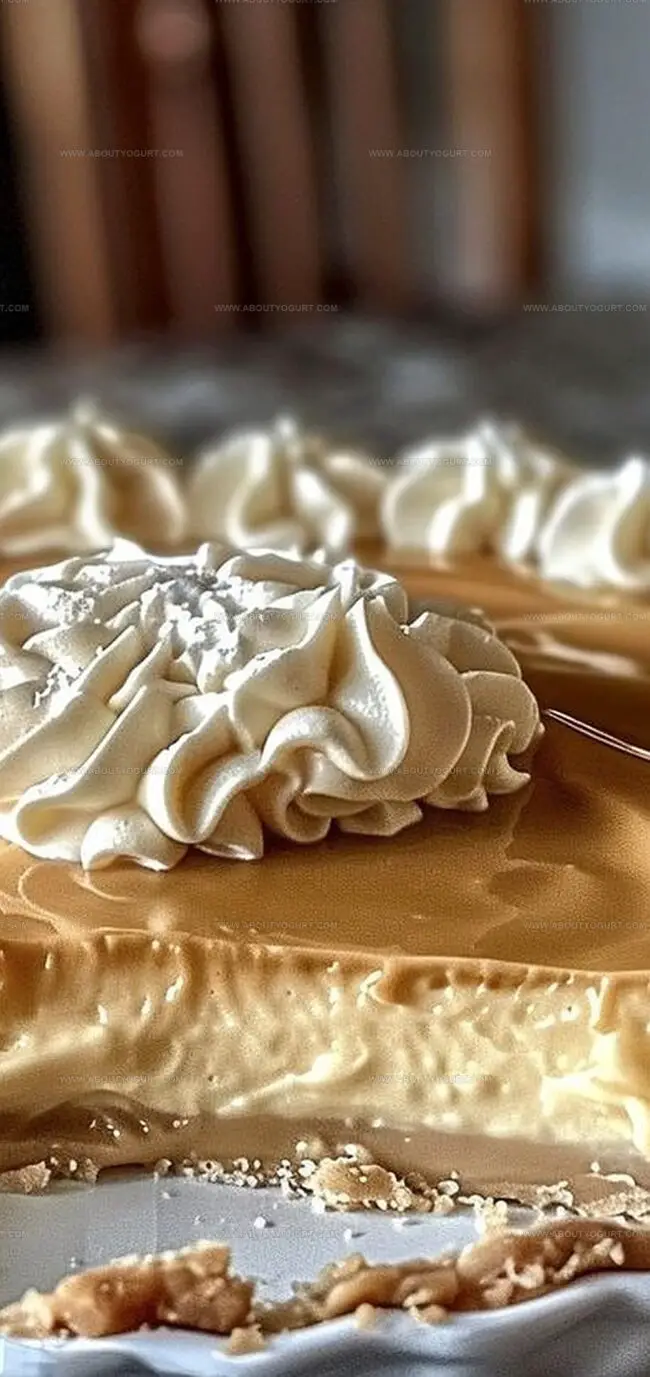
Whip up a dreamy cream topping by beating together:Whip until stiff peaks form. Spread or pipe the cloud-like whipped cream over the chilled butterscotch filling.
Step 5: Slice and Savor
Cut into this heavenly pie and enjoy every creamy, sweet bite of your homemade butterscotch masterpiece!
Pro Tips for Perfect Rich and Creamy Butterscotch Pie

Variations to Enhance Rich and Creamy Butterscotch Pie
Pairings That Go Well with Rich and Creamy Butterscotch Pie
How to Store Rich and Creamy Butterscotch Pie Properly
Frequently Asked Questions About Rich and Creamy Butterscotch Pie
The secret is tempering the egg yolks by gradually adding hot butterscotch mixture while whisking constantly, which prevents scrambling and ensures a silky, creamy texture.
Cooking brown sugar and butter creates a deeper, richer caramelized flavor that is essential to authentic butterscotch, developing complex sweetness and depth.
The filling is ready when it coats the back of a spoon and leaves a clear path when you run your finger through it, with a pudding-like consistency that holds its shape.
Print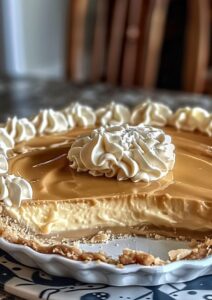
Rich and Creamy Butterscotch Pie Recipe
- Total Time: 4 hours 35 minutes
- Yield: 8 1x
Description
Butterscotch pie brings golden, caramel-kissed indulgence straight from homestyle kitchens. Sweet whispers of brown sugar and buttery goodness blend into a silky filling that will sweep you into delightful comfort with each sublime slice.
Ingredients
Main Ingredients (Pie Filling):
- 1 cup dark brown sugar
- 3 cups whole milk
- 4 large egg yolks
- 1/4 cup cornstarch
- 1/2 teaspoon salt
Crust Ingredients:
- 1 1/2 cups graham cracker crumbs
- 1/4 cup granulated sugar
- 6 tablespoons (3 ounces) unsalted butter, melted
Finishing Ingredients:
- 1 teaspoon vanilla extract
- 2 tablespoons unsalted butter
- 1 cup heavy whipping cream
- 2 tablespoons powdered sugar
- 1 teaspoon vanilla extract
Instructions
- Craft a buttery graham cracker foundation by combining crumbs, sugar, and melted butter. Press mixture firmly into a 9-inch pie dish, creating an even layer that extends up the sides.
- Bake the crust at 350F for 8-10 minutes until golden. Allow complete cooling before filling.
- Create butterscotch base by melting butter and caramelizing brown sugar over medium heat until bubbling.
- Incorporate flour into the butter-sugar mixture, whisking continuously to develop a smooth paste without lumps.
- Gradually introduce milk, stirring constantly to prevent scorching. Continue cooking until the mixture thickens and reaches a gentle boil.
- Temper egg yolks by slowly introducing hot butterscotch liquid while whisking vigorously to prevent curdling.
- Return egg-butterscotch mixture to heat, cooking for an additional 2-3 minutes until achieving a rich, velvety consistency.
- Remove from heat and enhance flavor with vanilla extract and a delicate pinch of salt.
- Transfer the luxurious butterscotch filling into the cooled graham cracker crust, smoothing the surface with a spatula.
- Refrigerate the pie for a minimum of 4 hours to ensure complete setting and optimal texture.
- Whip heavy cream with sugar and vanilla until forming stiff, billowy peaks.
- Generously crown the chilled pie with the airy whipped cream, either spreading smoothly or creating elegant piped designs.
- Slice and serve this decadent butterscotch pie, offering a sublime dessert experience.
Notes
- Brown sugar provides deeper caramel notes than white sugar, enhancing authentic butterscotch flavor complexity.
- Tempering eggs prevents scrambling, ensuring silky smooth filling texture without unwanted egg chunks.
- Graham cracker crust adds delightful crunch and complementary nutty undertones to creamy butterscotch filling.
- Chilling pie allows filling to set properly, creating perfect sliceable consistency for elegant serving.
- Prep Time: 20 minutes
- Cook Time: 15 minutes
- Category: Desserts
- Method: Baking
- Cuisine: American
Nutrition
- Serving Size: 8
- Calories: 191
- Sugar: 5 g
- Sodium: 71 mg
- Fat: 10 g
- Saturated Fat: 6 g
- Unsaturated Fat: 4 g
- Trans Fat: 0 g
- Carbohydrates: 22 g
- Fiber: 1 g
- Protein: 2 g
- Cholesterol: 18 mg
Michael Thompson
Founder & Recipe Developer
Expertise
Education
Cascade Culinary Institute – Bend, OR
ServSafe Food Handler Certification – Portland, OR
Focus: Certified in core food safety and hygiene principles for both home and professional kitchens, with emphasis on ingredient handling, kitchen cleanliness, and safe preparation methods.
Mike’s kitchen journey began with a single goal: to make everyday meals feel like something worth celebrating.
After earning his Certificate in Culinary Arts from Cascade Culinary Institute, he spent years working with local farmers and small kitchens across Oregon, learning the beauty of seasonal, small-batch cooking.
Mike’s approach is simple, cook with what’s fresh, keep it approachable, and always leave room for a little creativity. When he’s not testing yogurt marinades or designing single-serving meals, you’ll find him hiking trails or hunting down the best berries at local markets.