
Fluffy Condensed Milk Bread Recipe: Sweet Morning Magic
Baking soft and fluffy condensed milk bread sparks joy in every kitchen adventurer’s heart.
Kitchen magic happens when simple ingredients combine with unexpected charm.
Creamy sweetness from condensed milk creates a tender crumb that melts perfectly on your tongue.
Pure comfort emerges through each slice of this delightful treat.
Rich golden hues promise a bakery-quality experience right from your home oven.
Warm aromas will dance through your space, beckoning everyone near.
Hungry souls will find pure bliss in this delectable bread creation.
Why Soft and Fluffy Condensed Milk Bread Is Irresistible

Ingredients Needed for Soft and Fluffy Condensed Milk Bread
Base Ingredients:Leavening Agents:Binding and Enriching Ingredients:How to Make Soft and Fluffy Condensed Milk Bread
Step 1: Activate the Yeast
Combine warm milk, sugar, and instant yeast in a large mixing bowl. Allow the mixture to sit for 5 minutes until it becomes frothy and bubbly, indicating the yeast is active and ready.
Step 2: Create the Wet Mixture
Blend in the sweetened condensed milk, melted butter, egg, and salt. Whisk these ingredients thoroughly until they form a smooth, well-integrated liquid mixture with a consistent texture.
Step 3: Form the Dough
Gradually incorporate flour into the wet ingredients. Knead the mixture until it transforms into a soft, elastic dough that pulls away from the sides of the bowl. The dough should feel smooth and slightly tacky but not sticky.
Step 4: First Rise
Cover the dough with a clean kitchen towel and place it in a warm, draft-free spot. Allow the dough to rise for approximately 1 hour, or until it doubles in size and looks puffy and light.
Step 5: Shape the Bread
Gently deflate the risen dough by pressing down with your fist. Divide and shape the dough into rolls or a single loaf, depending on your preference. Arrange the shaped dough on a lined baking sheet.
Step 6: Second Rise
Let the shaped dough rest and rise again for about 30 minutes. The bread will become even more voluminous and soft during this proofing period.
Step 7: Bake to Golden Perfection
Preheat the oven to 350°F (175°C). Bake the bread for 25-30 minutes until it develops a beautiful golden-brown crust and sounds hollow when tapped on the bottom.
Pro Tips for Soft and Fluffy Condensed Milk Bread

Variation Suggestions for Soft and Fluffy Condensed Milk Bread
Pairing Ideas for Soft and Fluffy Condensed Milk Bread
Storage Advice for Soft and Fluffy Condensed Milk Bread
FAQs for Soft and Fluffy Condensed Milk Bread
Condensed milk adds rich sweetness, helps create a softer texture, and provides extra moisture to the bread, making it incredibly tender and flavorful.
Yes, but you’ll need to activate active dry yeast first in warm milk for about 10 minutes before mixing it into the dough, unlike instant yeast which can be added directly.
The dough should double in size and when you gently press it with a finger, the indentation should slowly spring back but not completely disappear.
Absolutely! This recipe is straightforward, requires basic ingredients, and follows simple steps that even novice bakers can successfully execute with some patience and care.
Print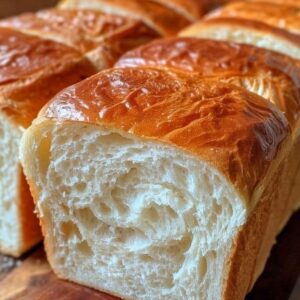
Soft And Fluffy Condensed Milk Bread Recipe
- Total Time: 2 hours to 2 hours 5 minutes
- Yield: 8 1x
Description
Condensed milk bread weaves magic into home baking with its silky crumb and rich sweetness. Home cooks can effortlessly craft this delightful treat that promises comfort in each tender slice.
Ingredients
Soft and Fluffy Condensed Milk Bread Ingredients:
Main Ingredients:
- 3 cups (360 grams) all-purpose flour
- 1/2 cup (120 milliliters) warm milk
- 1/2 cup (120 milliliters) sweetened condensed milk
- 1 egg
Leavening and Enhancing Ingredients:
- 2 teaspoons instant yeast
- 1/4 cup (50 grams) sugar
Seasoning and Fat Ingredients:
- 1/4 cup (57 grams) unsalted butter, melted
- 1/2 teaspoon salt
Instructions
- Activate the yeast mixture by whisking warm milk, sugar, and instant yeast together, allowing it to bloom and become frothy for 5 minutes.
- Incorporate sweetened condensed milk, melted butter, egg, and salt into the yeast mixture, stirring until thoroughly blended.
- Gradually fold in flour, kneading methodically until a soft, cohesive dough develops with a smooth, elastic texture.
- Transfer dough to a lightly greased bowl, cover with a damp cloth, and let it rest in a draft-free, warm environment for approximately 1 hour until doubled in volume.
- Gently deflate the risen dough, then shape into uniform rolls or a single loaf on a prepared baking sheet.
- Allow shaped dough to undergo a second proofing for 30 minutes, ensuring it becomes puffy and expanded.
- Preheat oven to 350F (175C) while the dough completes its final rise.
- Bake for 25-30 minutes, rotating midway through cooking to ensure even golden-brown coloration and consistent baking.
- Remove from oven and let cool on a wire rack before serving, allowing the bread to set and develop its full flavor profile.
Notes
- Choose room temperature ingredients to ensure smooth mixing and consistent dough texture.
- Activate yeast carefully by checking water temperature between 100-110°F to prevent killing or under-activating the yeast.
- Handle dough gently during kneading and shaping to maintain air pockets that create soft, tender bread structure.
- For gluten-free adaptation, substitute all-purpose flour with a blend of gluten-free flour and xanthan gum to maintain bread’s elasticity.
- Prep Time: 1 hour 35 minutes
- Cook Time: 25-30 minutes
- Category: Breakfast, Snacks
- Method: Baking
- Cuisine: Japanese
Nutrition
- Serving Size: 8
- Calories: 221 kcal
- Sugar: 10 g
- Sodium: 145 mg
- Fat: 6 g
- Saturated Fat: 3.5 g
- Unsaturated Fat: 2 g
- Trans Fat: 0.1 g
- Carbohydrates: 35 g
- Fiber: 1 g
- Protein: 5 g
- Cholesterol: 40 mg
Sarah Mitchell
Content Specialist & Home Cooking Enthusiast
Expertise
Education
Asheville-Buncombe Technical Community College – Asheville, NC
American Fitness Professionals & Associates – Online
Sarah’s passion for food was sparked by weekend trips to the farmers’ market and her belief that healthy meals should never feel boring.
After earning her culinary diploma and becoming a certified Nutrition and Wellness Consultant, she set out to help others fall in love with simple, wholesome cooking.
She’s all about celebrating the small wins in the kitchen: a colorful yogurt bowl, a new twist on a classic dish, or a homemade snack that feels just a little extra special.
Outside the kitchen, Sarah is a gardener at heart, a yoga enthusiast, and a believer that fresh herbs can brighten any meal, and any day.