
Cozy Apple Pie Biscuits Recipe: Sweet Comfort in Every Bite
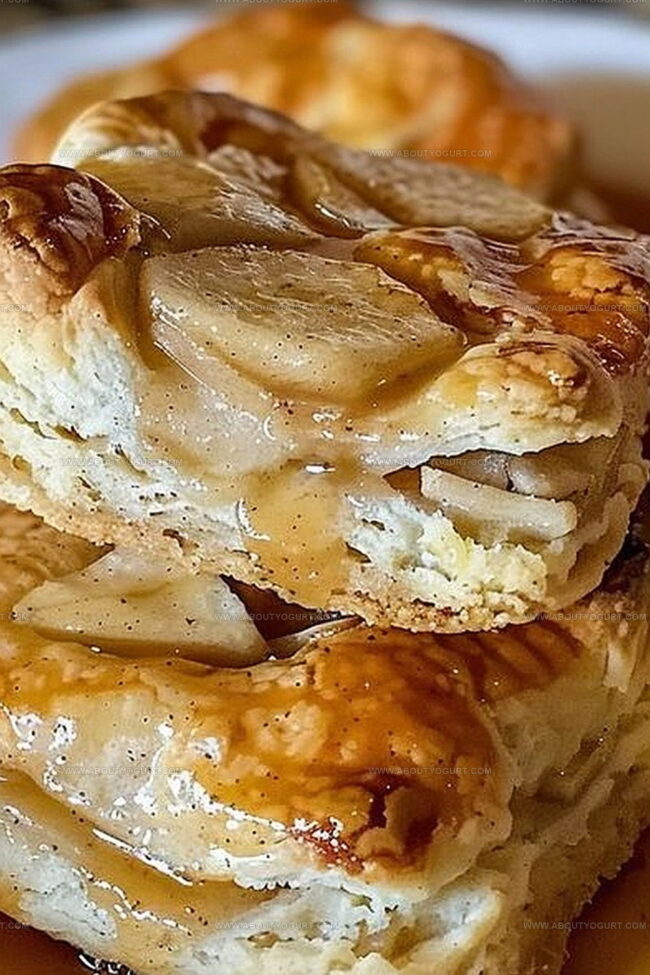
Crispy golden biscuits with a delightful apple pie twist have become my latest kitchen obsession.
Sweet aromas of cinnamon and fresh apples will dance through your home as you mix these delectable treats.
Buttery dough meets classic pie flavors in a clever reimagining of two beloved classics.
Warm spices and tender fruit create a magical combination that feels both comforting and exciting.
Crumbly biscuit edges paired with soft apple centers make this recipe a true crowd-pleaser.
Baking these little wonders takes less than an hour and guarantees smiles around the table.
Let’s transform your kitchen into a cozy haven of irresistible baked goodness.
Reasons to Enjoy Apple Pie Biscuits
Ingredients Needed for Apple Pie Biscuits
Main Ingredients:Leavening and Binding Agents:Flavor and Moisture Enhancers:Step-By-Step Instructions for Apple Pie Biscuits
Step 1: Prepare the Dough
In a large mixing bowl, combine flour, baking powder, salt, and sugar. Cut cold butter into small pieces and work it into the dry ingredients using your fingertips or a pastry cutter until the mixture resembles coarse crumbs. Pour in cold milk and stir until the dough just comes together.
Step 2: Create Apple Filling
Peel and dice fresh apples into small, uniform cubes. In a separate bowl, mix the apple pieces with:Step 3: Shape the Biscuits
Roll out the dough on a lightly floured surface to about 1/2 inch thickness. Use a round cookie cutter to cut out biscuit circles. Place a small spoonful of the apple mixture in the center of each biscuit.
Step 4: Fold and Seal
Carefully fold the biscuit dough over the apple filling, creating a half-moon shape. Press the edges together with a fork to seal completely. This prevents the filling from leaking during baking.
Step 5: Add Topping
Brush the tops of the biscuits with beaten egg. Sprinkle a mixture of granulated sugar and additional cinnamon over each biscuit for extra sweetness and crunch.
Step 6: Bake to Golden Perfection
Transfer the biscuits to a parchment-lined baking sheet. Bake in the preheated oven for 15-18 minutes, or until the biscuits turn a beautiful golden brown and the edges are crisp.
Step 7: Cool and Serve
Remove the biscuits from the oven and let them cool on a wire rack for 5-10 minutes. Serve warm, optionally drizzled with a light glaze or a sprinkle of powdered sugar.
Helpful Tips for Apple Pie Biscuits

Variation Ideas for Apple Pie Biscuits
Pairings That Complement Apple Pie Biscuits
Best Storage Solutions for Apple Pie Biscuits
FAQs About Apple Pie Biscuits
Yes, you can use various apples like Granny Smith, Honeycrisp, or Fuji. Each apple brings a unique flavor and texture to the biscuits.
Absolutely! You can prepare the dough and assemble the biscuits a few hours before baking. Just keep them refrigerated until you’re ready to bake.
No special equipment is required. A standard baking sheet, mixing bowl, and pastry cutter or knife are all you need to create these delicious apple pie biscuits.
Print
Apple Pie Biscuits Recipe
- Total Time: Not specified
- Yield: 8 1x
Description
Homemade “Apple Pie Biscuits” blend classic Southern comfort with sweet autumn flavors, creating a delightful pastry that marries flaky biscuit texture and warm cinnamon-spiced apple filling. Pastry enthusiasts will savor this delectable treat that brings nostalgic bakery charm straight to your kitchen.
Ingredients
Main Ingredients:
- 1 can buttermilk biscuits
- 1 can apple pie filling
Topping Ingredients:
- 4 tablespoons (60 milliliters) butter, melted
- 1/2 teaspoon (2.5 milliliters) ground cinnamon
- 1/4 cup (50 grams) granulated sugar
Instructions
- Fire up the oven to a toasty 375°F (190°C), preparing a welcoming environment for the pastry creation.
- Mix flour, baking powder, and salt in a spacious mixing bowl, forming a soft, powdery foundation for the biscuits.
- Cut cold butter into the dry mixture using a pastry blender or fingertips until the texture resembles coarse, crumbly breadcrumbs.
- Pour in cold buttermilk, gently folding and stirring until the dough just comes together without overworking.
- Sprinkle flour on a clean surface and roll out the dough to approximately 1/2-inch thickness, creating a smooth, even canvas.
- Carefully spread apple butter across the dough’s surface, ensuring an even, tantalizing layer of fruity richness.
- Fold the dough in half, pressing gently to seal the apple butter within the delicate layers.
- Roll the dough again to about 3/4-inch thickness, maintaining the precious apple butter filling.
- Use a biscuit cutter to shape uniform rounds, transferring each delicate disc to a parchment-lined baking sheet.
- Brush the biscuit tops with egg wash, creating a golden, glossy finish.
- Sprinkle cinnamon sugar over each biscuit, adding a sweet, aromatic crown.
- Bake for 15-18 minutes until the edges turn a beautiful golden brown and the tops gleam with promise.
- Remove from the oven and let cool on a wire rack for a few minutes before serving warm and inviting.
Notes
- Achieve golden-brown perfection by brushing biscuit tops with egg wash, creating a gorgeous, shiny surface that catches the light.
- Customize flavor profiles by experimenting with different apple varieties like Honeycrisp for sweetness or Granny Smith for tartness.
- Keep biscuit dough cold before cutting to ensure maximum flakiness and prevent butter from melting prematurely during preparation.
- Enhance nutritional value by adding a sprinkle of chopped walnuts or pecans for extra protein and a delightful crunch.
- Prep Time: Not specified
- Cook Time: Not specified
- Category: Breakfast, Snacks, Desserts
- Method: Baking
- Cuisine: American
Nutrition
- Serving Size: 8
- Calories: 277 kcal
- Sugar: 17 g
- Sodium: 370 mg
- Fat: 14 g
- Saturated Fat: 8 g
- Unsaturated Fat: 5 g
- Trans Fat: 0.5 g
- Carbohydrates: 34 g
- Fiber: 1 g
- Protein: 3 g
- Cholesterol: 35 mg
Michael Thompson
Founder & Recipe Developer
Expertise
Education
Cascade Culinary Institute – Bend, OR
ServSafe Food Handler Certification – Portland, OR
Focus: Certified in core food safety and hygiene principles for both home and professional kitchens, with emphasis on ingredient handling, kitchen cleanliness, and safe preparation methods.
Mike’s kitchen journey began with a single goal: to make everyday meals feel like something worth celebrating.
After earning his Certificate in Culinary Arts from Cascade Culinary Institute, he spent years working with local farmers and small kitchens across Oregon, learning the beauty of seasonal, small-batch cooking.
Mike’s approach is simple, cook with what’s fresh, keep it approachable, and always leave room for a little creativity. When he’s not testing yogurt marinades or designing single-serving meals, you’ll find him hiking trails or hunting down the best berries at local markets.