
Apple Pie Bombs Recipe for Sweet Little Treats
Crispy golden apple pie bombs burst with sweet, cinnamon-spiced excitement that’ll make your taste buds dance.
Layers of buttery pastry wrap around tender fruit chunks, creating a delightful handheld treat.
Warm spices mingle with soft apple pieces, promising a comforting dessert experience.
Each bite delivers a perfect balance of flaky crust and gooey filling.
Minimal ingredients and simple steps make this recipe accessible for bakers of all skill levels.
Weekend gatherings or cozy afternoons call for these irresistible little pastry delights.
Reasons to Love Apple Pie Bombs

Ingredients for Apple Pie Bombs
Main Ingredients:
Dough Base: .
Filling:Coating and Frying Components:Preparation Ingredients:How to Make Apple Pie Bombs
Step 1: Create Cinnamon Sugar Coating
Grab a shallow bowl and mix granulated sugar with ground cinnamon. This magical dust will give your pie bombs an irresistible sweet and spicy exterior.
Step 2: Prepare Frying Setup
Select a heavy-bottomed saucepan and fill it halfway with vegetable oil. You’ll want enough oil to completely submerge the delightful dough balls when cooking.
Step 3: Transform Biscuit Dough
Open the biscuit can and gently separate each biscuit into two layers. Softly flatten each piece using your fingers or a rolling pin. Keep the dough thick enough to hold the scrumptious filling.
Step 4: Stuff With Apple Goodness
Place a generous dollop of apple pie filling in the center of each flattened dough circle. Pinch edges tightly to seal, creating a perfect little bundle. Roll into a smooth ball, tucking any messy seams underneath.
Step 5: Heat Oil to Perfect Temperature
Warm the vegetable oil until it reaches 325°F. Maintaining this precise temperature ensures golden, crispy exteriors.
Step 6: Fry To Crispy Perfection
Carefully lower dough balls into hot oil using a slotted metal spoon. Fry 2-3 bombs at a time, rotating continuously for even browning. Cook until they turn a gorgeous golden color, about 5 minutes per batch.
Step 7: Roll in Cinnamon Sugar
Transfer freshly fried bombs to the cinnamon sugar bowl. Coat each bomb thoroughly, ensuring a sweet and sparkly exterior.
Step 8: Serve and Enjoy
Devour these warm treats immediately. For ultimate indulgence, pair with a scoop of vanilla ice cream and watch everyone’s eyes light up!
Pro Tips for Apple Pie Bombs

Variation Ideas for Apple Pie Bombs
Pairing Suggestions for Apple Pie Bombs
Storage Advice for Apple Pie Bombs
FAQs About Apple Pie Bombs
Use a digital candy or deep-fry thermometer to check that the oil is precisely at 325F. If you don’t have a thermometer, drop a small piece of bread into the oil – if it sizzles and turns golden brown within 30-45 seconds, the oil is ready.
While frying gives the best crispy texture, you can bake them at 375F for about 12-15 minutes on a parchment-lined baking sheet. The texture will be different and less crispy, but still delicious.
Make sure to pinch the edges very tightly and seal completely when forming the bombs. If a small leak occurs during frying, don’t worry – the oil will seal the hole quickly.
Print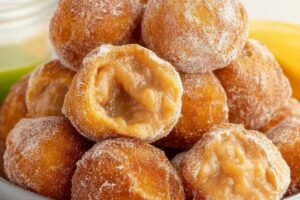
Apple Pie Bombs Recipe
- Total Time: 25-30 minutes
- Yield: 8 1x
Description
Delightful apple pie bombs bring classic American dessert magic into bite-sized spheres of pure comfort. Crispy golden pastry shells cradle warm cinnamon-spiced apple filling, promising sweet satisfaction for dessert enthusiasts seeking simple yet irresistible indulgence.
Ingredients
Main Ingredients:
- 1 (16.3-ounce / 462 grams) can Grands Big biscuits, flaky
- 1 (21-ounce / 595 grams) can apple pie filling or caramel apple pie filling
Coating and Seasoning:
- 1 cup granulated sugar
- 1 tablespoon ground cinnamon
Cooking Ingredient:
- Vegetable oil for frying
Instructions
- Craft a delicate mixture of granulated sugar and ground cinnamon in a shallow dish, setting it aside for the final coating process.
- Select a heavy-bottomed saucepan and fill it approximately halfway with vegetable oil, ensuring sufficient depth to completely submerge the dough spheres during frying.
- Delicately separate each biscuit into two halves by gently pulling apart the flaky layers. Use fingertips or a rolling pin to create uniform, slightly flattened circles without compromising the dough’s structural integrity.
- Position a dollop of apple pie filling precisely in the center of each dough circle. Meticulously seal the edges, pressing firmly to prevent leakage, then gently transform the sealed package into a smooth, seamless sphere.
- Ignite the oil, bringing it to a precise temperature of 325F (163C). Maintain this consistent heat throughout the frying process to guarantee optimal golden-brown transformation.
- Deploy a slotted metal spoon to carefully introduce the dough spheres into the simmering oil. Fry in small batches of 2-3, continuously rotating to ensure uniform coloration and prevent scorching. Anticipate approximately 5 minutes per batch for perfect crispy exterior.
- Extract the golden-brown orbs using the slotted spoon and immediately transfer them into the prepared cinnamon-sugar mixture. Thoroughly coat each piece, ensuring complete sugar coverage while the surface remains piping hot.
- Serve these decadent morsels immediately, preferably accompanied by a luxurious scoop of vanilla ice cream to elevate the sensory experience.
Notes
- Check oil temperature precisely using a reliable digital thermometer to ensure perfect golden-brown exterior without burning.
- Create uniform dough balls by using consistent pressure when sealing and rolling to prevent leaks during frying.
- Drain excess oil on paper towels before coating in cinnamon sugar for lighter, crispier texture.
- Experiment with different pie fillings like peach, cherry, or blueberry for variety and personalized flavor combinations.
- Prep Time: 15 minutes
- Cook Time: 10-15 minutes
- Category: Desserts, Snacks
- Method: Frying
- Cuisine: American
Nutrition
- Serving Size: 8
- Calories: 450 kcal
- Sugar: 32 g
- Sodium: 520 mg
- Fat: 22 g
- Saturated Fat: 4 g
- Unsaturated Fat: 16 g
- Trans Fat: 0.5 g
- Carbohydrates: 60 g
- Fiber: 2 g
- Protein: 4 g
- Cholesterol: 20 mg
Sarah Mitchell
Content Specialist & Home Cooking Enthusiast
Expertise
Education
Asheville-Buncombe Technical Community College – Asheville, NC
American Fitness Professionals & Associates – Online
Sarah’s passion for food was sparked by weekend trips to the farmers’ market and her belief that healthy meals should never feel boring.
After earning her culinary diploma and becoming a certified Nutrition and Wellness Consultant, she set out to help others fall in love with simple, wholesome cooking.
She’s all about celebrating the small wins in the kitchen: a colorful yogurt bowl, a new twist on a classic dish, or a homemade snack that feels just a little extra special.
Outside the kitchen, Sarah is a gardener at heart, a yoga enthusiast, and a believer that fresh herbs can brighten any meal, and any day.