
Magical Baked Alaska Recipe: Toasty, Sweet Cloud of Delight
Crafting a delectable baked alaska brings pure culinary magic right to your kitchen.
Layers of contrasting temperatures create an extraordinary dessert experience.
Smooth ice cream nestles beneath a golden meringue crown, waiting to surprise your taste buds.
Cold meets hot in this classic showstopper that seems almost impossible.
Elegant yet surprisingly simple, this dessert requires minimal ingredients but maximum wow factor.
Professional pastry techniques merge with home kitchen creativity to produce something truly spectacular.
You’ll feel like a dessert virtuoso when presenting this stunning sweet finale.
Let’s uncover the delightful secrets of creating this stunning frozen-fire sensation.
Why Nigella Baked Alaska Is A Showstopper

What You’ll Need For Nigella Baked Alaska
Base Layer:Frozen Center:Meringue Topping:How To Make Nigella Baked Alaska Step By Step

Step 1: Slice Cake Base
Cut the sponge cake horizontally into two even layers. Carefully place the bottom layer into a freezer-safe dish that will fit in your oven.
Step 2: Create Ice Cream Layer
Allow ice cream to soften at room temperature for a few minutes. Spread the softened ice cream evenly over the cake base. Place the dish in the freezer and let it set completely for about 2 hours until the ice cream is rock solid.
Step 3: Whip Meringue Magic
In a clean, dry mixing bowl, whip egg whites using an electric mixer. Beat until soft peaks form. Slowly sprinkle in sugar while continuing to whip. Keep beating until the meringue becomes thick, glossy, and forms stiff peaks that hold their shape.
Step 4: Preheat Oven
Turn on the oven and set the temperature to 220 degrees Celsius or 425 degrees Fahrenheit. Allow the oven to fully heat up before baking.
Step 5: Cover with Meringue
Remove the frozen cake and ice cream from the freezer. Carefully spread the meringue over the entire surface, making sure to completely cover the ice cream layer. Use a spatula to create decorative swirls and seal all edges completely.
Step 6: Quick Golden Bake
Place the meringue-covered dessert into the preheated oven. Bake for 10-15 minutes, watching carefully until the meringue turns a beautiful golden brown color.
Step 7: Serve Immediately
Remove from the oven and let the Baked Alaska cool for just a few moments. Use a knife dipped in hot water to slice cleanly through the dessert. Serve right away while the meringue is crisp and the ice cream remains frozen.
Tips That Help With Nigella Baked Alaska
Fun Variations For Nigella Baked Alaska
What Goes Well With Nigella Baked Alaska
How To Store Nigella Baked Alaska Correctly
FAQs About Nigella Baked Alaska
The key technique is creating a meringue that completely seals the ice cream, which prevents melting during the brief high-temperature baking process.
Softening allows easier spreading and helps create a smooth, even layer that freezes quickly and uniformly on the cake base.
While sponge cake works best, you can experiment with other dense, sturdy cakes like pound cake or génoise that can hold the ice cream layer without becoming soggy.
With careful preparation and precise steps, even novice bakers can successfully create this impressive dessert by following the technique of freezing and meringue coating carefully.
Print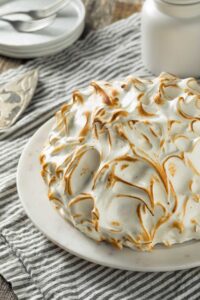
Baked Alaska Recipe
- Total Time: 2 hours 25-30 minutes
- Yield: 6 1x
Description
Creamy, dreamy Baked Alaska brings together classic French culinary elegance with American innovation. Layers of rich ice cream nestled within golden sponge cake and crowned with perfectly torched meringue invite you to savor each luxurious bite of this spectacular dessert.
Ingredients
Main Ingredients:
- 1 sponge cake
- 1 liter (33.8 fluid ounces) ice cream
Egg Whites and Sweetener:
- 4 large egg whites
- 200 grams (7.05 ounces) sugar
Optional Add-ins:
- 50 grams (1.76 ounces) cornflakes
- Zest of 1 lemon
Instructions
- Slice the sponge cake horizontally into two even layers, creating a stable base for the dessert.
- Allow ice cream to soften at room temperature for 5-7 minutes, ensuring a smooth spreadable consistency.
- Carefully spread the softened ice cream evenly over the bottom cake layer, creating a thick, uniform surface.
- Transfer the cake with ice cream to the freezer and allow to solidify completely for approximately 2 hours until firm.
- Whip egg whites using an electric mixer, gradually incorporating sugar until the meringue forms glossy, stiff peaks that hold their shape.
- Heat the oven to a high temperature of 220°C (425°F), preparing for the final baking stage.
- Remove the frozen cake from the freezer and generously coat the entire surface with the prepared meringue, ensuring complete coverage and sealed edges.
- Place the meringue-covered dessert into the preheated oven and bake for 10-12 minutes until the exterior turns a rich, golden brown color.
- Remove from the oven and allow to rest for a brief moment to stabilize the structure.
- Using a knife dipped in hot water, slice the Baked Alaska and serve immediately to maintain the dramatic temperature contrast between the crisp meringue and cold ice cream.
Notes
- Prep the cake layers ahead of time to ensure a perfectly even base for your dessert.
- Allow ice cream to soften just enough to spread smoothly without melting completely.
- Use a sharp knife dipped in hot water for clean, precise slices when serving.
- Choose high-quality, dense ice cream that will hold its shape during baking and won’t melt too quickly.
- Prep Time: 15 minutes
- Cook Time: 10-15 minutes
- Category: Desserts
- Method: Baking
- Cuisine: American
Nutrition
- Serving Size: 6
- Calories: 371
- Sugar: 40 g
- Sodium: 48 mg
- Fat: 7 g
- Saturated Fat: 4 g
- Unsaturated Fat: 2 g
- Trans Fat: 0.1 g
- Carbohydrates: 71 g
- Fiber: 1 g
- Protein: 4 g
- Cholesterol: 11 mg
Michael Thompson
Founder & Recipe Developer
Expertise
Education
Cascade Culinary Institute – Bend, OR
ServSafe Food Handler Certification – Portland, OR
Focus: Certified in core food safety and hygiene principles for both home and professional kitchens, with emphasis on ingredient handling, kitchen cleanliness, and safe preparation methods.
Mike’s kitchen journey began with a single goal: to make everyday meals feel like something worth celebrating.
After earning his Certificate in Culinary Arts from Cascade Culinary Institute, he spent years working with local farmers and small kitchens across Oregon, learning the beauty of seasonal, small-batch cooking.
Mike’s approach is simple, cook with what’s fresh, keep it approachable, and always leave room for a little creativity. When he’s not testing yogurt marinades or designing single-serving meals, you’ll find him hiking trails or hunting down the best berries at local markets.