Savory Classic Patty Melt Recipe That Sizzles With Flavor
Beef sizzles and melts together in this classic patty melt recipe that promises pure comfort on a plate.
Generations of home cooks have perfected this diner-style sandwich packed with rich, savory flavors.
Caramelized onions add a sweet depth to the perfectly seasoned burger patty.
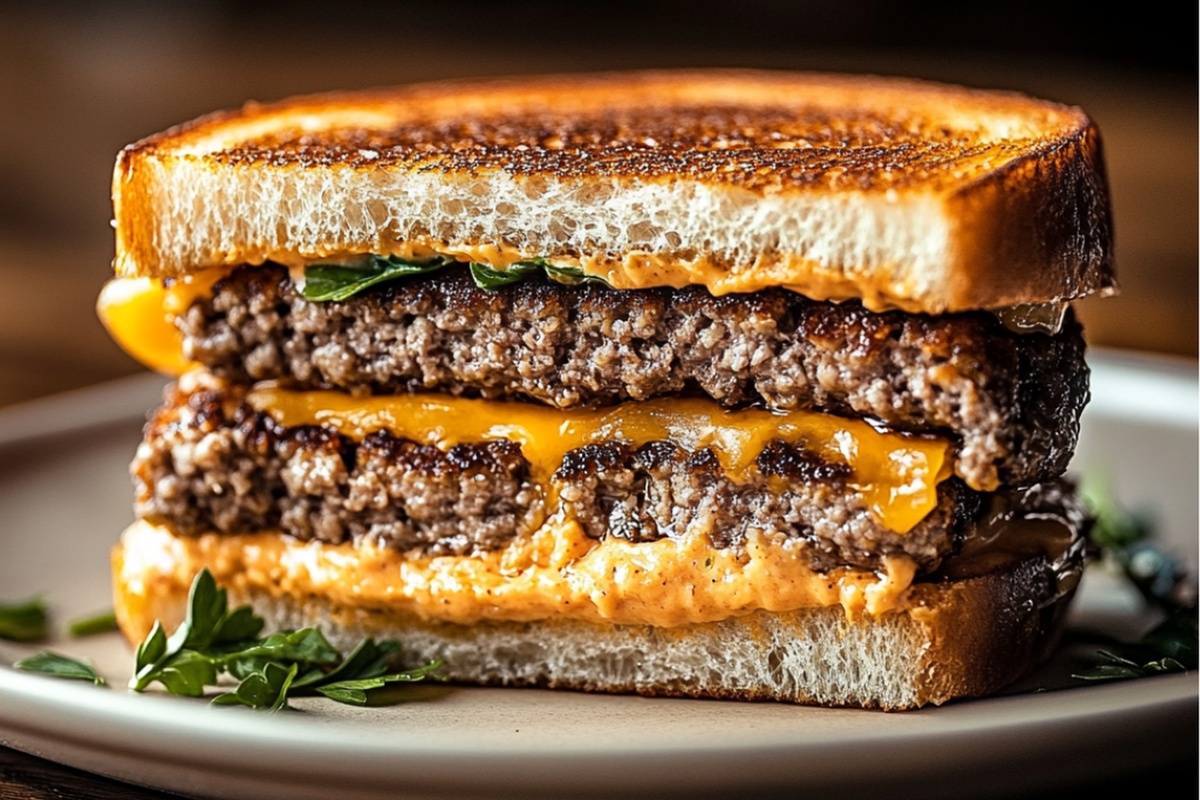
Melted Swiss cheese creates a gooey blanket over the meat, nestled between golden, buttery toasted rye bread.
Every bite delivers a nostalgic blend of textures and tastes that transport you straight to a cozy roadside diner.
The combination of crispy bread, juicy meat, and melted cheese makes this patty melt an absolute crowd-pleaser.
Prepare to indulge in a timeless sandwich that never goes out of style.
What Makes a Patty Melt Comforting
What’s Inside a Classic Patty Melt
Meat Base:Bread and Cheese:Sauce and Cooking Ingredients:How to Cook a Juicy Patty Melt
Step 1: Prepare Beef Patties
Create delicious hamburger patties by blending ground beef with seasonings. Mix the meat with:Gently form the mixture into three equal-sized burger patties.
Step 2: Cook Meat Perfectly
Warm a heavy skillet over medium-high heat. Place patties into the pan and cook for 2-3 minutes on each side.
Reduce heat and continue cooking until internal temperature reaches 160 degrees Fahrenheit.
Step 3: Create Zesty Sandwich Spread
In a small mixing bowl, combine:Whisk ingredients together until smooth and well-blended.
Step 4: Build Delectable Sandwich
Butter one side of each rye bread slice. Place bread butter-side down in a preheated skillet.
Layer sandwich with:Spread prepared sauce on unbuttered bread side and place sauce-side down on top.
Step 5: Toast and Crisp Sandwich
Grill sandwich over medium-low heat until bread turns golden brown and crispy, approximately 2-3 minutes per side.
Step 6: Serve Immediately
Transfer hot patty melts to serving plates and enjoy while warm.
Notes for Toasty Classic Patty Melt Lovers
Swaps for Making Patty Melts Your Own
What Sides Work With Patty Melt Sandwiches
Craft Perfect Beverage Companions: Crisp Craft Beer Pairing – Choose a hoppy IPA or amber ale to cut through the rich, meaty sandwich and complement its robust flavors.
Refreshing Side Drink: Tangy Pickle Mocktail – Mix dill pickle juice, sparkling water, and a dash of hot sauce for a zesty non-alcoholic option that mirrors the sandwich’s savory profile.
Classic Comfort Combo: Creamy Milkshake Match – Blend a classic vanilla or chocolate milkshake to balance the patty melt’s salty, greasy goodness with smooth, cold sweetness.
Zesty Palate Cleanser: Citrus Iced Tea – Brew a lemon-infused black tea with a hint of mint to refresh the palate between hearty bites of the sandwich.
Storing Patty Melts for Another Meal
FAQs
Rye bread is traditional and provides the classic flavor, but you can also use sourdough or texas toast for a similar texture and taste.
Absolutely! While cheddar and provolone are recommended, you can swap with swiss, american, or monterey jack cheese based on your preference.
Use a meat thermometer to check that the internal temperature reaches 160°F, which ensures the ground beef is safely cooked through.
Yes, you can add a dash of hot sauce, a pinch of cayenne pepper, or some sriracha to the sauce mixture to give it an extra kick of heat.
Print
Classic Patty Melt Recipe
- Total Time: 30 minutes
- Yield: 3 1x
Description
Sizzling classic patty melt recipe elevates comfort food with its perfect blend of juicy beef, caramelized onions, and melted Swiss cheese between buttery grilled rye bread. Crispy, savory, and irresistibly satisfying, you’ll crave this diner-style sandwich that brings pure culinary nostalgia to your plate.
Ingredients
Meat Protein:
- 1 pound ground beef
Cheese:
- 6 slices cheddar cheese
- 6 slices provolone cheese
Bread and Seasoning:
- 6 slices rye bread
- 6 tablespoons butter, softened
- 3/4 teaspoon black pepper
- 1/2 teaspoon salt
- 1/4 teaspoon onion powder
Condiments:
- 3 tablespoons mayonnaise
- 2 tablespoons ketchup
- 1 teaspoon sweet relish
- 1 teaspoon sugar
Instructions
- Prepare rye bread by generously coating one side of each slice with butter, ensuring even coverage for optimal golden-brown toasting.
- Create beef patties by thoroughly blending ground beef with pepper, salt, and onion powder, then carefully forming three uniform patties.
- Preheat skillet to medium-high heat and cook patties for 2-3 minutes per side, achieving a robust sear, then reduce temperature to low and continue cooking until internal temperature reaches 160°F.
- Craft signature sauce by whisking mayonnaise, ketchup, sweet relish, and sugar in a small mixing bowl, blending ingredients until smooth and well-incorporated.
- Position skillet at medium-low temperature and place bread slices butter-side down, creating a foundation for layering.
- Construct sandwich layers by adding cheddar cheese slices, cooked beef patty, and provolone cheese, creating a rich, melty texture.
- Spread prepared sauce on unbuttered bread side and carefully place sauce-side down atop cheese layers.
- Toast each side of assembled sandwich for 2-3 minutes, monitoring closely to achieve a perfect golden-brown crust.
- Repeat assembly process for remaining patty melts, ensuring consistent cooking technique.
- Serve immediately while warm, presenting a delectable fusion of crispy bread, melted cheese, and savory beef.
Notes
- Enhance meat flavor by mixing ground beef with finely minced onions or garlic for extra depth and complexity.
- Use high-quality, slightly fatty ground beef (80/20 blend) to ensure juicy, tender patties that won’t dry out during cooking.
- For gluten-free option, swap rye bread with gluten-free bread or lettuce wraps, maintaining the classic sandwich experience.
- Control burger doneness carefully by using a meat thermometer to prevent overcooking, keeping patties perfectly moist and tender.
- Prep Time: 15 minutes
- Cook Time: 15 minutes
- Category: Lunch, Dinner, Snacks
- Method: Frying
- Cuisine: American
Nutrition
- Serving Size: 3
- Calories: 808 kcal
- Sugar: 6 g
- Sodium: 812 mg
- Fat: 56 g
- Saturated Fat: 25 g
- Unsaturated Fat: 27 g
- Trans Fat: 1.5 g
- Carbohydrates: 42 g
- Fiber: 3 g
- Protein: 44 g
- Cholesterol: 132 mg
Michael Thompson
Founder & Recipe Developer
Expertise
Education
Cascade Culinary Institute – Bend, OR
ServSafe Food Handler Certification – Portland, OR
Focus: Certified in core food safety and hygiene principles for both home and professional kitchens, with emphasis on ingredient handling, kitchen cleanliness, and safe preparation methods.
Mike’s kitchen journey began with a single goal: to make everyday meals feel like something worth celebrating.
After earning his Certificate in Culinary Arts from Cascade Culinary Institute, he spent years working with local farmers and small kitchens across Oregon, learning the beauty of seasonal, small-batch cooking.
Mike’s approach is simple, cook with what’s fresh, keep it approachable, and always leave room for a little creativity. When he’s not testing yogurt marinades or designing single-serving meals, you’ll find him hiking trails or hunting down the best berries at local markets.