
Fluffy Jam and Coconut Sponge Recipe That Melts in Your Mouth
Mouthwatering memories of grandma’s kitchen dance through my mind whenever I think about this classic jam and coconut sponge recipe.
Sweet aromas instantly transport me back to childhood afternoons.
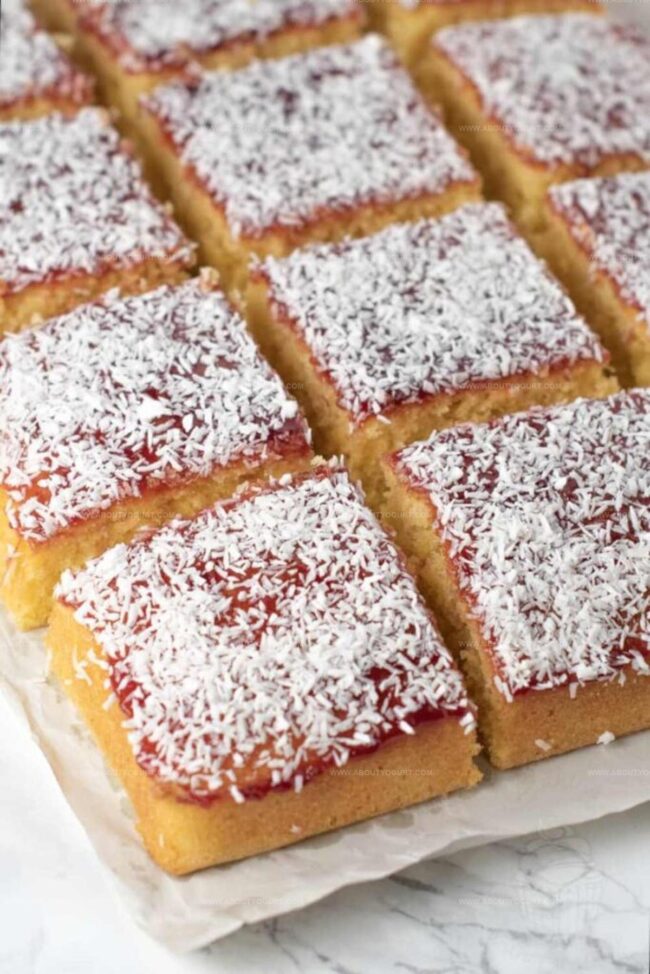
My family cherished these soft, delicate slices that sparkled with vibrant raspberry jam.
Tender crumbs melted effortlessly, revealing layers of tropical coconut goodness.
Baking this treat feels like wrapping yourself in a warm, comforting embrace.
Simplicity meets pure deliciousness in every single bite.
You will fall in love with this incredibly easy dessert that promises pure happiness.
Why Mary Berry Jam And Coconut Sponge Stands Out
Mary Berry Jam And Coconut Sponge Ingredient List
Base Ingredients:Filling and Topping:Baking Essentials:Steps For Making Mary Berry Jam And Coconut Sponge
Step 1: Warm Up The Oven
Crank your oven to 180°C (160°C fan) and grab a 9×12 inch baking tin. Line the tin with parchment paper, making sure it covers the bottom and sides completely.
Step 2: Cream Butter And Sugar
In a large mixing bowl, whip the margarine and sugar together until the mixture turns light, airy, and looks like fluffy clouds. Keep beating until the color becomes pale and the texture becomes super smooth.
Step 3: Incorporate Eggs
Crack the eggs into the creamy mixture one at a time. After adding each egg, beat thoroughly to ensure it’s fully blended before adding the next. This helps create a smooth, well-combined batter.
Step 4: Fold In Flour
Gently fold the self-raising flour into the wet ingredients. Use a soft, sweeping motion to incorporate the flour, being careful not to overmix. The goal is a silky, lump-free batter that’s light and airy.
Step 5: Bake The Sponge
Pour the batter into the prepared tin, spreading it evenly. Slide the tin into the preheated oven and bake for 35-40 minutes. Look for a golden-brown top and a firm texture that springs back when lightly touched.
Step 6: Cool The Cake
Remove the sponge from the oven and let it cool completely on a wire rack. This prevents the bottom from becoming soggy and helps the cake set properly.
Step 7: Add Jam And Coconut
Gently warm the jam to make it more spreadable. Evenly spread the jam across the cooled sponge cake. Sprinkle shredded coconut generously over the jam layer, creating a delightful tropical topping.
Tips To Help With Mary Berry Jam And Coconut Sponge

New Ideas For Mary Berry Jam And Coconut Sponge
What Pairs Nicely With Mary Berry Jam And Coconut Sponge
Storage Tips For Mary Berry Jam And Coconut Sponge
FAQ Guide For Mary Berry Jam And Coconut Sponge
Yes, you can substitute margarine with unsalted butter for the same rich flavor and texture in the sponge cake.
Insert a skewer or toothpick into the center of the cake. If it comes out clean without any wet batter, the cake is done.
Any sweet berry jam like strawberry, raspberry, or mixed berry will complement the coconut topping perfectly.
Yes, self-raising flour helps the sponge rise and creates a light, fluffy texture essential to the cake’s success.
Print
Jam And Coconut Sponge Recipe
- Total Time: 45-50 minutes
- Yield: 8 1x
Description
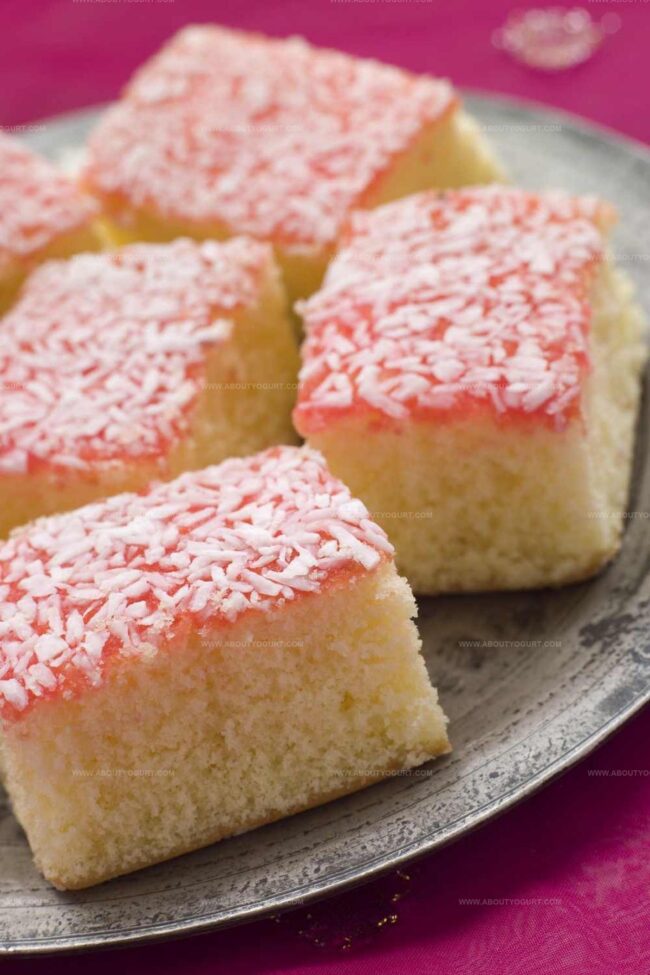
Indulgent British classic Jam and Coconut Sponge brings nostalgic comfort to dessert tables with its sweet layers of fruity preserve and tropical coconut. Delicate crumb and creamy texture invite sweet memories while promising delightful moments for passionate bakers and dessert enthusiasts.
Ingredients
Main Ingredients:
- 280 grams (9.9 ounces) margarine
- 280 grams (9.9 ounces) caster sugar
- 5 free-range eggs
- 280 grams (9.9 ounces) self-raising flour
Filling and Topping:
- 300 grams (10.6 ounces) jam (strawberry or raspberry)
- 100 grams (3.5 ounces) desiccated coconut
Instructions
- Prepare the oven by heating to 180°C (160°C fan) and line a 9×12-inch baking tin with parchment paper.
- Cream margarine and sugar together until the mixture becomes light and airy, achieving a pale, fluffy consistency.
- Incorporate eggs into the mixture one at a time, thoroughly mixing after each addition to ensure a smooth incorporation.
- Gently fold self-raising flour into the mixture, creating a silky, uniform batter without overmixing.
- Transfer the batter to the prepared tin, spreading it evenly to ensure consistent baking.
- Bake in the preheated oven for 35-40 minutes, watching for a golden-brown surface and a set texture that springs back when lightly touched.
- Remove from the oven and allow the sponge to cool completely on a wire rack, ensuring it reaches room temperature.
- Slightly warm the jam to make it more spreadable, then carefully distribute it across the entire surface of the cooled sponge.
- Generously sprinkle shredded coconut over the jam layer, creating an even coating that adds texture and flavor to the dessert.
Notes
- Toast coconut beforehand to enhance its nutty flavor and add extra crunch to the dessert.
- Replace margarine with unsalted butter for a richer taste and more traditional baking approach.
- Use gluten-free self-raising flour to make this recipe suitable for those with gluten sensitivities.
- Consider using low-sugar jam or homemade fruit preserves to reduce overall sugar content and create a more balanced sweetness.
- Prep Time: 10 minutes
- Cook Time: 35-40 minutes
- Category: Desserts
- Method: Baking
- Cuisine: British
Nutrition
- Serving Size: 8
- Calories: 394kcal
- Sugar: 34g
- Sodium: 120mg
- Fat: 22g
- Saturated Fat: 9g
- Unsaturated Fat: 10g
- Trans Fat: 0.5g
- Carbohydrates: 44g
- Fiber: 2g
- Protein: 5g
- Cholesterol: 75mg
Michael Thompson
Founder & Recipe Developer
Expertise
Education
Cascade Culinary Institute – Bend, OR
ServSafe Food Handler Certification – Portland, OR
Focus: Certified in core food safety and hygiene principles for both home and professional kitchens, with emphasis on ingredient handling, kitchen cleanliness, and safe preparation methods.
Mike’s kitchen journey began with a single goal: to make everyday meals feel like something worth celebrating.
After earning his Certificate in Culinary Arts from Cascade Culinary Institute, he spent years working with local farmers and small kitchens across Oregon, learning the beauty of seasonal, small-batch cooking.
Mike’s approach is simple, cook with what’s fresh, keep it approachable, and always leave room for a little creativity. When he’s not testing yogurt marinades or designing single-serving meals, you’ll find him hiking trails or hunting down the best berries at local markets.