
Red Velvet Oreo Cake Roll Recipe That’s Bursting with Flavor
Craving a delightful red velvet oreo cake roll that combines classic flavors in a spectacular dessert?
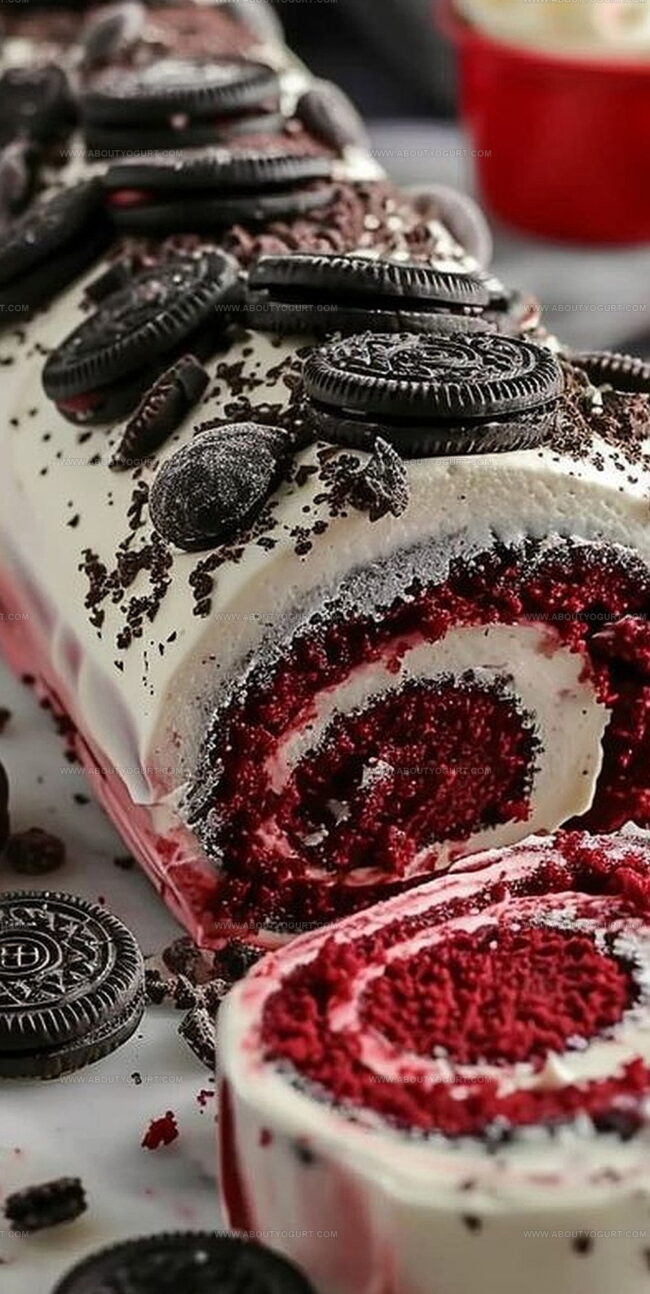
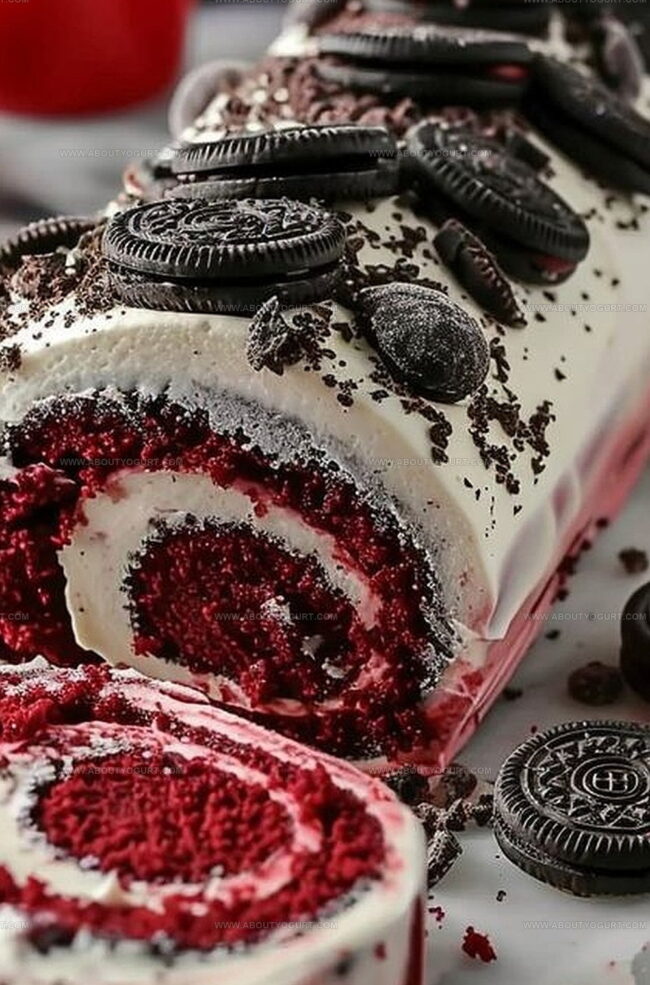
Chocolate cookie crumbles add unexpected texture to this dreamy creation.
Sweet cream cheese filling swirls through soft, velvety cake layers with irresistible charm.
Bakers seeking a show-stopping treat will fall head over heels for this decadent recipe.
Each slice promises a perfect balance of rich cocoa and creamy goodness.
Oreo chunks nestled inside create delightful surprises with every single bite.
You won’t be able to resist slicing into this incredible dessert that looks as amazing as it tastes.
Red Velvet Oreo Cake Roll That Impresses
Ingredients for Red Velvet Oreo Cake Roll
Cake Base Ingredients:Wet Ingredients:Filling and Topping Ingredients:Step-by-Step Red Velvet Oreo Cake Roll Instructions
Step 1: Warm Up the Oven
Crank your oven to a toasty 350F. Grab a jelly roll pan and line it with parchment paper, giving it a light spray of grease to prevent sticking.
Step 2: Create the Cake Base
Grab two mixing bowls for your cake magic. In the first bowl, sift together:In the second bowl, whisk up:Gently blend the wet ingredients into the dry ingredients until they just come together.
Step 3: Bake to Perfection
Pour the vibrant batter into your prepared pan, spreading it evenly. Slide into the preheated oven and bake for 12-15 minutes. The cake is ready when a toothpick comes out clean.
Step 4: Roll with Confidence
Spread a clean kitchen towel on your counter and dust it with powdered sugar. The moment the cake comes out of the oven, flip it onto the towel. Carefully peel away the parchment paper. Starting from one short side, roll the cake up with the towel. Let it cool completely.
Step 5: Whip Up the Creamy Filling
In a mixing bowl, beat cream cheese and butter until silky smooth. Gradually add powdered sugar, mixing until light and fluffy. Fold in vanilla extract and crushed Oreo cookies for that extra crunch.
Step 6: Assemble the Masterpiece
Unroll the cooled cake and spread the Oreo cream cheese filling from edge to edge. Carefully roll the cake back up without the towel. Place it seam-side down on a serving platter.
Step 7: Drizzle with Chocolate Goodness
Heat heavy cream in a small saucepan until it’s just about to simmer. Pour the hot cream over dark chocolate chips and stir until you have a glossy, smooth ganache. Let it cool slightly.
Step 8: Final Touch and Serve
Drizzle the ganache over the cake roll, letting it cascade down the sides. Allow the chocolate to set for a few minutes. Slice and serve this showstopping dessert that’s sure to wow everyone at the table.
Expert Tips for Red Velvet Oreo Cake Roll
Tasty Variations for Red Velvet Oreo Cake Roll
Perfect Pairings for Red Velvet Oreo Cake Roll
How to Keep Red Velvet Oreo Cake Roll Fresh
Red Velvet Oreo Cake Roll FAQs
The red food coloring is responsible for the vibrant red color, creating the classic red velvet appearance in the cake roll.
Yes, you can omit the food coloring and still have a delicious chocolate cake roll, though it won’t have the traditional red velvet look.
Roll the cake while it’s still warm and use a kitchen towel dusted with powdered sugar to help prevent cracking and make rolling easier.
Regular chocolate Oreo cookies are ideal, but you can use Double Stuf or other varieties based on your preference.
Print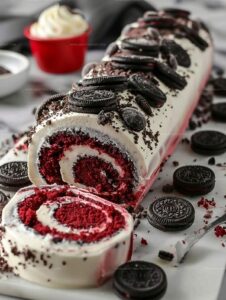
Red Velvet Oreo Cake Roll Explosion Recipe
- Total Time: 37-40 minutes
- Yield: 8 1x
Description
Indulgent red velvet oreo cake roll weaves magical dessert dreams with creamy chocolate swirls and velvety texture. Sinful layers promise rich satisfaction that melts gracefully across eager palates, drawing you into pure dessert bliss.
Ingredients
Cake Base Ingredients:
- 1 1/2 cups (180 grams) all-purpose flour
- 1 cup (200 grams) granulated sugar
- 1/2 cup (50 grams) unsweetened cocoa powder
- 1 teaspoon baking powder
- 1/2 teaspoon baking soda
- 1/2 teaspoon salt
Liquid Ingredients:
- 1 cup (240 milliliters) buttermilk
- 1/2 cup (120 milliliters) vegetable oil
- 2 large eggs
- 2 tablespoons red food coloring
- 1 teaspoon vanilla extract
- 1 teaspoon white vinegar
Instructions
- Prepare the oven environment by heating to 350F (175C). Coat a 15×10-inch jelly roll pan with parchment paper and a light grease layer.
- Craft the cake foundation by sifting dry ingredients: flour, sugar, cocoa powder, baking powder, baking soda, and salt into a mixing bowl. Whisk wet components separately: buttermilk, vegetable oil, eggs, red food coloring, vanilla extract, and vinegar. Gently incorporate wet mixture into dry ingredients until just combined.
- Transfer batter into prepared pan, ensuring even distribution. Bake for 12-15 minutes until a toothpick emerges clean from the center.
- Create a powdered sugar-dusted kitchen towel on a flat surface. Immediately after baking, invert cake onto towel. Carefully remove parchment paper and roll cake with towel from one short edge. Allow complete cooling.
- Whip cream cheese and butter until silky smooth. Gradually fold in powdered sugar until achieving a fluffy consistency. Incorporate vanilla extract and fold in crushed Oreo cookies.
- Carefully unroll cooled cake and spread cream cheese mixture evenly across surface. Re-roll cake without towel, positioning seam-side down on serving platter.
- Prepare chocolate ganache by heating heavy cream until barely simmering. Pour over dark chocolate chips, stirring until achieving a glossy, smooth texture. Allow brief cooling before drizzling over cake roll.
- Let ganache set completely before slicing and presenting the decadent dessert.
Notes
- Perfectly line the jelly roll pan with parchment paper, ensuring smooth edges to prevent cake sticking and create clean cake boundaries.
- Use room temperature ingredients like eggs and buttermilk to guarantee a smoother, more evenly mixed batter with better rising potential.
- Crush Oreo cookies finely but maintain some texture for an interesting filling that provides delightful cookie crunch throughout the cake roll.
- When rolling the cake, work quickly while it’s warm to prevent cracking and maintain a flexible, smooth texture that will hold its shape when filled.
- Prep Time: 25 minutes
- Cook Time: 12-15 minutes
- Category: Desserts
- Method: Baking
- Cuisine: American
Nutrition
- Serving Size: 8
- Calories: 249 kcal
- Sugar: 20 g
- Sodium: 208 mg
- Fat: 12 g
- Saturated Fat: 2 g
- Unsaturated Fat: 10 g
- Trans Fat: 0 g
- Carbohydrates: 33 g
- Fiber: 2 g
- Protein: 4 g
- Cholesterol: 37 mg
Sarah Mitchell
Content Specialist & Home Cooking Enthusiast
Expertise
Education
Asheville-Buncombe Technical Community College – Asheville, NC
American Fitness Professionals & Associates – Online
Sarah’s passion for food was sparked by weekend trips to the farmers’ market and her belief that healthy meals should never feel boring.
After earning her culinary diploma and becoming a certified Nutrition and Wellness Consultant, she set out to help others fall in love with simple, wholesome cooking.
She’s all about celebrating the small wins in the kitchen: a colorful yogurt bowl, a new twist on a classic dish, or a homemade snack that feels just a little extra special.
Outside the kitchen, Sarah is a gardener at heart, a yoga enthusiast, and a believer that fresh herbs can brighten any meal, and any day.