Ricotta Self-Filling Cake Recipe That’s Pure Bake Joy
My baking adventures recently stumbled upon this delightful ricotta self-filling cake that promises pure magic in every slice.
Unexpected culinary techniques create a dessert so clever, it practically prepares itself during baking.
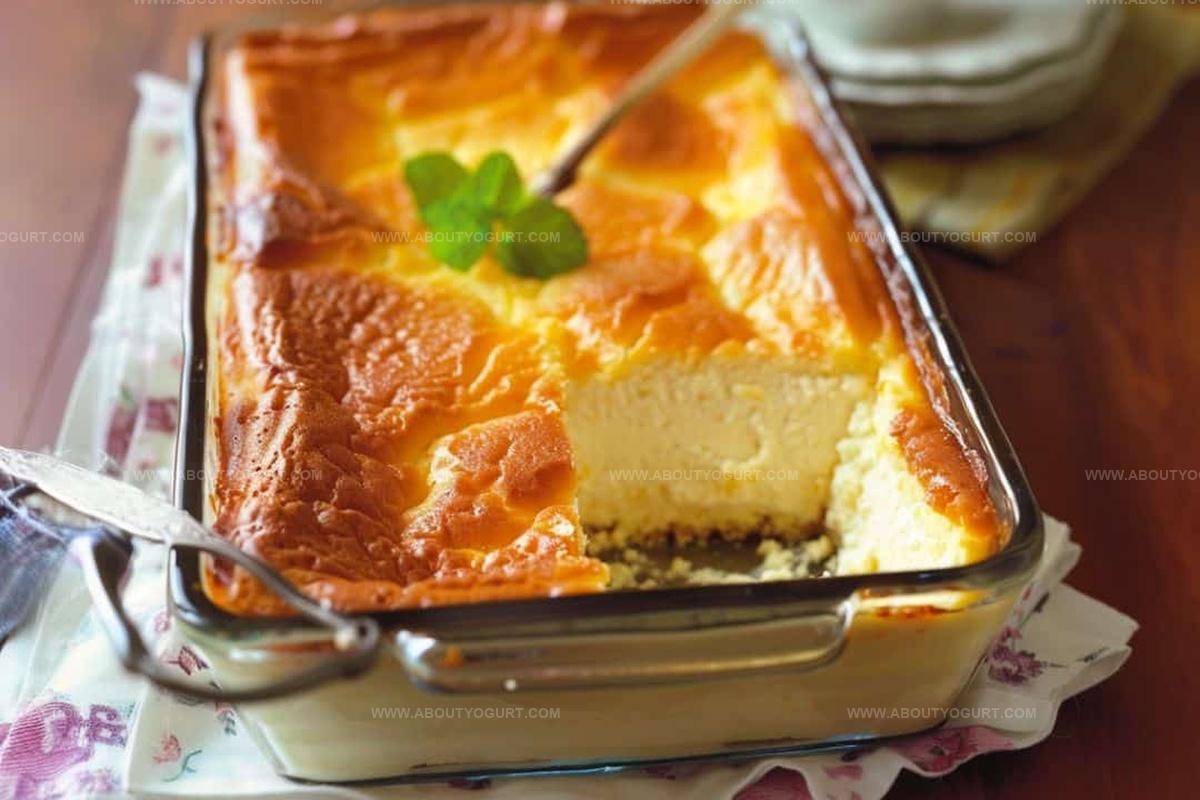
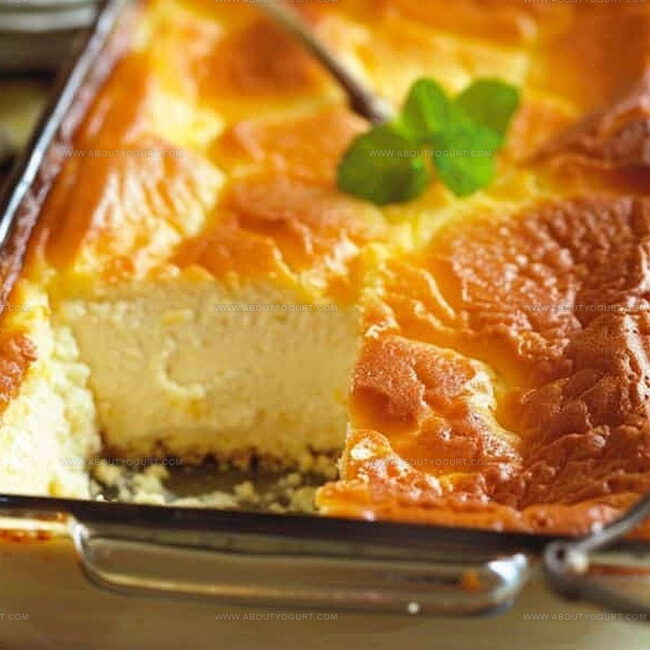
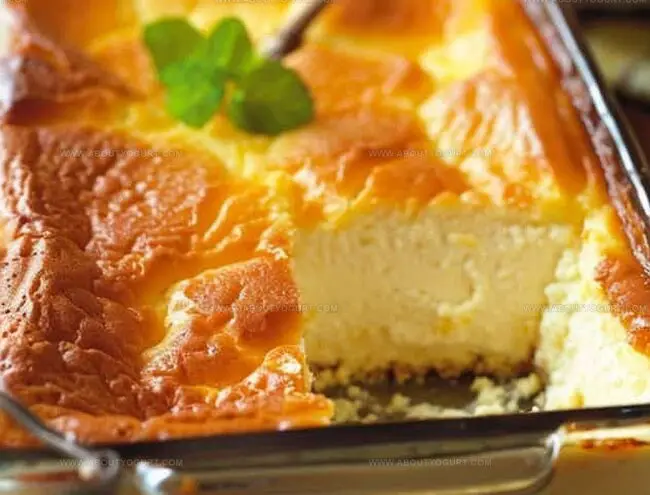
Creamy pockets of ricotta emerge spontaneously as the cake rises, forming delectable internal layers without complex preparation.
Soft and luscious, this Italian-inspired treat brings simplicity to your kitchen with minimal effort.
Surprising textures will delight anyone seeking a dessert that looks impressive but requires surprisingly little skill.
Minimal ingredients and straightforward steps guarantee success, even for novice bakers wanting something special.
What Makes Ricotta Self-Filling Cake Delicious
Ingredients for Ricotta Self-Filling Cake
Cake Base:Ricotta Filling:Baking Preparation:Ricotta Self-Filling Cake Recipe Steps
Step 1: Warm Up the Oven
Set your oven to 300F (150C). Grab a 13 x 9-inch baking dish and give it a light coating of grease and flour to help the cake release easily after baking.
Step 2: Create the Cake Base
Follow the yellow cake mix instructions to whip up the batter. Pour the mixture into the prepared baking dish, making sure it spreads out evenly across the pan.
Step 3: Whip Up the Creamy Filling
In a mixing bowl, blend together:Stir everything until the mixture becomes silky smooth and well combined.
Step 4: Build the Layered Magic
Gently pour the ricotta cheese mixture over the cake batter. Don’t stir or mix the layers – the filling will naturally sink into the cake during baking, creating a delightful surprise.
Step 5: Bake to Perfection
Slide the baking dish into the preheated oven. Bake for about 75 minutes. Check the cake’s doneness by inserting a toothpick into the center – it should come out clean when the cake is ready.
Step 6: Let It Rest and Enjoy
Allow the cake to cool completely before cutting into slices. This helps the filling set and makes for easier serving. Slice, serve, and savor every creamy bite!
Tips for Perfect Ricotta Self-Filling Cake
Ricotta Cake Variations to Try
Pairings to Complement Ricotta Self-Filling Cake
How to Store Ricotta Self-Filling Cake
Ricotta Self-Filling Cake FAQs
The ricotta mixture naturally sinks into the cake batter during baking, creating a self-filling effect where the cheese layer becomes integrated with the cake, resulting in a moist and creamy dessert.
This cake is actually very easy to prepare, using a boxed cake mix and simple ingredients. The technique of pouring the ricotta mixture over the batter requires no special skills and creates a impressive result.
Yes, you can substitute low-fat ricotta cheese without significantly changing the cake’s texture or taste. The key is to ensure the ricotta is smooth and well-mixed with other ingredients.
Print
Ricotta Self-Filling Cake Recipe
- Total Time: 90 minutes
- Yield: 8 1x
Description
Creamy ricotta self-filling cake brings Italian dessert magic to your kitchen, blending simple ingredients into a delightful culinary experience. Sweet layers of rich ricotta and delicate cake promise pure indulgence you’ll savor with each delectable bite.
Ingredients
Main Ingredients:
- 2 (15 ounces/425 grams) containers ricotta cheese
- 1 box yellow cake mix
- 2 eggs, beaten
- 4 egg whites, beaten
Sweeteners:
- 1/2 cup (100 grams) sugar
Flavor Enhancers:
- 1 1/2 teaspoons vanilla extract
Instructions
- Prepare the baking environment by heating the oven to 300F (150C) and coating a 13 x 9-inch baking dish with grease and a light dusting of flour to prevent sticking.
- Create the cake foundation by mixing the yellow cake mix precisely according to package instructions, then carefully distribute the batter across the prepared baking dish, ensuring an even surface.
- Craft the rich ricotta filling by whisking together ricotta cheese, eggs, egg whites, sugar, and vanilla extract until the mixture achieves a silky, uniform consistency.
- Gently cascade the ricotta mixture over the cake batter, allowing it to naturally settle and integrate without manual blending; the filling will organically sink during the baking process.
- Position the cake in the preheated oven and bake for approximately 75 minutes, monitoring until the cake sets completely and a toothpick emerges clean when inserted into the center.
- Remove from the oven and permit the cake to cool thoroughly at room temperature before slicing, which allows the layers to stabilize and flavors to meld harmoniously.
Notes
- Check cake mix quality for best texture, selecting premium brands that promise moist, rich results.
- Use fresh, high-quality ricotta cheese at room temperature to ensure smooth, creamy filling without lumps.
- Gently fold ricotta mixture to maintain light, airy consistency and prevent deflating the eggs’ volume.
- Experiment with flavor variations by adding lemon zest, almond extract, or cinnamon to enhance the cake’s taste profile.
- Prep Time: 15 minutes
- Cook Time: 75 minutes
- Category: Desserts
- Method: Baking
- Cuisine: Italian
Nutrition
- Serving Size: 8
- Calories: 355
- Sugar: 22 g
- Sodium: 230 mg
- Fat: 11 g
- Saturated Fat: 6 g
- Unsaturated Fat: 3 g
- Trans Fat: 0.2 g
- Carbohydrates: 45 g
- Fiber: 1 g
- Protein: 10 g
- Cholesterol: 95 mg
Sarah Mitchell
Content Specialist & Home Cooking Enthusiast
Expertise
Education
Asheville-Buncombe Technical Community College – Asheville, NC
American Fitness Professionals & Associates – Online
Sarah’s passion for food was sparked by weekend trips to the farmers’ market and her belief that healthy meals should never feel boring.
After earning her culinary diploma and becoming a certified Nutrition and Wellness Consultant, she set out to help others fall in love with simple, wholesome cooking.
She’s all about celebrating the small wins in the kitchen: a colorful yogurt bowl, a new twist on a classic dish, or a homemade snack that feels just a little extra special.
Outside the kitchen, Sarah is a gardener at heart, a yoga enthusiast, and a believer that fresh herbs can brighten any meal, and any day.