
Silky Strawberry Banana Pudding Recipe: A Sweet Treat for All
Creamy and dreamy strawberry banana pudding captures the essence of summer sweetness in every spoonful.
Memories of childhood desserts dance through this simple yet luxurious treat.
Fresh fruit adds natural brightness to the classic comfort recipe.
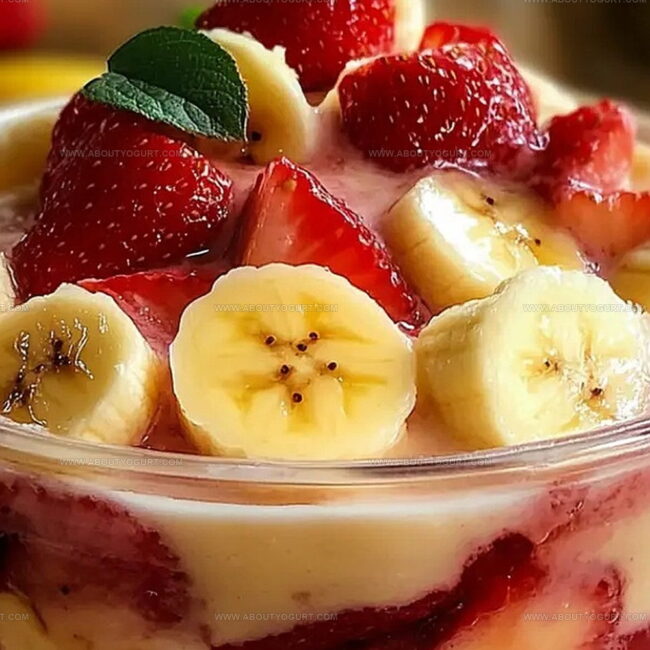
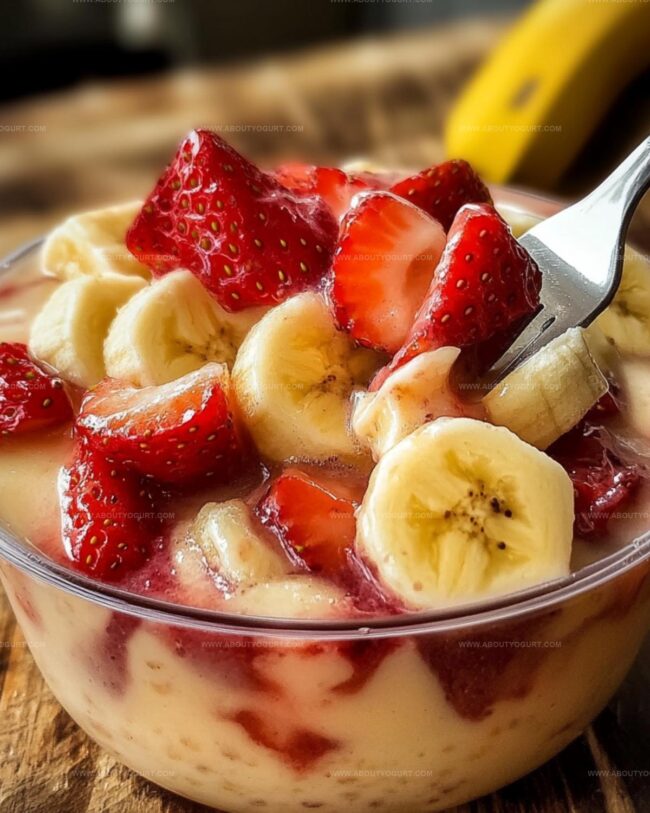
Soft bananas and ripe strawberries create a delightful harmony of flavors.
Layers of smooth pudding and tender fruit promise a mouthwatering experience.
Rich vanilla undertones complement the fruity notes perfectly.
Strawberry Banana Pudding – Sweet, Creamy, and Nostalgic
Ingredients for Classic Strawberry Banana Pudding
For the Base:For the Pudding Mixture:For the Cream Mixture:For the Topping:How to Make This Creamy Delight
Step 1: Create Delicious Foundation
Grab a rectangular baking dish and create a cozy base by carefully arranging vanilla wafers to cover the entire bottom. Slice ripe bananas into delicate rounds and spread them evenly over the wafer layer, creating a sweet and creamy landscape.
Step 2: Whip Up Smooth Pudding
In a mixing bowl, pour milk and sprinkle pudding mix. Grab an electric mixer and blend the ingredients until they transform into a silky, smooth mixture with no lumps.
The pudding should look creamy and inviting.
Step 3: Craft Dreamy Cream Cheese Blend
Take another bowl and add softened cream cheese.
Pour in sweetened condensed milk and mix thoroughly until the combination becomes incredibly smooth and velvety. Each stir should create a luxurious texture that promises delightful richness.
Step 4: Fold Fluffy Clouds
Gently introduce thawed whipped topping into the cream cheese mixture. Use a spatula to fold the ingredients together, creating a light and airy blend that looks like soft clouds dancing together.
Step 5: Marry Pudding Mixtures
Combine the pudding mixture with the cream cheese blend. Stir carefully until the two become one harmonious, creamy delight with no separation.
Step 6: Build Delectable Layers
Pour the combined pudding mixture over the wafer and banana foundation. Sprinkle chopped strawberries across the top, then crown the dessert with remaining vanilla wafers for a stunning finish.
Step 7: Chill and Delight
Place the dessert in the refrigerator and let it cool and set. When ready to serve, scoop out a portion and enjoy the symphony of flavors and textures.
Pro Tips for Perfect Pudding Texture

Variations to Customize Your Strawberry Banana Pudding
What to Serve with Strawberry Banana Pudding
Storing Strawberry Banana Pudding Simply
Store covered with plastic wrap or aluminum foil in the refrigerator for up to 3-4 days. Keep the dessert sealed tightly to prevent absorption of other food odors.
Wrap the pudding securely in plastic wrap and place in a freezer-safe container. Freeze for maximum 2 weeks. Thaw overnight in the refrigerator before serving.
Gently warm individual portions in the microwave for 15-20 seconds at low power. Avoid overheating to prevent separation of the creamy layers.
Remove from refrigerator 10-15 minutes before serving to soften the texture and enhance flavor. Use a clean spoon to maintain dessert quality.
FAQs
Yes, you can substitute with fresh berries like raspberries or blueberries, or use sliced peaches for a different flavor profile.
Absolutely! You can prepare this pudding a day in advance and keep it refrigerated, which actually helps the flavors meld together better.
No special equipment is required. A handheld electric mixer and mixing bowls are all you need to create this delicious dessert.
Toss the sliced bananas in a little lemon juice before layering them in the dish. This will help prevent quick browning and keep them looking fresh.
Print
Strawberry Banana Pudding Recipe
- Total Time: 2 hours 20 minutes
- Yield: 8 1x
Description
Creamy strawberry banana pudding blends Southern comfort with fruity freshness in one irresistible dessert. Sweet layers of ripe bananas, velvety pudding, and juicy strawberries promise pure indulgence you won’t want to miss.
Ingredients
Fresh Ingredients:
- 6 to 8 bananas, sliced
- 1 container strawberries, chopped
Dairy Ingredients:
- 2 cups milk
- 1 (8 ounces) package cream cheese, softened
- 1 (14 ounces) can sweetened condensed milk
- 1 (12 ounces) container frozen whipped topping (thawed) or an equal amount of sweetened whipped cream
Dry and Packaged Ingredients:
- 2 boxes vanilla wafers
- 1 (5 ounces) box French vanilla pudding
Instructions
- Establish the foundation by arranging vanilla wafers across the base of a serving dish, creating a uniform layer that will serve as the dessert’s crisp bottom.
- Transform milk and pudding mix into a silky, smooth consistency using an electric mixer, whisking until no lumps remain and the texture becomes uniform.
- Blend softened cream cheese with sweetened condensed milk, working the ingredients until they merge into a luxurious, velvety mixture without any visible cream cheese chunks.
- Incorporate thawed whipped topping into the cream cheese blend, folding gently to maintain the airy volume and prevent deflation.
- Marry the pudding and cream cheese mixtures, stirring methodically to create a harmonious, creamy filling that will embrace the dessert’s layers.
- Cascade the combined mixture over the wafer and banana base, ensuring even distribution. Embellish the surface with vibrant strawberry pieces and crown with a final layer of crisp vanilla wafers.
- Chill thoroughly in the refrigerator for at least 2 hours, allowing flavors to meld and the dessert to set into a cool, refreshing treat ready to be savored.
Notes
- Use room temperature cream cheese for smoother mixing and easier blending without lumps.
- Choose ripe but firm bananas to prevent browning and maintain texture in the layered dessert.
- Crush some vanilla wafers and sprinkle on top for an extra crunchy texture and decorative finish.
- Swap whipped topping with homemade whipped cream for a fresher, less processed flavor profile.
- Prep Time: 20 minutes
- Cook Time: 2 hours
- Category: Desserts, Snacks
- Method: Blending
- Cuisine: American
Nutrition
- Serving Size: 8
- Calories: 257
- Sugar: 33 g
- Sodium: 190 mg
- Fat: 9 g
- Saturated Fat: 5 g
- Unsaturated Fat: 3 g
- Trans Fat: 0.2 g
- Carbohydrates: 40 g
- Fiber: 2 g
- Protein: 4 g
- Cholesterol: 25 mg
Michael Thompson
Founder & Recipe Developer
Expertise
Education
Cascade Culinary Institute – Bend, OR
ServSafe Food Handler Certification – Portland, OR
Focus: Certified in core food safety and hygiene principles for both home and professional kitchens, with emphasis on ingredient handling, kitchen cleanliness, and safe preparation methods.
Mike’s kitchen journey began with a single goal: to make everyday meals feel like something worth celebrating.
After earning his Certificate in Culinary Arts from Cascade Culinary Institute, he spent years working with local farmers and small kitchens across Oregon, learning the beauty of seasonal, small-batch cooking.
Mike’s approach is simple, cook with what’s fresh, keep it approachable, and always leave room for a little creativity. When he’s not testing yogurt marinades or designing single-serving meals, you’ll find him hiking trails or hunting down the best berries at local markets.