
Dreamy Strawberry Velvet Cake with Vanilla Bean Frosting Recipe
Sweet strawberry velvet cake dreams come alive with a decadent twist that will make taste buds dance.
Delicate pink layers whisper promises of summer’s most luscious fruit.
Soft crumbs melt perfectly against creamy vanilla bean frosting, creating a dessert both elegant and comforting.
Subtle strawberry essence weaves through each tender slice, bringing unexpected depth to classic cake traditions.
Professional bakers and home cooks alike will adore this simple yet sophisticated recipe.
Seasonal strawberries elevate this dessert from ordinary to extraordinary with minimal effort.
You can create restaurant-quality magic right in your own kitchen.
Strawberry Velvet Cake with Vanilla Bean Frosting Charm
Ingredients for Strawberry Velvet Cake with Vanilla Bean Frosting
Cake Dry Ingredients:Cake Wet Ingredients:Frosting Ingredients:Garnish:How to Bake Strawberry Velvet Cake with Vanilla Bean Frosting
Step 1: Warm Up the Oven
Set your oven to a cozy 350F (175C). Grab two 9-inch round cake pans and give them a quick spray with cooking oil, then dust with flour to prevent sticking.
Step 2: Mix Dry Ingredients
Grab a large mixing bowl and sift together:Toss in softened butter and blend until the mixture looks like crumbly sand.
Step 3: Combine Wet Ingredients
In a separate bowl, whisk together:Slowly pour the wet mixture into the dry ingredients, stirring until silky smooth.
Step 4: Add Fruity Goodness
Gently fold chopped strawberries into the batter, being careful not to crush them.
Step 5: Bake the Cake
Divide the batter between the prepared pans. Slide into the preheated oven and bake for 25-30 minutes. Check doneness by inserting a toothpick – it should come out clean.
Step 6: Cool Down
Let the cakes rest in their pans for 10 minutes, then transfer to wire racks to cool completely.
Step 7: Whip Up Vanilla Bean Frosting
Beat softened butter until creamy. Gradually add powdered sugar, mixing thoroughly after each addition. Blend in:Whip until the frosting is light and fluffy.
Step 8: Build Your Masterpiece
Place first cake layer on a serving plate. Spread a generous layer of frosting on top. Carefully position the second cake layer. Frost the entire cake, covering top and sides completely.
Step 9: Final Flourish
Decorate with fresh strawberries for a stunning finish.
Step 10: Slice and Savor
Cut into this dreamy Strawberry Velvet Cake and enjoy every delectable bite!
Pro Tips for Strawberry Velvet Cake with Vanilla Bean Frosting
Variations for Strawberry Velvet Cake with Vanilla Bean Frosting
Pairing Ideas for Strawberry Velvet Cake with Vanilla Bean Frosting
Storage Advice for Strawberry Velvet Cake with Vanilla Bean Frosting
Strawberry Velvet Cake with Vanilla Bean Frosting FAQs
Buttermilk helps create a tender, moist cake texture and adds a subtle tangy flavor that enhances the overall taste of the strawberry velvet cake.
Fresh strawberries are recommended for the best flavor and texture, but if using frozen strawberries, thaw and drain them completely to prevent excess moisture in the cake batter.
Gently scrape the vanilla bean pod and mix the seeds thoroughly while beating the frosting to ensure an even distribution of vanilla flavor throughout the frosting.
Print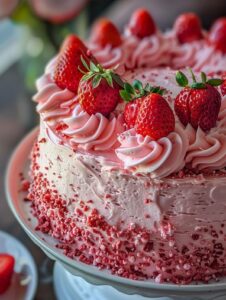
Strawberry Velvet Cake With Vanilla Bean Frosting Recipe
- Total Time: 55-60 minutes
- Yield: 8 1x
Description
Heavenly strawberry velvet cake delivers pure dessert magic with rich crimson layers and silky vanilla bean frosting. Creamy, elegant slices promise delightful indulgence that transports you straight to sweet paradise.
Ingredients
Main Ingredients:
- 3 large eggs, room temperature
- 1 cup buttermilk, room temperature
- 1/2 cup unsalted butter, softened
- 1 cup finely chopped fresh strawberries
Dry Ingredients:
- 2 cups cake flour
- 1 cup granulated sugar
- 1 teaspoon baking powder
- 1/2 teaspoon baking soda
- 1/2 teaspoon salt
Liquid and Flavoring Ingredients:
- 1/4 cup vegetable oil
- 1 teaspoon vanilla extract
Instructions
- Prepare the baking environment by heating the oven to 350F (175C) and preparing two 9-inch round cake pans with grease and flour.
- Create the cake base by sifting dry ingredients together, ensuring a uniform mixture of cake flour, sugar, leavening agents, and salt.
- Incorporate softened butter into the dry mixture until it resembles coarse, sandy texture.
- Whisk wet ingredients separately, blending buttermilk, vegetable oil, eggs, and vanilla extract into a smooth liquid mixture.
- Merge wet and dry ingredients, stirring gently until a uniform batter forms without overmixing.
- Carefully fold chopped strawberries into the batter, distributing them evenly throughout.
- Divide the batter equally between prepared cake pans, ensuring smooth surface distribution.
- Bake for 25-30 minutes, checking doneness with a toothpick that should emerge clean when inserted into the cake’s center.
- Allow cakes to rest in pans for 10 minutes, then transfer to wire racks for complete cooling.
- Prepare frosting by whipping softened butter until creamy and light.
- Gradually integrate powdered sugar, beating thoroughly after each addition to create a smooth consistency.
- Enhance frosting with heavy cream, vanilla bean seeds, and vanilla extract, whipping until fluffy and spreadable.
- Assemble the cake by placing first layer on serving plate and spreading a generous frosting layer.
- Position second cake layer and coat entire cake with remaining frosting, creating an even, smooth finish.
- Decorate with fresh strawberries as a final garnish before serving.
Notes
- Choose ripe, sweet strawberries for the most vibrant flavor and color in your cake.
- Ensure all ingredients are at room temperature to create a smoother, more even cake batter.
- Gently fold strawberries into the batter to prevent them from sinking and maintain their texture.
- For a gluten-free version, substitute cake flour with a gluten-free all-purpose flour blend and add 1/2 teaspoon of xanthan gum.
- To make the cake less sweet, reduce the sugar by 1/4 cup and add a pinch of salt to balance the flavors.
- Freeze leftover cake slices individually for up to 2 months, wrapped tightly in plastic wrap and aluminum foil.
- Prep Time: 30 minutes
- Cook Time: 25-30 minutes
- Category: Desserts
- Method: Baking
- Cuisine: American
Nutrition
- Serving Size: 8
- Calories: 255 kcal
- Sugar: 18 g
- Sodium: 210 mg
- Fat: 14 g
- Saturated Fat: 6 g
- Unsaturated Fat: 7 g
- Trans Fat: 0.3 g
- Carbohydrates: 28 g
- Fiber: 1 g
- Protein: 4 g
- Cholesterol: 70 mg
Sarah Mitchell
Content Specialist & Home Cooking Enthusiast
Expertise
Education
Asheville-Buncombe Technical Community College – Asheville, NC
American Fitness Professionals & Associates – Online
Sarah’s passion for food was sparked by weekend trips to the farmers’ market and her belief that healthy meals should never feel boring.
After earning her culinary diploma and becoming a certified Nutrition and Wellness Consultant, she set out to help others fall in love with simple, wholesome cooking.
She’s all about celebrating the small wins in the kitchen: a colorful yogurt bowl, a new twist on a classic dish, or a homemade snack that feels just a little extra special.
Outside the kitchen, Sarah is a gardener at heart, a yoga enthusiast, and a believer that fresh herbs can brighten any meal, and any day.