
Texas Roadhouse Rattlesnake Bites Recipe to Try
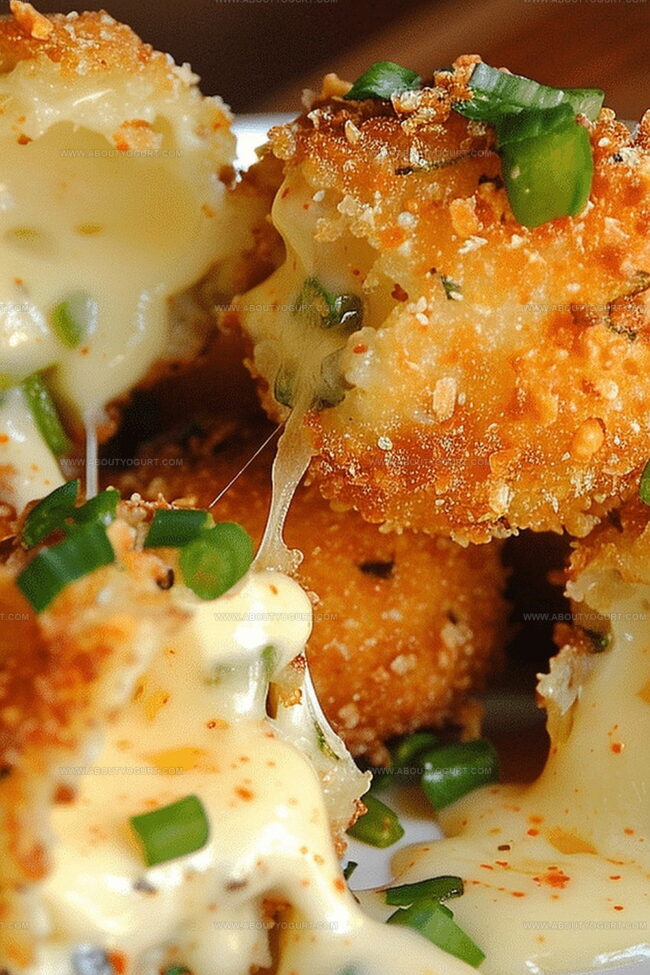
Crispy and bold, these texas roadhouse rattlesnake bites pack a serious punch of flavor that’ll make your taste buds dance.
Jalapeños and cheese blend together in a crunchy coating that screams comfort food.
Friends always request this appetizer when I host game nights or weekend gatherings.
Homemade versions can easily rival the restaurant’s famous recipe with just a few simple ingredients.
Each bite delivers a spicy kick balanced by creamy cheese that melts perfectly inside the golden-brown exterior.
Restaurant-quality snacks are totally possible in your own kitchen with minimal effort.
You’ll become the ultimate party hero when these sizzling bites hit the table.
Why Texas Roadhouse Rattlesnake Bites Are So Popular
Components Needed for Texas Roadhouse Rattlesnake Bites
Cheese Mixture:Dredging Ingredients:Seasoning and Frying Ingredients:Stepwise Preparation of Texas Roadhouse Rattlesnake Bites
Step 1: Craft the Cheese Filling
Combine cream cheese and cheddar cheese in a mixing bowl. Finely chop jalapeños and fold them into the cheese mixture. Mix thoroughly until all ingredients are well incorporated.
Step 2: Shape the Cheese Balls
Use your hands to roll the cheese mixture into small, uniform bite-sized spheres. Place the cheese balls on a baking sheet lined with parchment paper.
Step 3: Quick Freeze the Cheese Balls
Transfer the baking sheet to the freezer. Let the cheese balls firm up for 30-45 minutes, which helps them maintain their shape during coating and frying.
Step 4: Set Up Dredging Stations
Prepare three separate shallow dishes:* paprika
* garlic powder
* black pepper
* salt
Step 5: Coat the Cheese Balls
Roll each frozen cheese ball through the stations:Repeat the egg and breadcrumb coating for extra crispiness.
Step 6: Fry the Rattlesnake Bites
Heat vegetable oil in a deep skillet to 350°F. Carefully drop cheese balls into hot oil in small batches. Fry until golden brown and crispy, about 2-3 minutes per batch.
Step 7: Drain and Serve
Remove bites with a slotted spoon. Place on paper towels to drain excess oil. Serve hot with ranch or your favorite dipping sauce.
Top Tips to Master Texas Roadhouse Rattlesnake Bites

Variations to Spice Up Texas Roadhouse Rattlesnake Bites
Pairings That Enhance Texas Roadhouse Rattlesnake Bites
Storage Recommendations for Texas Roadhouse Rattlesnake Bites
Common Questions About Texas Roadhouse Rattlesnake Bites
While they have jalapenos, they’re not extremely hot. The cheese balances the pepper’s heat, creating a mild to moderate spice level that most people can enjoy.
Yes! You can prepare the cheese balls, freeze them before dredging, and keep them in an airtight container for up to 2 weeks. When ready to serve, thaw slightly and then dredge and fry.
Pepper jack and cream cheese are ideal. The pepper jack adds flavor and slight heat, while cream cheese provides a smooth, creamy texture that helps bind the filling together.
Print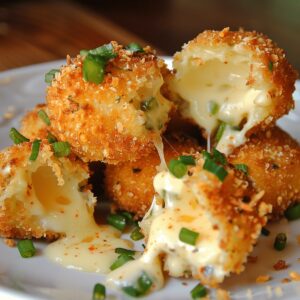
Texas Roadhouse Rattlesnake Bites Recipe
- Total Time: 1 hour 15 minutes
- Yield: 4 1x
Description
Spicy Texas Roadhouse Rattlesnake Bites deliver crispy jalapeño poppers packed with creamy cheese and zesty flavor. Crisp golden breading and bold southwestern seasonings promise a mouthwatering appetizer you’ll crave at your next gathering.
Ingredients
Main Ingredients:
- 2 cups pepper jack cheese, shredded
- 2 cups sharp cheddar cheese, shredded
- 2 jalapenos, seeds removed, sauteed until soft
Coating Ingredients:
- 1 cup all-purpose flour
- 1 cup Panko breadcrumbs
- 2 large eggs
- 1 cup buttermilk
Seasoning Ingredients:
- 2 teaspoons slap ya mama seasoning
- 2 teaspoons garlic powder
- 1 teaspoon paprika
- 1 teaspoon black pepper
- 1/2 teaspoon red pepper flakes
Cooking Ingredient:
- 1–2 cups vegetable oil
Instructions
- Assemble a dredging station with three shallow containers: flour in the first, whisked buttermilk and eggs in the second, and seasoned breadcrumbs in the third.
- Combine jalapenos with both cheese varieties in a mixing bowl, creating a smooth, spicy filling.
- Carefully craft small, uniform cheese balls and arrange them on a baking sheet, then transfer to the freezer for 30-45 minutes to firm up.
- Meticulously coat each frozen cheese ball: first in flour, then dip completely in egg mixture, and finally roll thoroughly in seasoned breadcrumbs. Repeat the egg and breadcrumb coating for extra crispiness.
- Heat oil in a deep skillet to 350°F, maintaining a consistent temperature for even cooking.
- Carefully lower cheese balls into hot oil in small batches, avoiding overcrowding, and fry until they achieve a rich, golden-brown exterior, approximately 2-3 minutes.
- Extract the crispy bites using a slotted spoon, allowing excess oil to drain on paper towels, which helps maintain their crunchy texture.
- Let the appetizers rest for a few minutes before serving to prevent burning and allow the interior to settle.
Notes
- Chill thoroughly before coating to prevent cheese from melting during frying, ensuring crispy exterior and intact filling.
- Double-dredge creates extra crunch by adding second layer of breadcrumb coating, which adds more texture and flavor complexity.
- Use fresh jalapeños for maximum heat and flavor punch, adjusting quantity based on personal spice tolerance.
- Perfect for make-ahead appetizers since they can be prepared, frozen, and fried later when guests arrive, saving precious party preparation time.
- Prep Time: 30 minutes
- Cook Time: 15 minutes
- Category: Appetizer, Snacks
- Method: Frying
- Cuisine: American
Nutrition
- Serving Size: 4
- Calories: 590 kcal
- Sugar: 2 g
- Sodium: 520 mg
- Fat: 45 g
- Saturated Fat: 22 g
- Unsaturated Fat: 21 g
- Trans Fat: 0.5 g
- Carbohydrates: 20 g
- Fiber: 1.5 g
- Protein: 28 g
- Cholesterol: 130 mg
Michael Thompson
Founder & Recipe Developer
Expertise
Education
Cascade Culinary Institute – Bend, OR
ServSafe Food Handler Certification – Portland, OR
Focus: Certified in core food safety and hygiene principles for both home and professional kitchens, with emphasis on ingredient handling, kitchen cleanliness, and safe preparation methods.
Mike’s kitchen journey began with a single goal: to make everyday meals feel like something worth celebrating.
After earning his Certificate in Culinary Arts from Cascade Culinary Institute, he spent years working with local farmers and small kitchens across Oregon, learning the beauty of seasonal, small-batch cooking.
Mike’s approach is simple, cook with what’s fresh, keep it approachable, and always leave room for a little creativity. When he’s not testing yogurt marinades or designing single-serving meals, you’ll find him hiking trails or hunting down the best berries at local markets.